During the booking process, it is crucial to only request data that is absolutely necessary for registration to your offer. Edoobox provides maximum flexibility by enabling you to create your own participant form within the Design Manager. The following documentation details how to set up your form and outlines the additional options the template offers to optimize the registration process.
Available Widgets in the Participant Form
If you choose not to create a custom participant form and do not place any widgets in this template, edoobox will automatically utilize all active participant data fields enabled in the Participant Data Fields settings.
Info: Additional Participant Data Fields
Within the edoobox settings, under Participant Data Fields, and starting with the Limited2 subscription, you can pre-create up to 30 additional data fields and subsequently link them here.
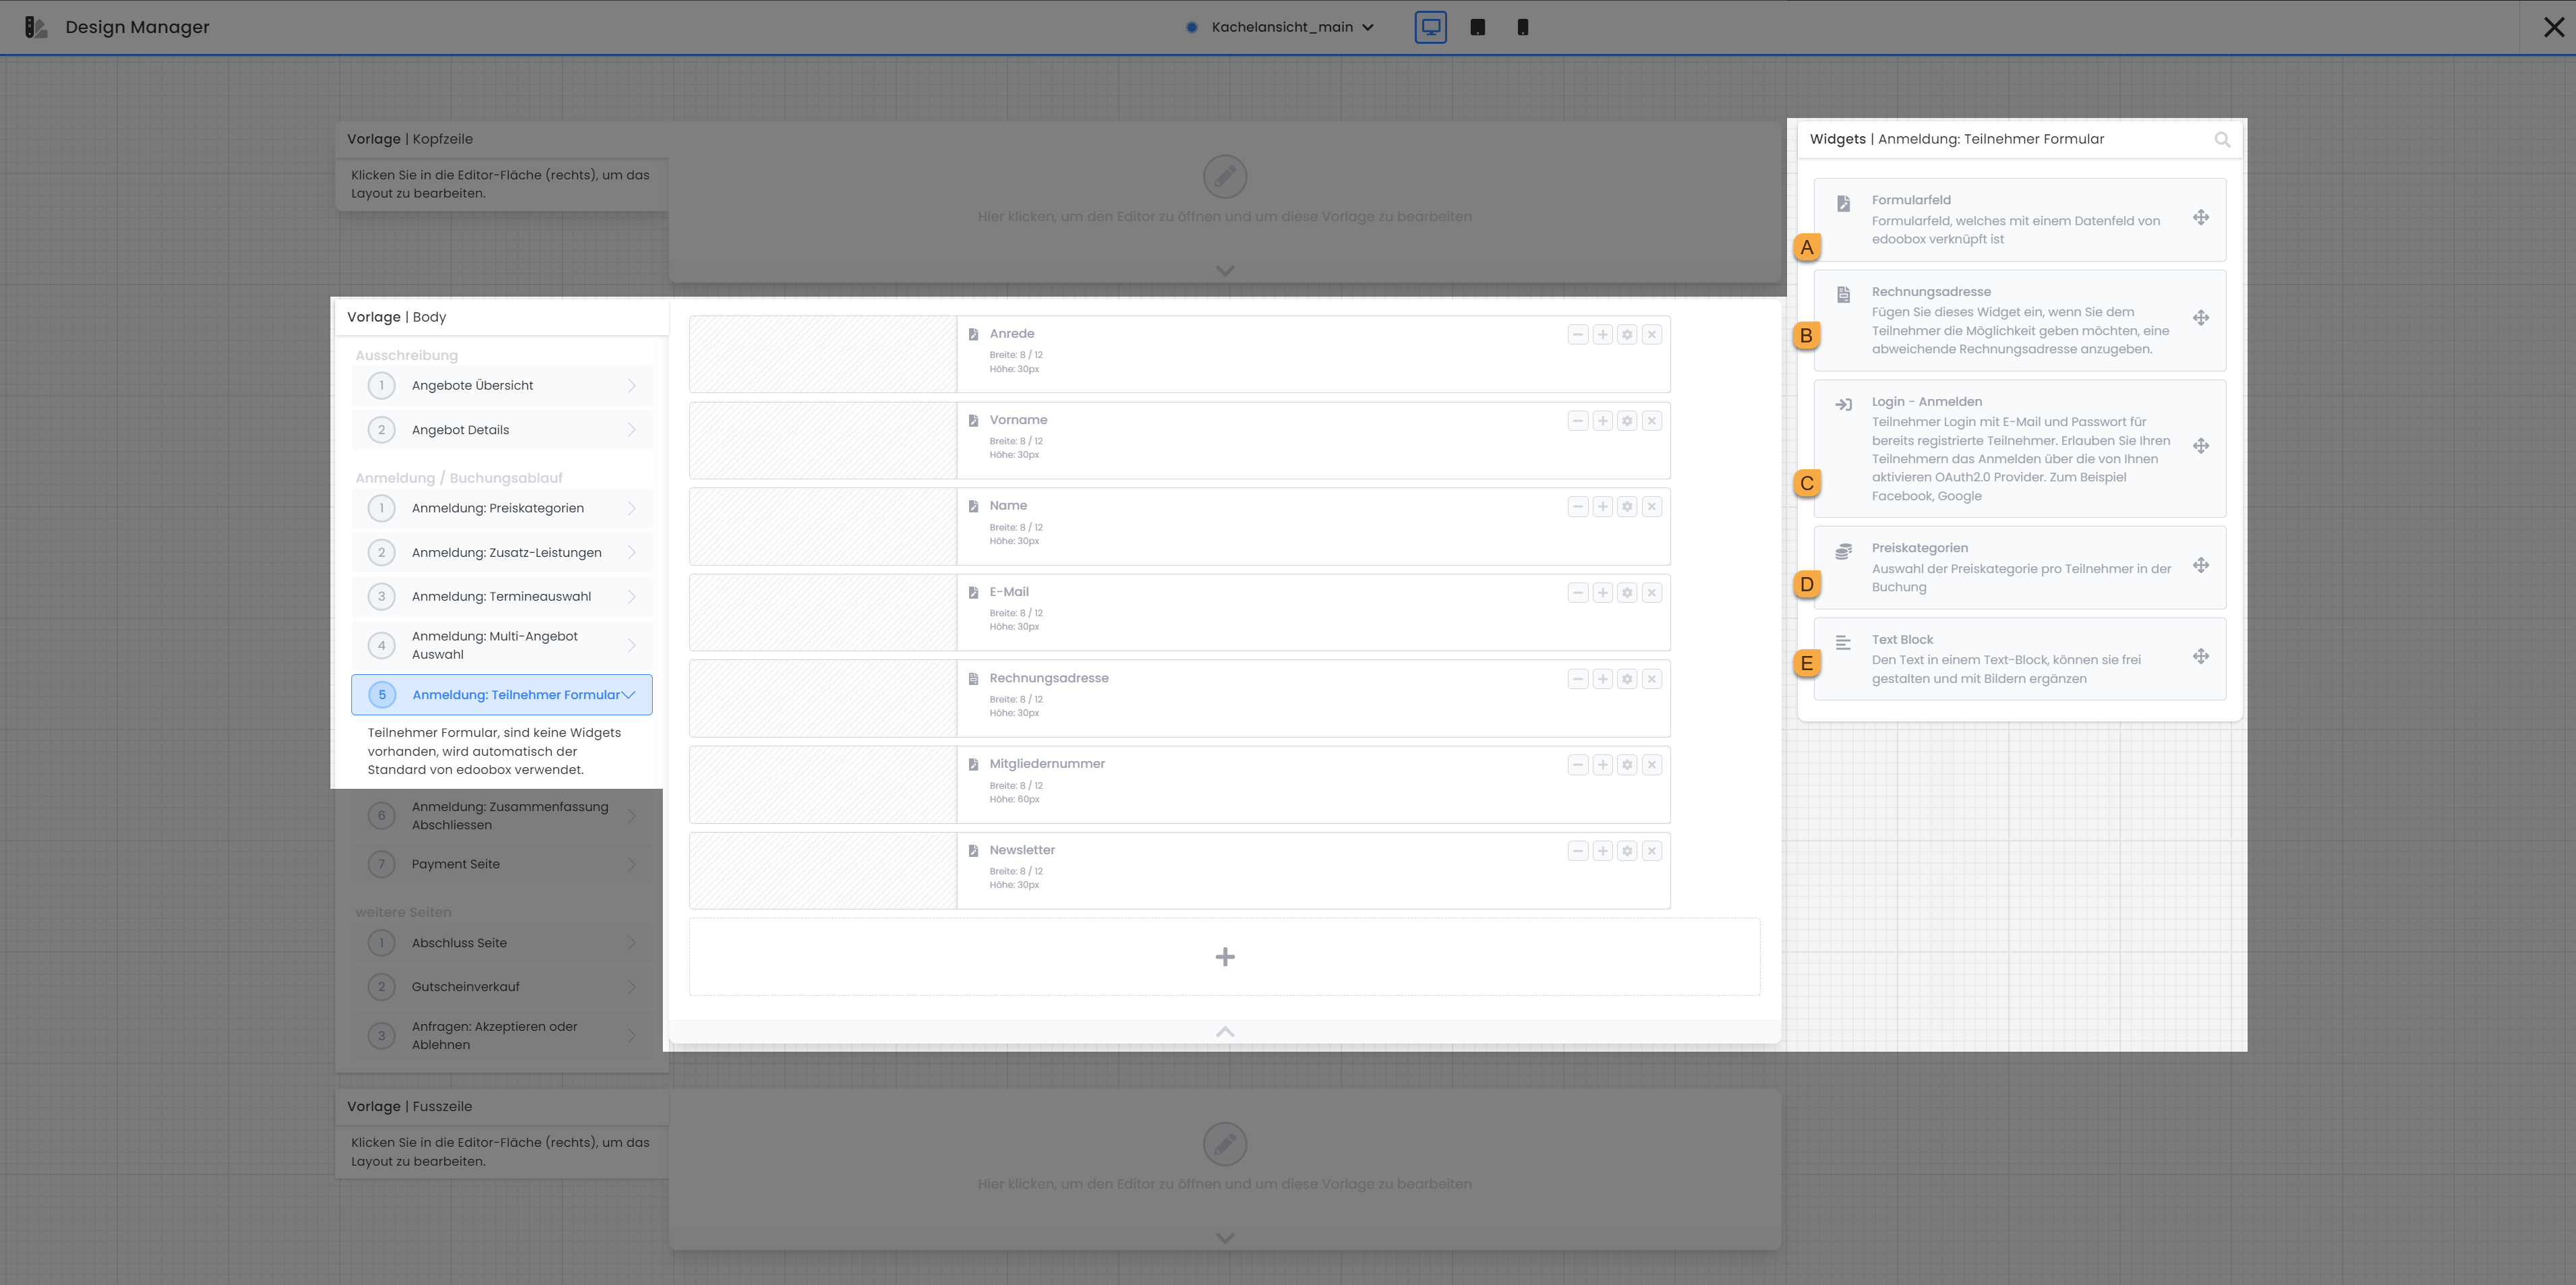
form field A
To integrate a form field into your template, simply use the drag-and-drop function. For each data field you wish to query during the booking process, drag a corresponding form field into the template. More detailed information on the widget settings for the form field can be found below in the section: Properties and Options of Participant Form Fields.
Billing address B
The Billing Address widget allows participants to specify a different billing address, such as that of their employer. If you use the reverse-charge procedure, adding this widget is essential as it enables the collection of the VAT identification number. The alternative billing address is stored within the participant's booking, not in their general participant information. In the widget settings, you have the option to activate the data fields you wish to query for the billing address.
Login – Sign In C
With the Login – Sign In widget, participants can log in, for example, via their Facebook profile or existing participants can log in via the edoobox login. Upon initial registration, participants receive their login credentials via a confirmation email. For this information to be sent correctly, it is necessary that the ##UserAccess## placeholder is integrated into the corresponding email template.
Tip: Avoid Duplicates
To remind your returning customers of their participant account, it is advisable to integrate the 'Login-Sign In' widget into the registration form. By having your customers log in via their existing participant account, pre-stored information is automatically populated into the corresponding data fields, thereby reducing the occurrence of duplicates.
Price Categories D
The Price Categories field can be useful for group registrations when different price categories are used. This allows the desired price to be assigned to each participant.
Text Block E
Use the Text Block to insert text and images at any desired location in all active system languages. Select whether the Text Block should always be displayed, or only when the offer overview is opened within the iFrame itself.
Properties and Options of Participant Form Fields
Link Form Field
Before making any settings in the Form Field widget, it is essential to first link the specific participant data field you wish to query with the widget. The dropdown will display only those data fields that are not yet used in the form.
Please note: no association
If a form field is not (correctly) linked, registration cannot be completed!
Label Text
Next, in the Label Text field, define how the data field should be labeled during the booking process. If you offer the booking form in multiple languages, you have the option here to translate the data fields into all active languages.
Field Type
By selecting a specific Field Type, you then determine the design in which the data field will be presented. You have the option to choose between various field types. Each of these field types allows for a specific method of data entry, which can be customized according to the requirements of your booking form.
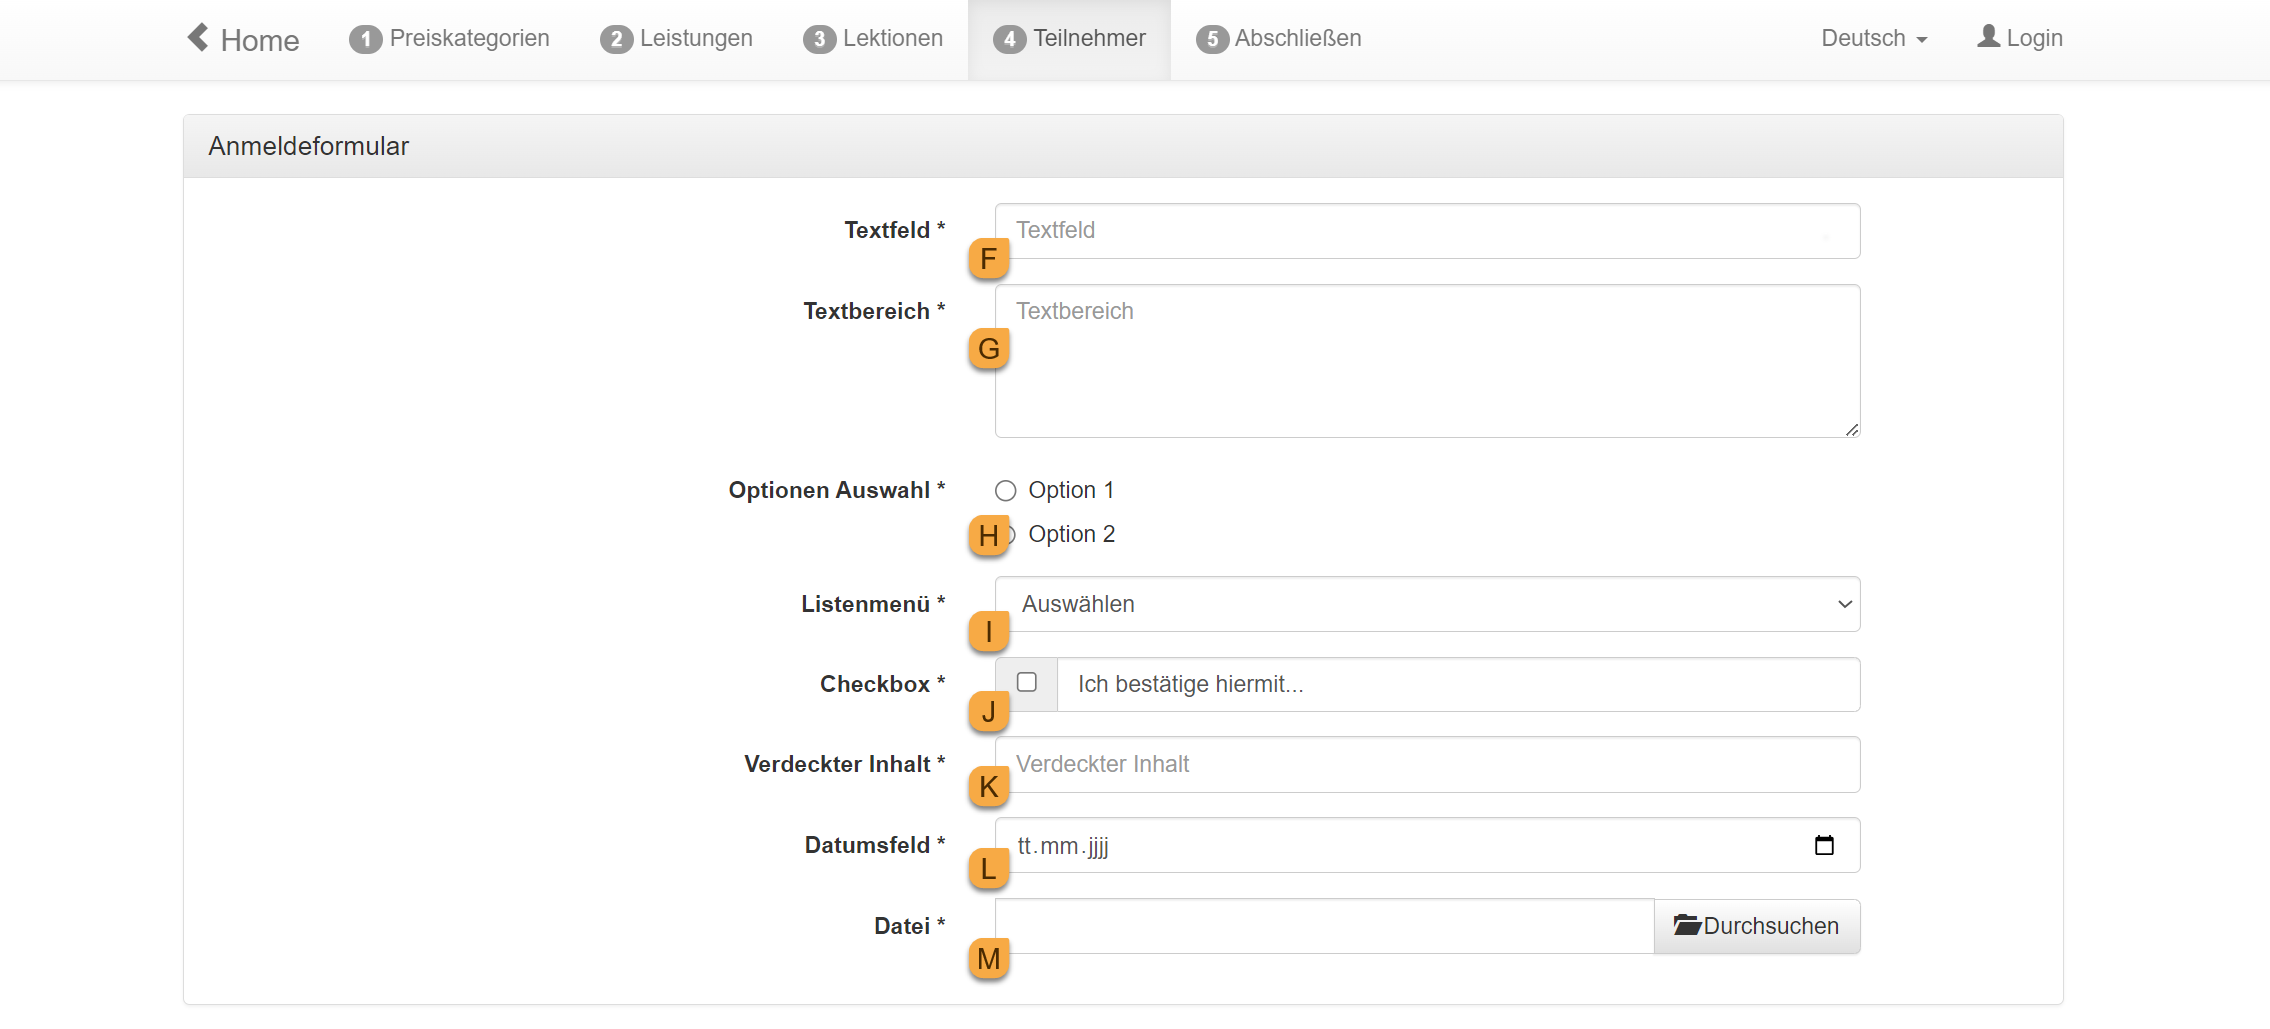
Available Field Types
|
Field Type |
Required field
|
Usage |
|
Text field F |
Yes |
Max. 256 characters |
|
Text area G |
Yes |
Max. 256 characters |
|
Options Selection h |
Default |
Selection from predefined options |
|
List menu i |
Default |
Selection from a predefined list |
|
Checkbox j |
Yes |
Checkbox for a form field |
|
Hidden content k
|
Yes |
For entering data that should not be displayed in the input form. |
|
Date field l |
No |
For entering dates such as date of birth |
|
File m |
Yes |
For uploading files such as images, videos, or PDFs |
Field Settings
The available settings vary depending on the selected field type. The following section briefly explains the most important settings for the different field types, providing guidance for configuring your form fields.
Mandatory Field
Before submitting the form data, the system verifies that all mandatory fields are correctly completed. This validation is only performed when the «Complete Registration» button is clicked, allowing the booking person to navigate back and forth through the registration steps even if the form is not fully completed.
Info: Mandatory Fields
The followingthreefields are required in the custom registration form:
First name, Last name and Email.
Re-enter Information
This setting is particularly useful for entries where accurate spelling is crucial. Participants are required to enter the information twice to ensure both fields match. This is commonly used for capturing email addresses to guarantee data accuracy without requiring validation via a confirmation code.
Email Validation
edoobox enables you to verify the authenticity of a participant's email address free of charge through a code validation process. This involves sending an email with a validation code to the provided address. For many email providers, merely opening the email is sufficient to confirm successful validation. Should this not suffice, the code can also be entered manually to authenticate the email address.
Automatic Profile Recognition (Magic Login)
The Email Magic Login feature enables automatic recognition and adoption of existing customer profiles. This extension is based on active email code validation. If a customer enters their first name and email address, and a customer account already exists for this combination, they will be prompted to immediately adopt their existing data after successful email confirmation. This streamlines the booking process and prevents duplicate entries.
Phone Number Validation
Edoobox allows you to verify the authenticity of a participant's phone number via code validation. When a local number is entered, edoobox utilizes the country of registration or, if no country code is specified, the country determined by the browser's system settings.
Mobile numbers are validated via an SMS code, whereas landline numbers use a voice code delivered by call. This verification incurs a charge of approximately 0.08 EUR per validation, which will be debited from your edoobox account. Validation is only processed if your account maintains a minimum balance of 10 EUR. Individual transactions can be reviewed under «Billing» in the settings.
Date Field Validation
For date fields, edoobox offers two distinct validation types:
-
Date Validation: This feature allows edoobox to verify if the date entered by the registrant falls within a predefined timeframe, ensuring the input adheres to the specified parameters.
-
Age Validation: This method calculates the individual's age based on the provided date of birth. This functionality enables you to restrict registrations to a specific age range. The required minimum and maximum ages must strictly fall within the defined period.
Validate Input with Pattern (Experts)
Utilizing Regex for pattern validation allows for precise definition of input formats. However, this method necessitates expertise in Regex, as users are required to define the pattern independently.
A practical application of Regex validation is email domain verification, particularly when you need to ensure that only participants with specific email domains can register for a course. In this specific scenario, only individuals whose email addresses end with schule.edoobox.de or bildung.edoobox.de end.
The corresponding Regex pattern used to enforce this restriction is:
[a-zA-Z0-9._%+-]+@(schule|bildung)\.edoobox\.de
This pattern ensures that the email address preceding the '@' symbol contains one or more permissible characters (letters, digits, periods, underscores, percentage signs, plus signs, and minus signs). Subsequently, the domain must be precisely schule.edoobox.de or bildung.edoobox.de be.
Label and Field Width
This setting determines the ratio between the label and the actual form field—for example, 25% label, 75% input field.
This setting affects the display on larger screens. In the mobile view, the label is automatically displayed above the field, regardless of the selected ratio.
Group Participants
Select this option if you want the form field to appear even for bulk registrations (i.e., for additional participants added during the booking process).
If this option is deselected, the field will only appear for the primary booker—for example, this is useful for information that does not need to be requested multiple times.
Visibility by Booking Type
Here you define for which booking types the form field should be displayed:
-
All booking types are allowed (=form field is displayed for the booking type)
-
Normal Booking (No inquiry list, waiting list)
-
Inquiry List Only
-
Waiting List Only (incl. MustPay)
By default, form fields are visible for all booking types. Through targeted restrictions, fields can, for example, be displayed only when a person makes a binding booking – ideal for information required exclusively for confirmed bookings, rather than for waiting list or inquiry list bookings.

Related Guides
Keywords for this guide
Design Manager ¦ Participant Form ¦ Validation ¦ Regex ¦ Billing Address ¦ Participant Form ¦ Registration Form ¦ Registration ¦ Data Fields