In edoobox, each of your offerings features a dedicated calendar where you can schedule appointments, thereby informing your clientele about the specific dates of each offering. For an optimal overview, all scheduled appointments within edoobox can be viewed and sorted in a global calendar. Additionally, you have the option to export the Calendar Feed URL to display edoobox appointments in an external calendar. This facilitates convenient management and an efficient overview of all your scheduled events.
The Global Calendar
Your edoobox account includes a global calendar, providing a comprehensive summary of all scheduled appointments. The global calendar is accessible via the app menu by clicking on «Calendar». Here, various viewing options are available, allowing you to filter appointment displays by instructors, locations, and offerings.
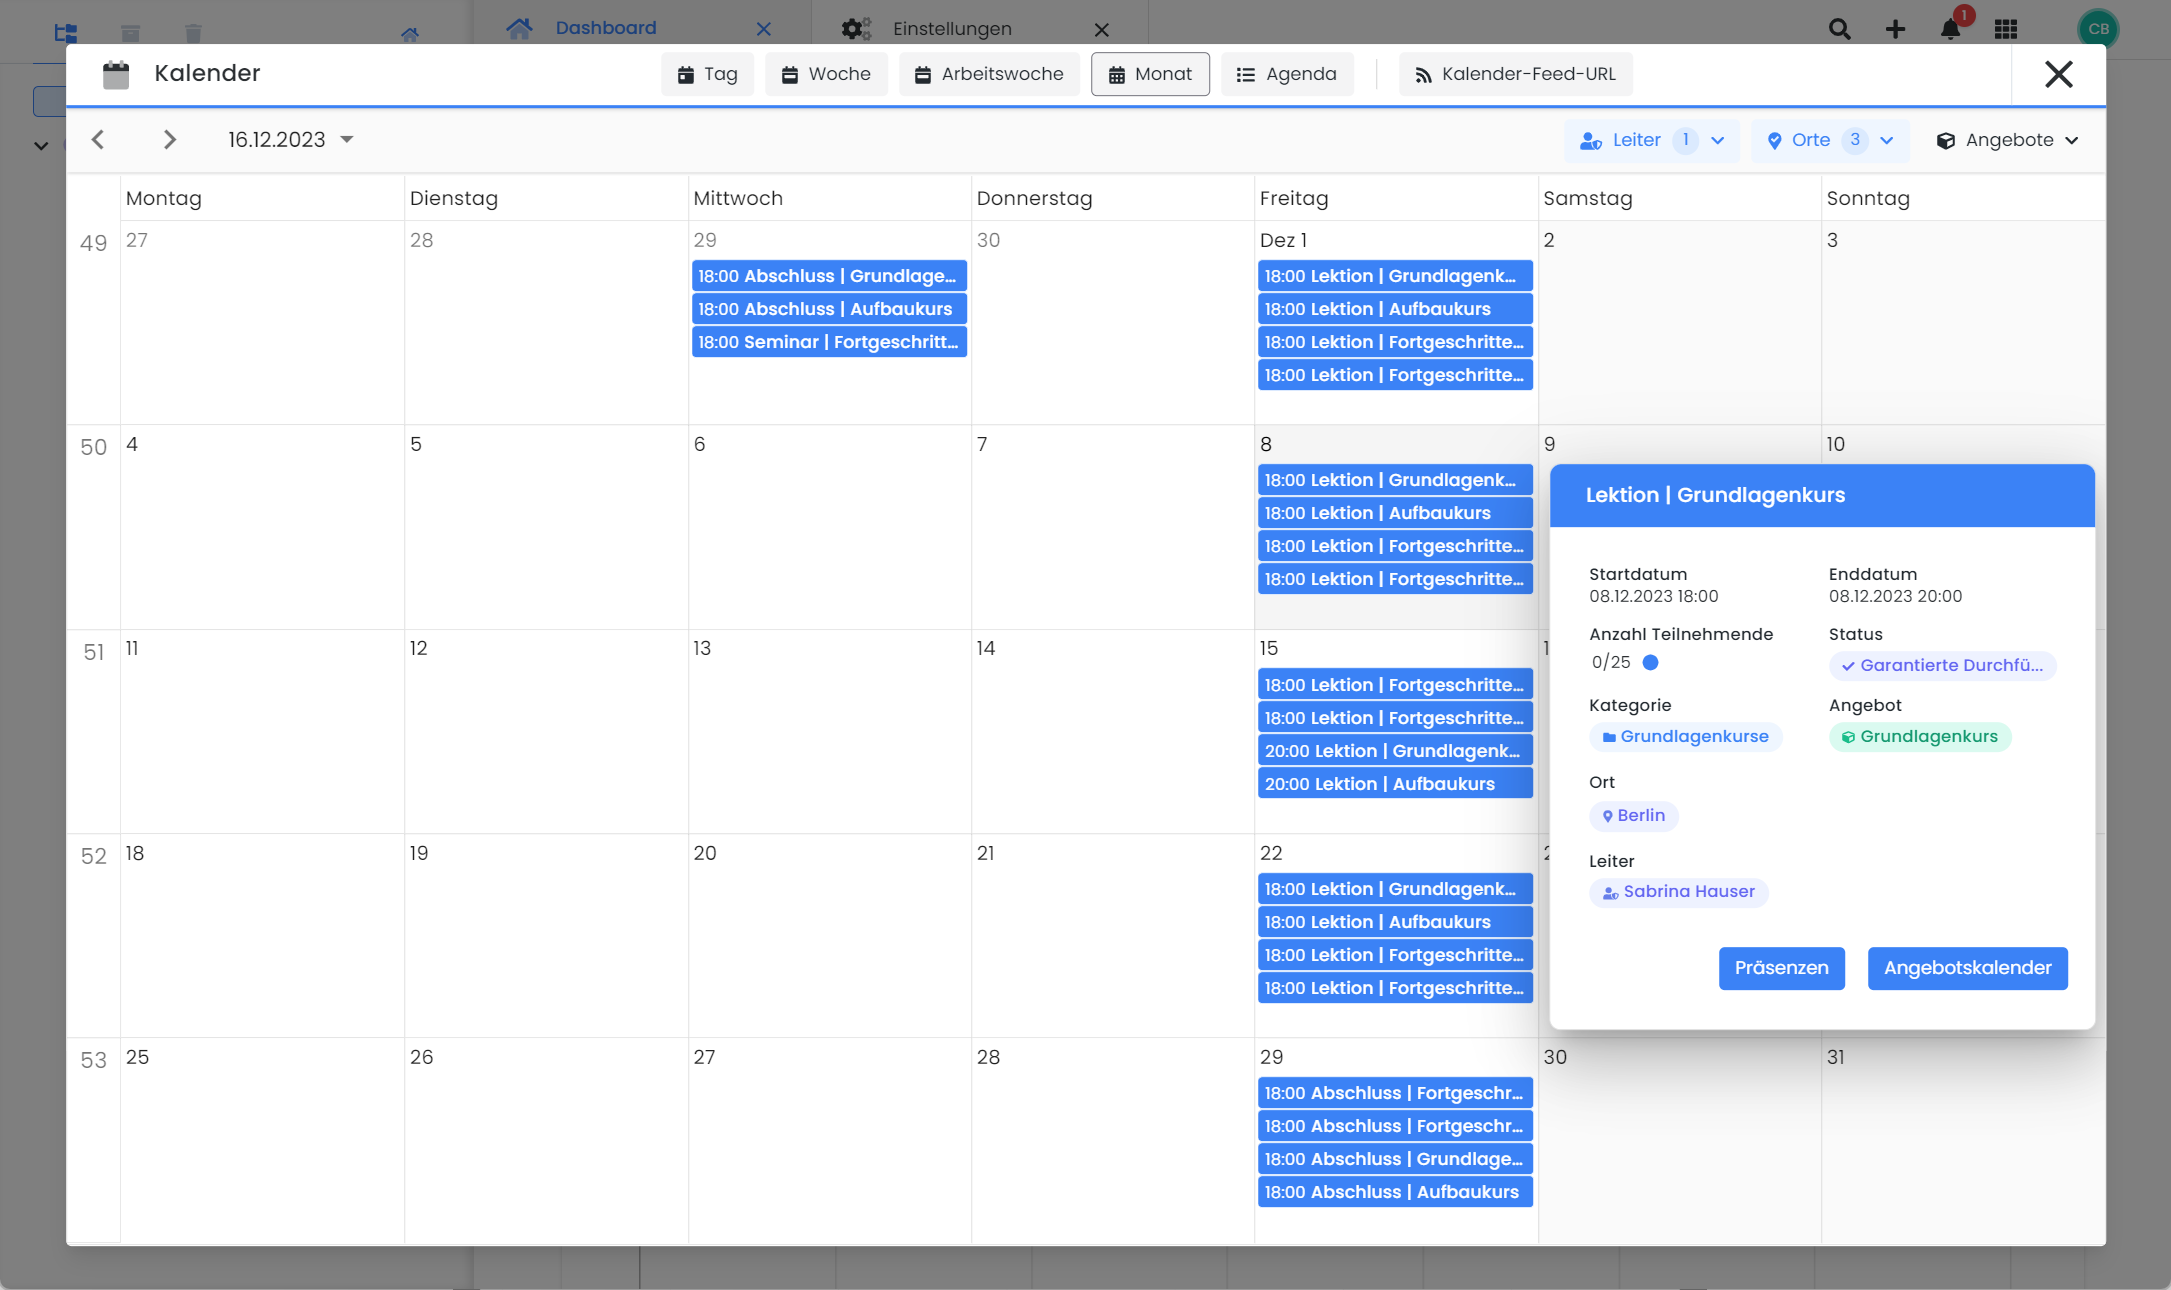
To access further information regarding a specific appointment, click on the respective entry in the calendar. This action opens a detailed view, providing information on the appointment's time, location, instructor, and available capacity. Additionally, it displays the name of the offering associated with the appointment, its parent category, and the current status of the offering. For swift modification of the individual appointment, a direct link to the offering calendar is provided at this point, along with a seamless connection to its attendances.
Offering Calendar
Offerings within edoobox consistently comprise at least one scheduled appointment. These appointments serve to inform your clientele precisely when and where an offering will take place. Each appointment can include a description, a start and end timestamp (date and time), assigned instructors, and a specific location. These created appointments can then be displayed on your website and integrated into email templates. The nomenclature for appointments varies based on the offering type, and may include terms such as «lessons», «modules», or «lectures».
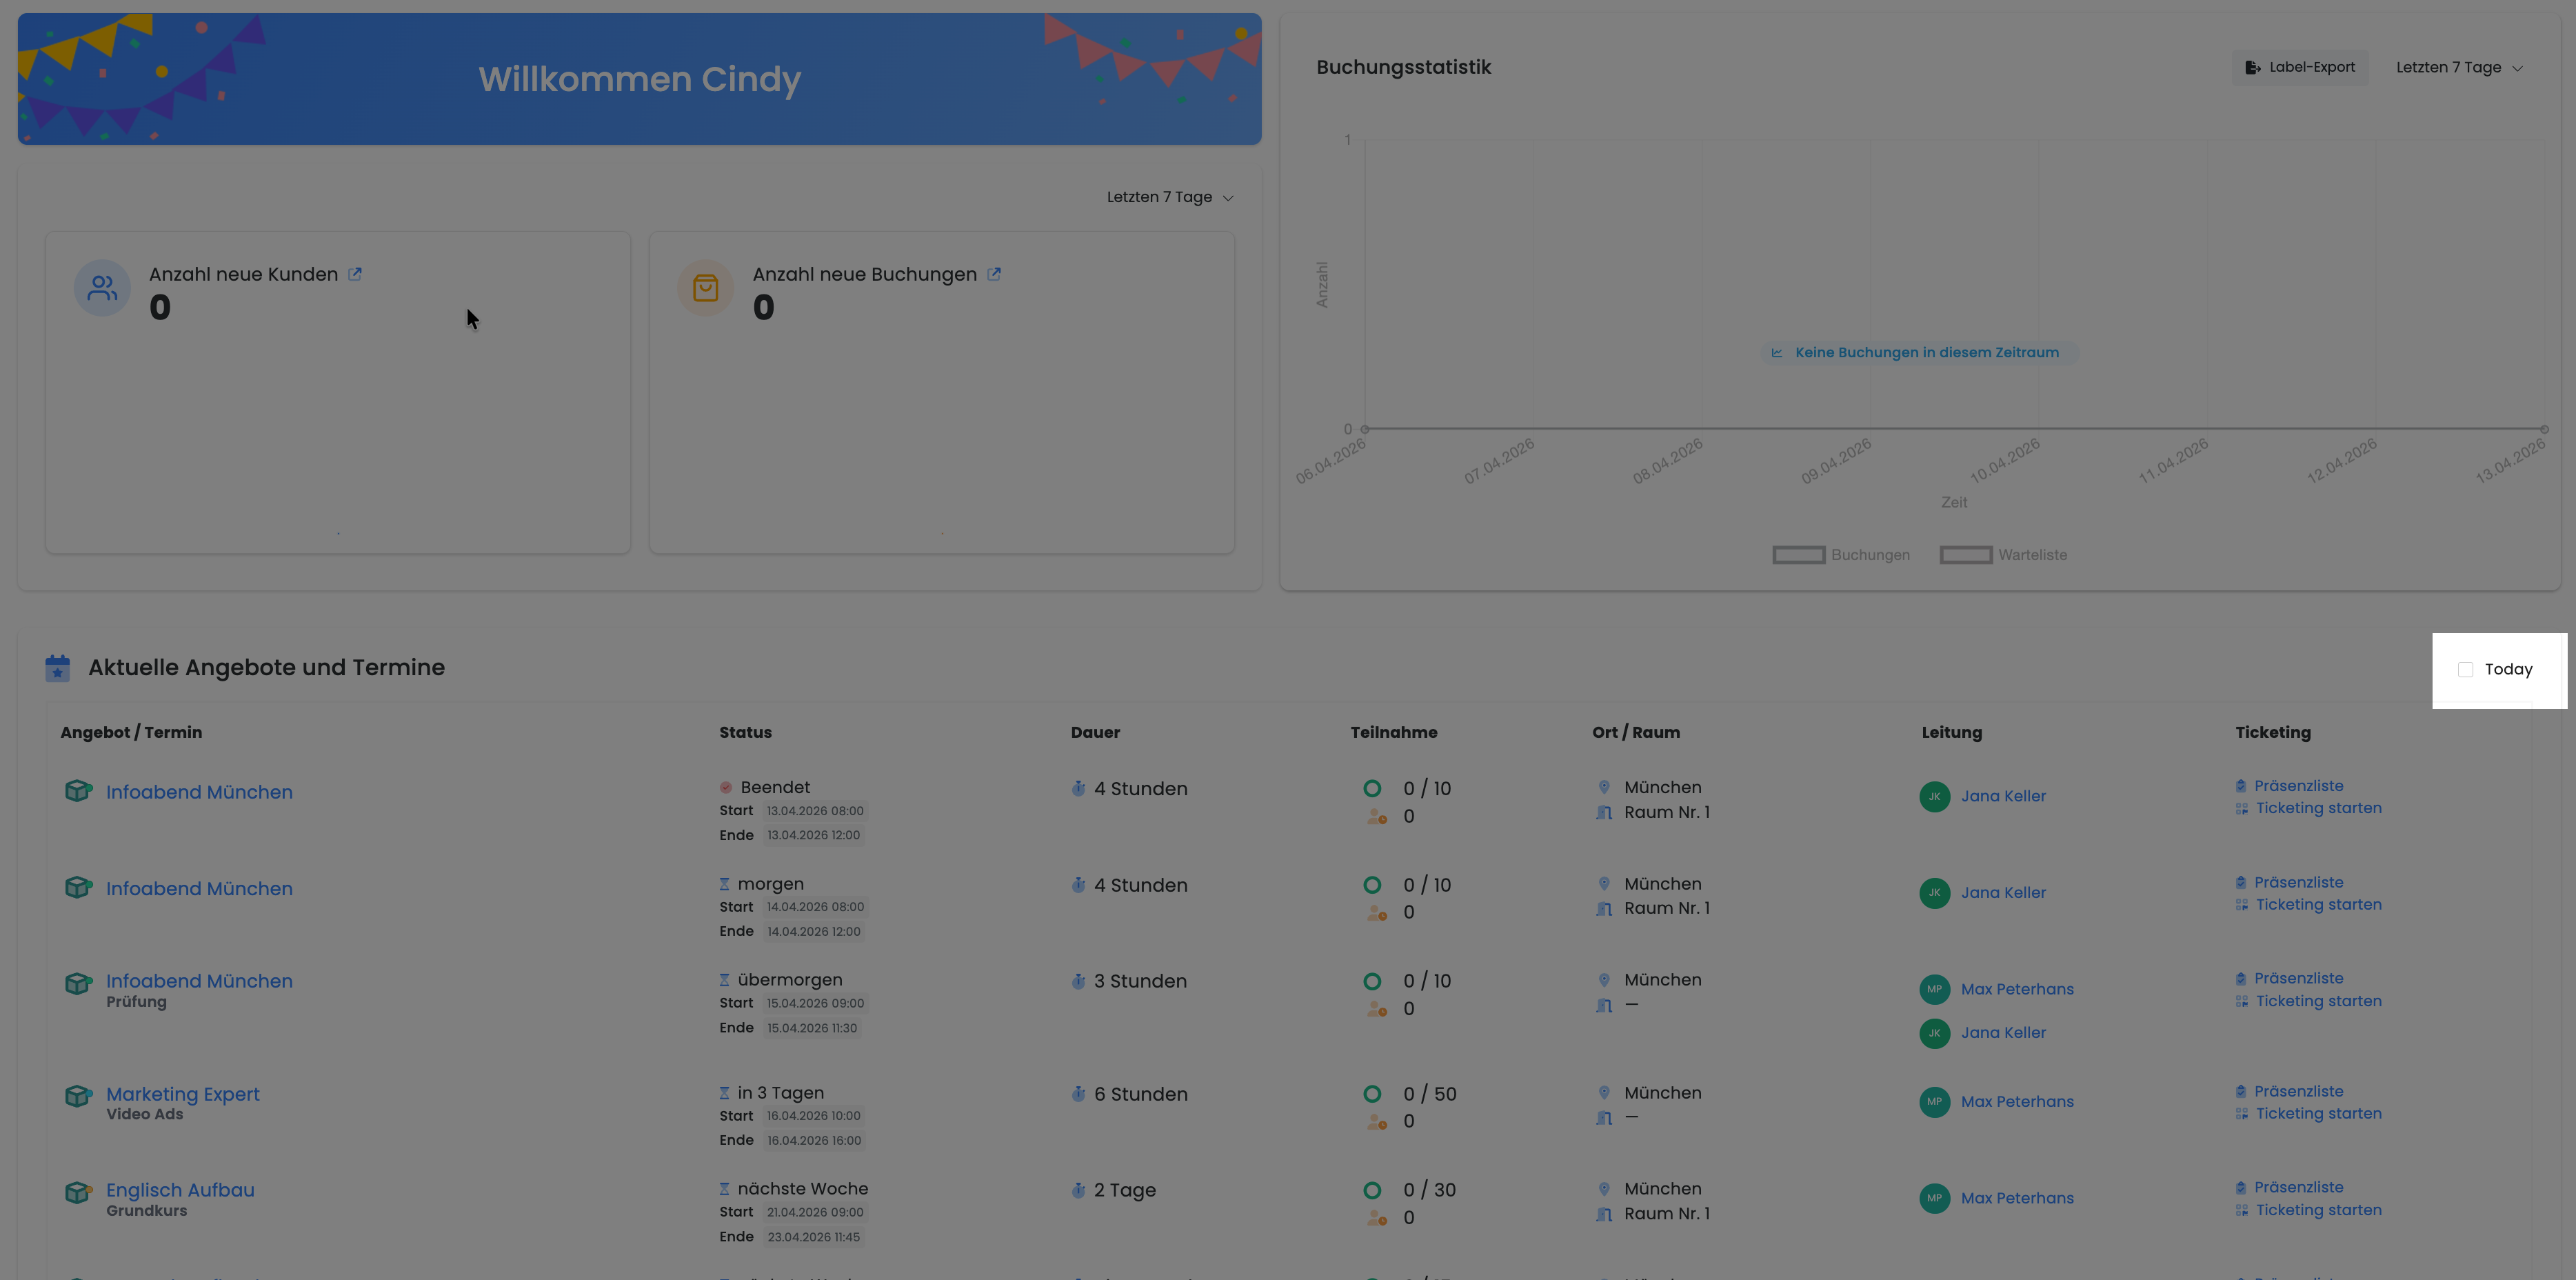
Quick views (e.g., Today)
The "Today" quick view shows only the appointments for the current day.
Creating a New Appointment
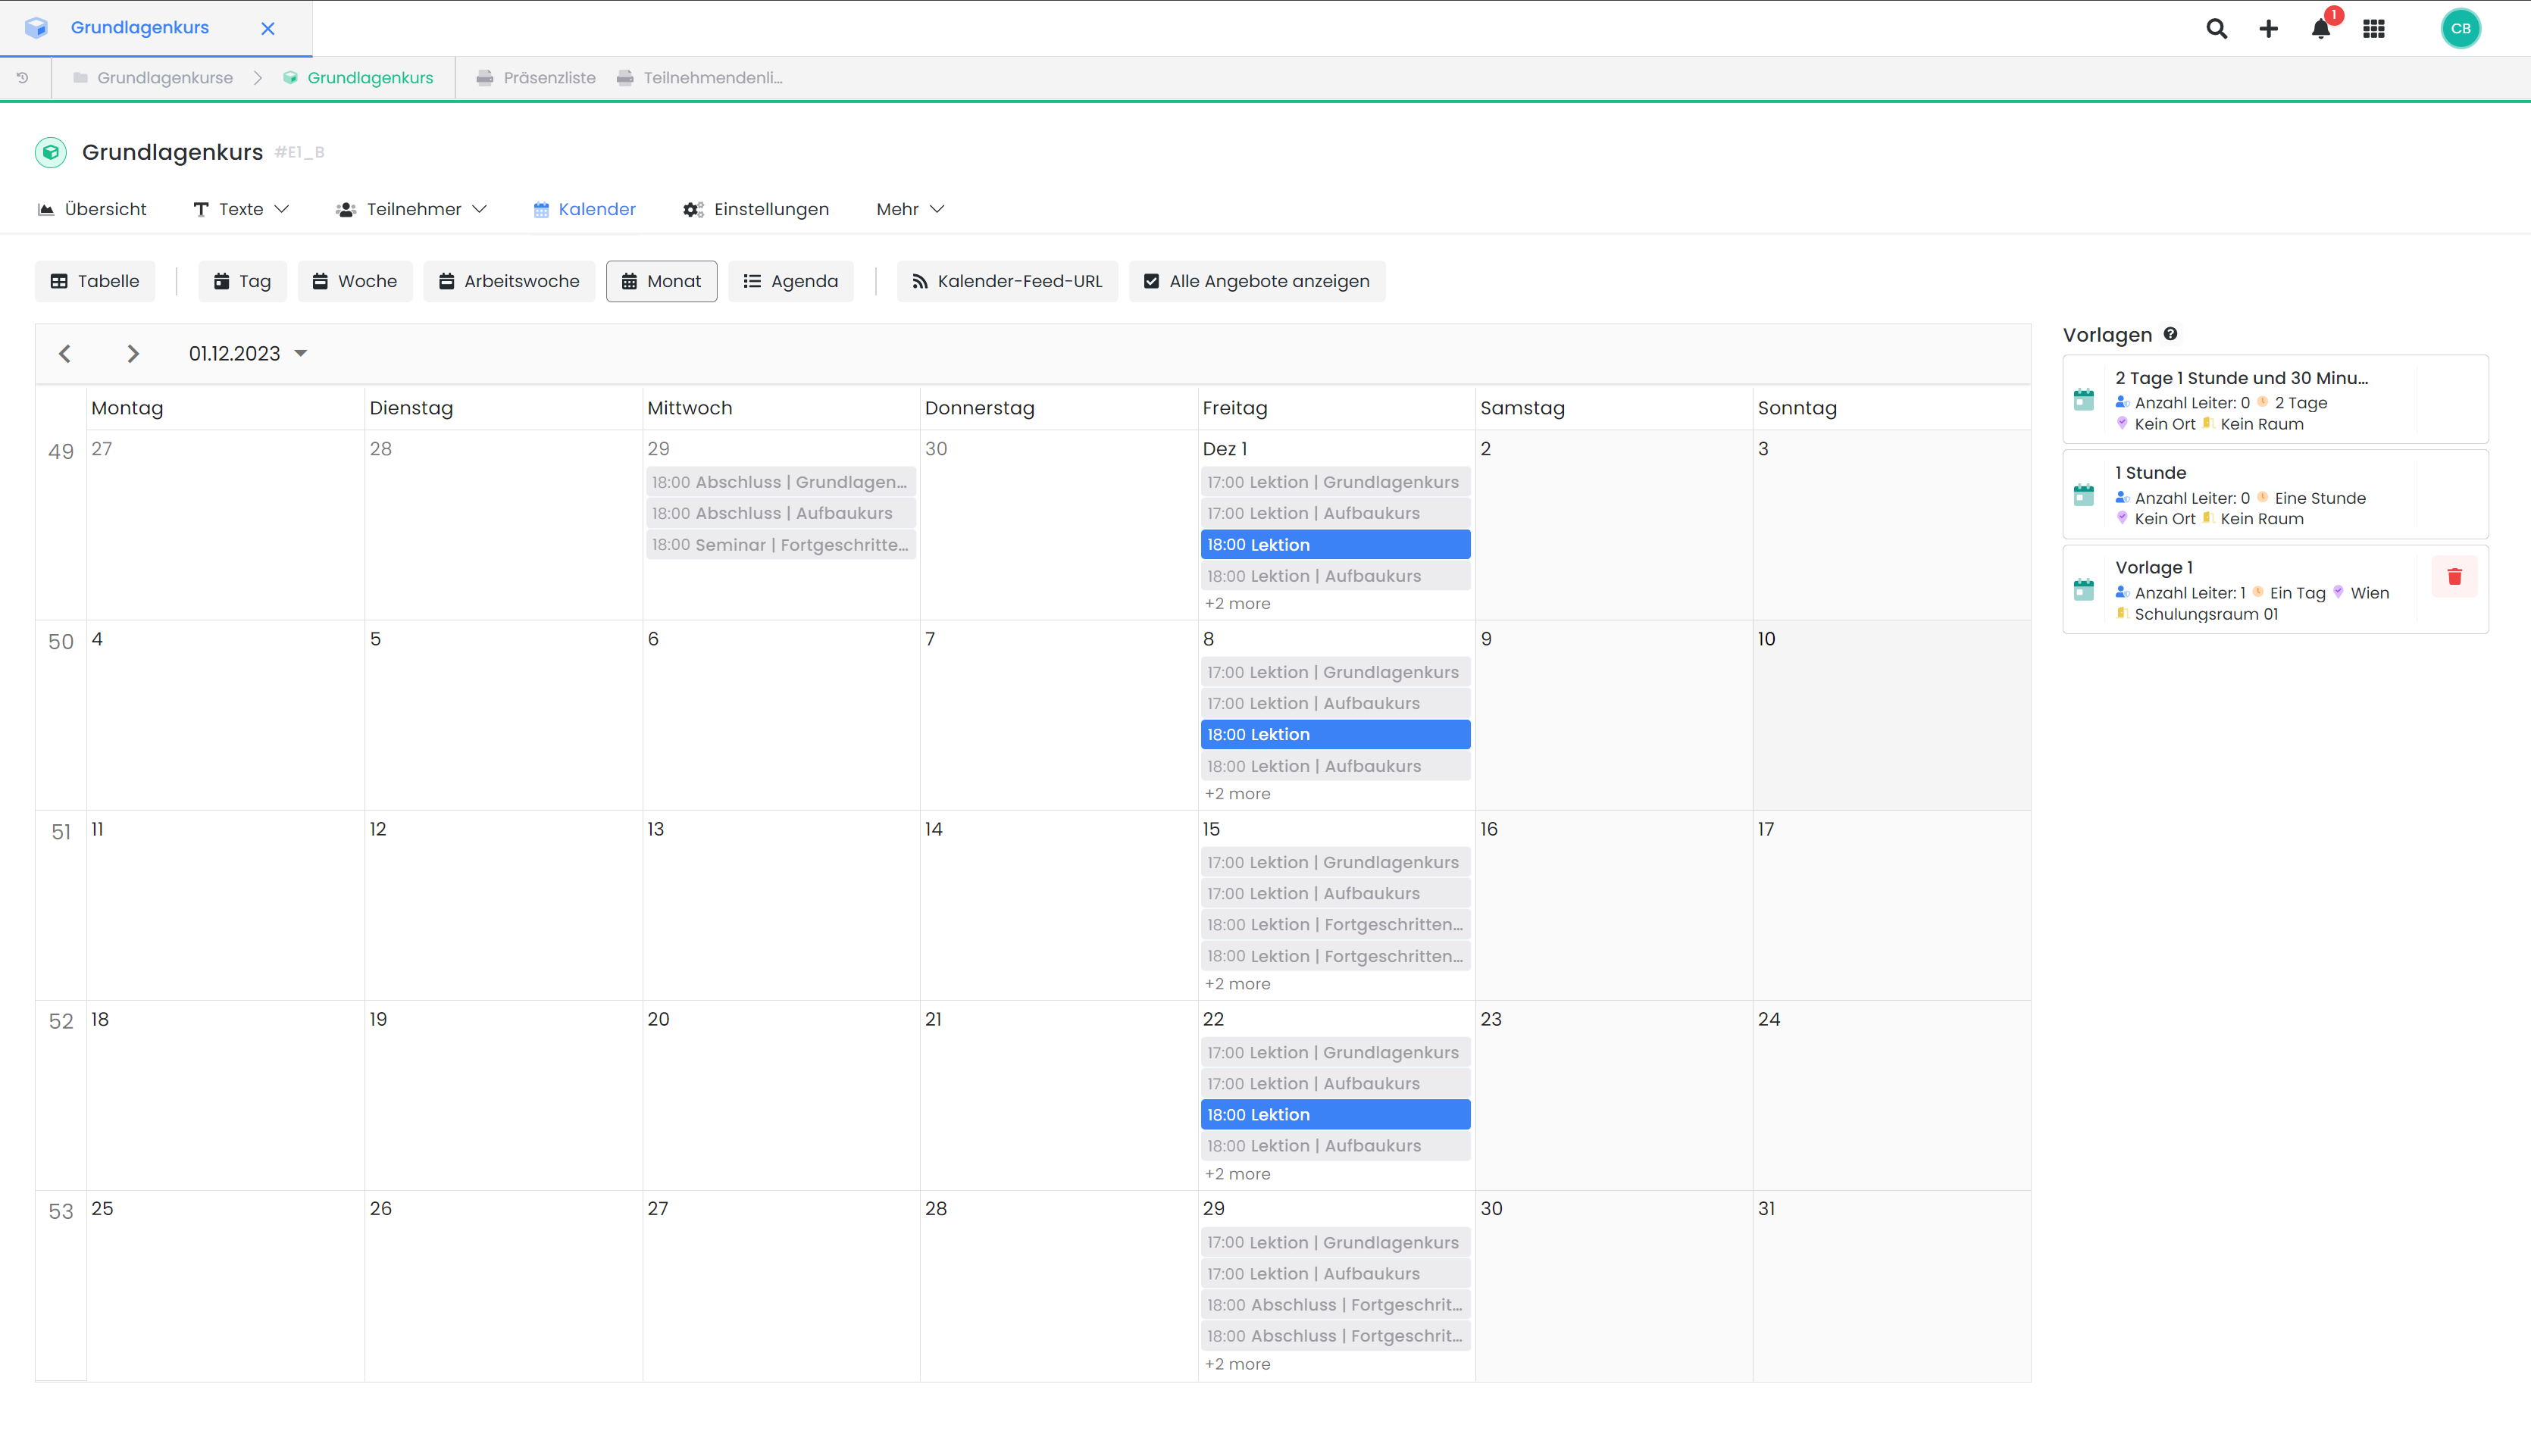
To append new appointments to an existing offering, multiple methods are available. The most common procedure involves navigating through the offering tree, selecting the desired offering, proceeding to its offering dashboard, and then accessing the «Calendar» tab.
Within the calendar, click on any desired day and time to initiate the creation of a new appointment. This action will open a new window, prompting you to input all requisite details for the appointment.
Description
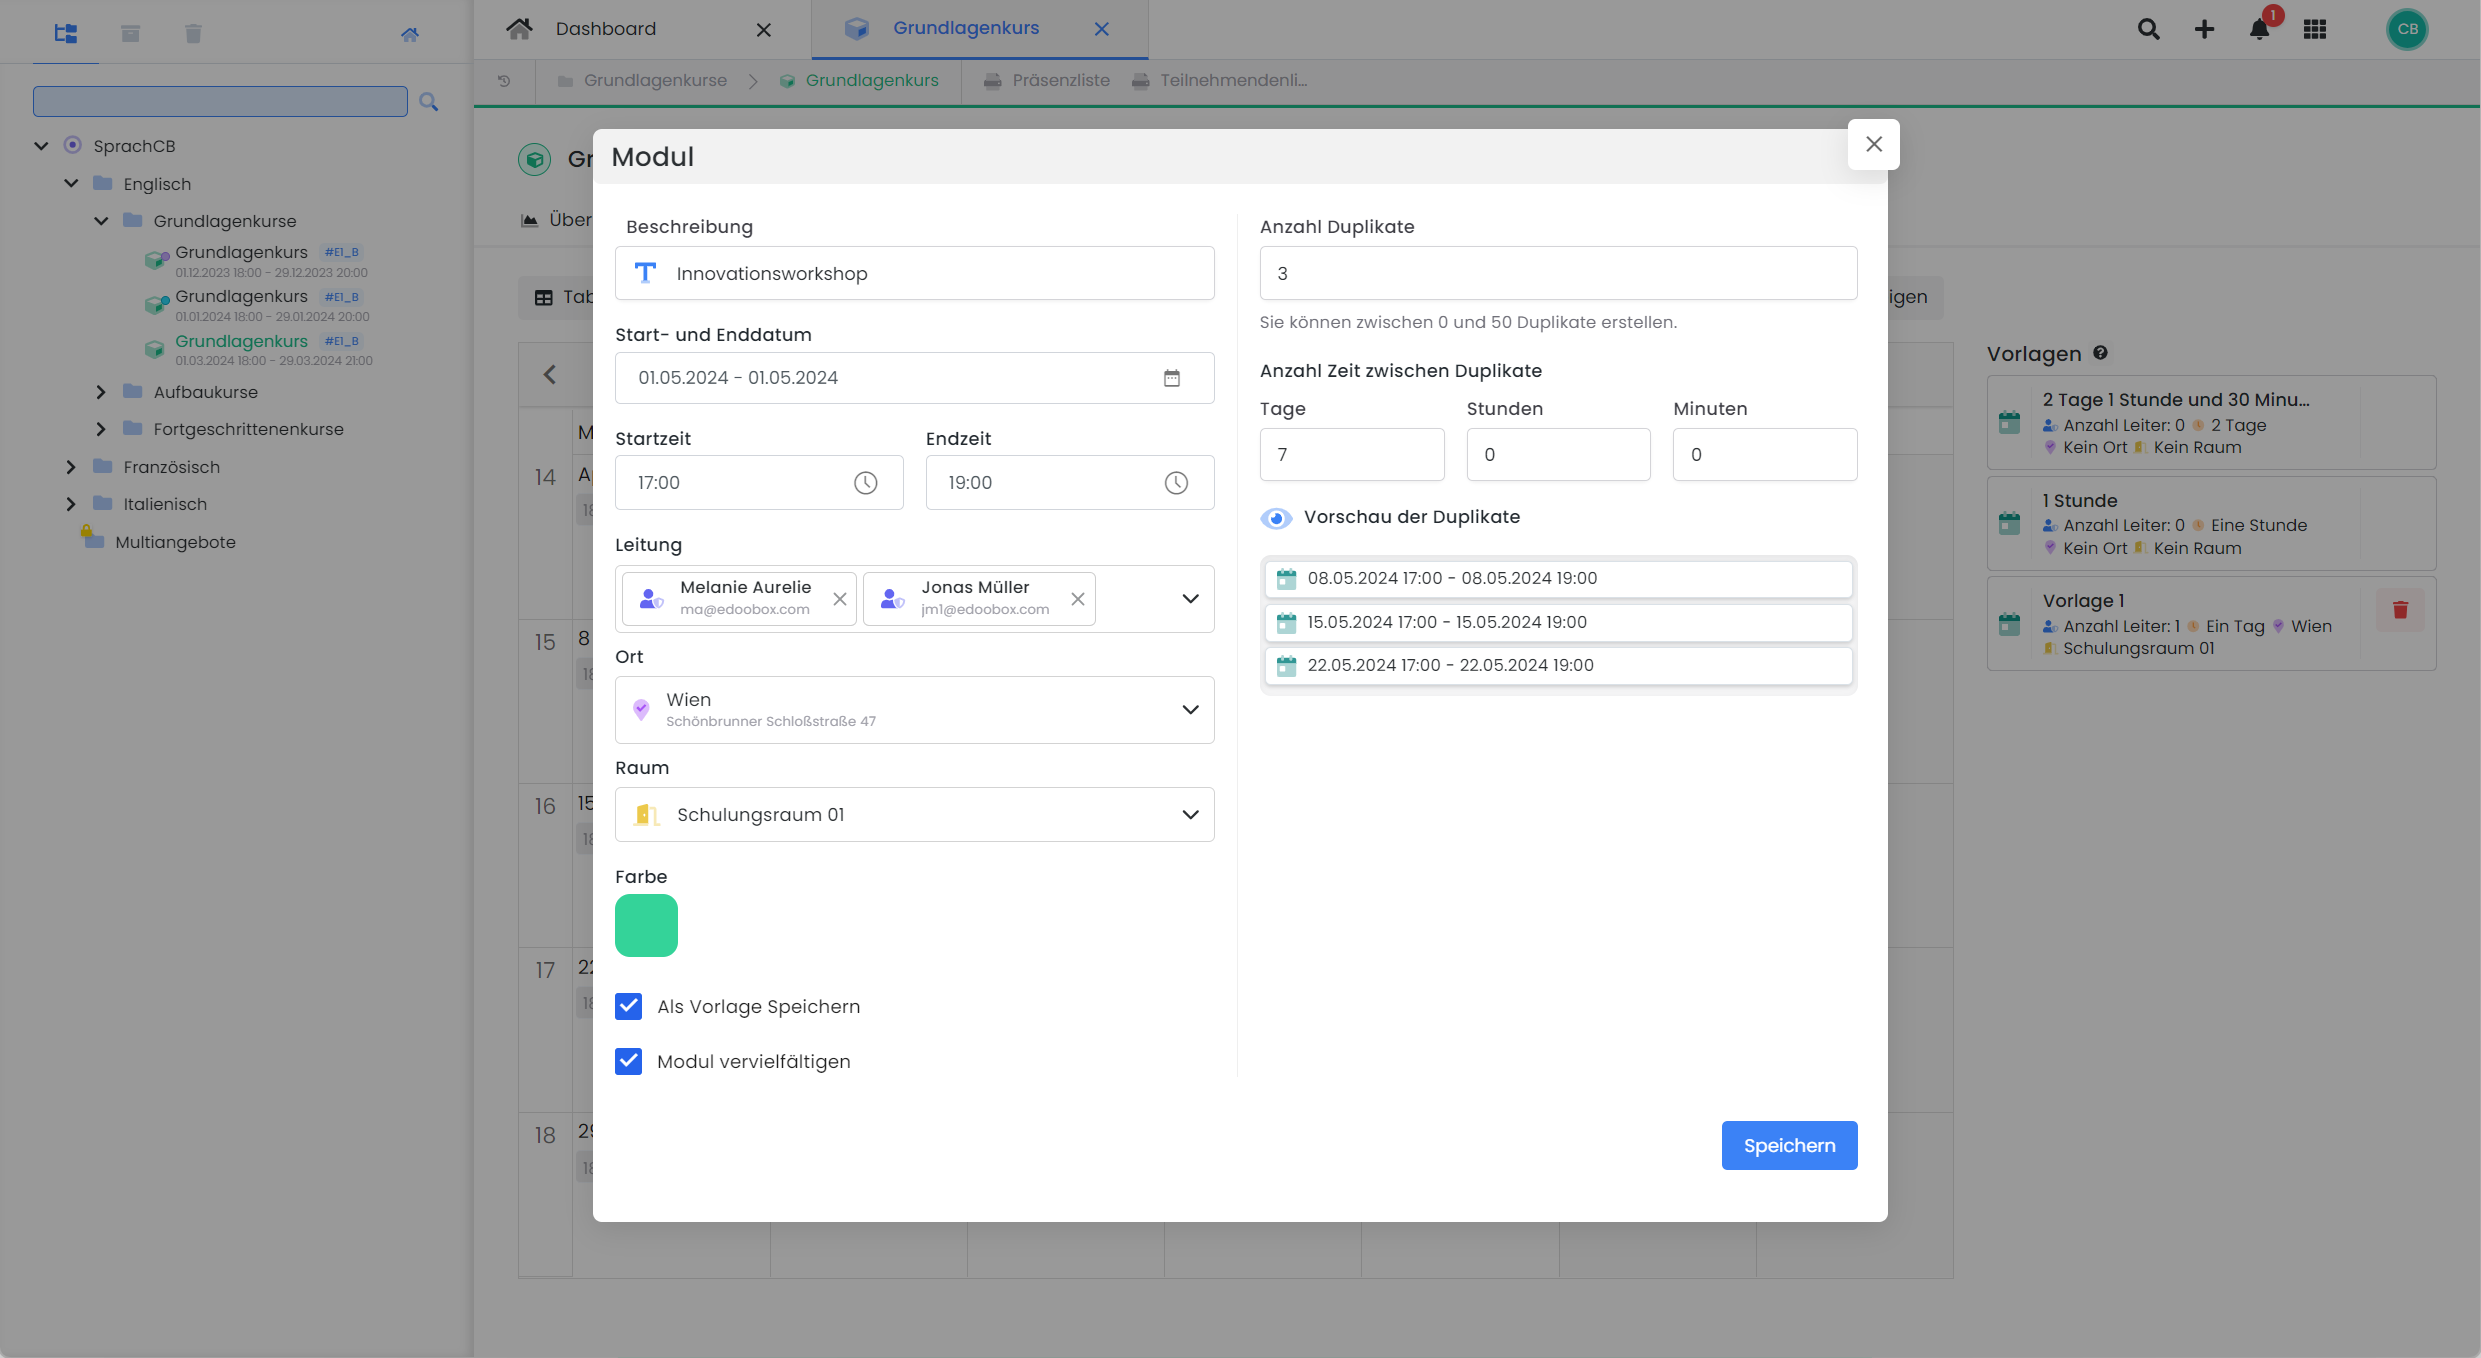
Provide a concise description or designation for the appointment. This is particularly beneficial for managing numerous appointments, ensuring improved clarity for both you and your clientele.
Start and End Date, Start and End Time
In this section, you specify the commencement and conclusion of the appointment. An appointment can span multiple days, and it is also feasible to schedule several appointments within a single day.
Tip: Time Grid
Within the global settings, the calendar time grid can be configured with intervals ranging from 1 to 60 minutes.
Instructor
Here, you assign the instructors for the specific appointment. Please note that all instructors previously registered in the system are available for selection. Instructors can also be assigned to individual appointments retrospectively.
Location and Room
At this juncture, you specify the execution location for each appointment. If required, you can further specify the exact room in addition to the general location. Please note that all locations previously recorded in the system are available for selection. Locations can also be assigned to individual appointments retrospectively.
To support participants and visualize the event location, you can display the venue using Google Maps during the registration process. This provides your participants with a clear understanding of the event location and facilitates their arrival.
Color
For improved clarity and visual differentiation of appointments, you can mark them with various colors. A total of 40 different colors are available for this purpose.
Save as Template
To streamline your calendar workflows, this feature allows you to save individual appointments as templates. These templates are then available in all offer calendars and appear directly as a list next to the respective calendar. To use a template, simply drag and drop it onto the desired date. This opens the 'Add Appointment' dialog box, where the template data is already pre-filled. You can make further adjustments or duplicate the appointment to quickly and easily add recurring appointments to offers.
If you are working on a small screen, you will find the templates under an action icon in the top right corner above the calendar. Clicking it opens a dialog box where you can select and edit the templates. This facilitates work on devices with limited screen space.
Duplicate Appointment
In this section, you can specify the number of duplicates for an appointment and the time interval between individual start times. After entering and saving this data, the original appointment and its duplicates, along with their corresponding information including description, instructor, location, and color, will be entered into the offer calendar. This allows you to quickly and easily create consecutive appointments within an offer.
Calendar Views
The calendar view can be changed with a single click.

Table: Table view displaying information such as Name, Start Date, End Date, Instructor, Location, and Room. Appointments can be adjusted in the dialog box by clicking on the appointment.
Day: Single-day view with a time grid. Appointments can be chronologically repositioned using the mouse, and further adjustments are possible in the dialog box by clicking on the appointment.
Week: Weekly view (Monday – Sunday) with a time grid. Appointments can be moved by time and day using the mouse, and further adjustments are possible in the dialog box by clicking on the appointment.
Work Week: Weekly view (Monday – Friday) with a time grid. Appointments can be moved by time and day using the mouse, and further adjustments are possible in the dialog box by clicking on the appointment.
Month (Default): Monthly view. Appointments can be moved to other days using the mouse, and further adjustments are possible in the dialog box by clicking on the appointment.
Agenda: List view for individual weeks, showing Name, Date, Day of the Week, and Time. The date of the week to be displayed can be set manually. Appointments can be adjusted in the dialog box by clicking on them.
Note: Book Appointments Individually
Starting with the Limited 2-subscription, the registration type 'Free Appointment Selection' can be activated for any offer. With this setting, participants can select and book their desired appointment individually. If 'Normal Registration' is active, all appointments of an offer are booked.
Delete Appointment
Created appointments can only be edited or deleted individually.
Calendar Feed URL
To display your edoobox appointments in an external calendar, you can generate a Calendar Feed URL and subscribe to it in your external calendar (e.g., Outlook, Google, iCal). The calendar feed does not exchange data in real-time; instead, the data is updated several times a day in your external calendar.
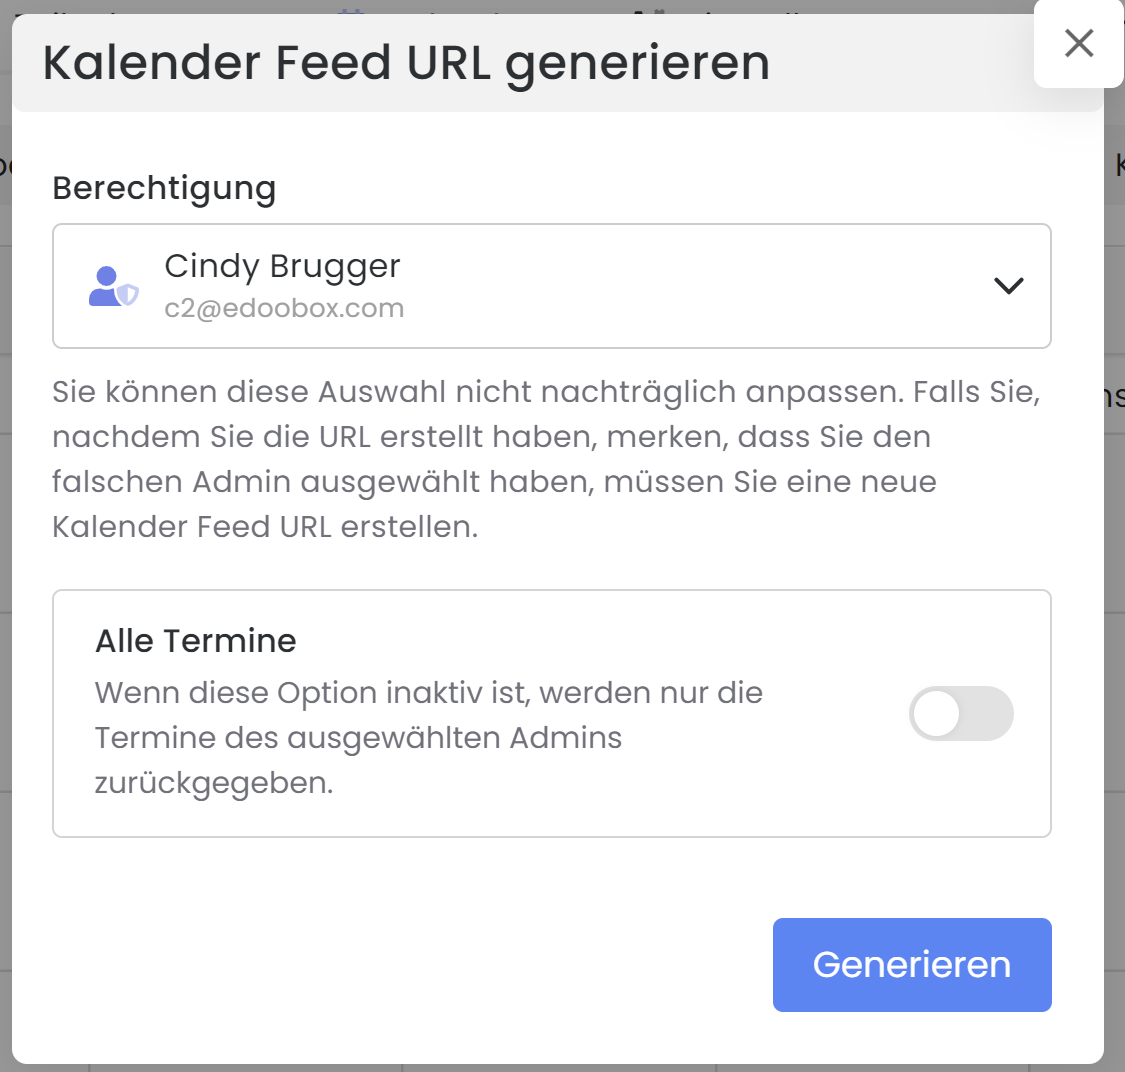
To generate a Calendar Feed URL, please follow these steps:
-
Click on the «Calendar Feed URL» in an offer calendar or the global edoobox calendar.
-
Select the admin whose appointments you wish to display in an external calendar. By selecting a specific admin, your external calendar will receive all appointments where this admin is designated as the lead.
-
If you wish to subscribe to all appointments in your edoobox account, select the «All Appointments» option.
-
Clicking 'Generate' will create your Calendar Feed URL.
-
Click on the URL to copy it to the clipboard.
-
Navigate to your external calendar to subscribe to the Calendar Feed URL.
MS Outlook
-
Launch Outlook.
-
Navigate to the Outlook calendar.
-
Click 'Add' and select 'From Internet...'.
-
Copy the Calendar Feed URL into the address field.
-
Your calendar will be created.
Google Calendar
-
Launch Google Calendar.
-
Under «Other calendars», select the «From URL» option.
-
Copy the Calendar Feed URL into the address field.
-
The «Make calendar public» option can remain disabled.
-
Your calendar will be created.
-
In the calendar settings, provide a name for the calendar.
macOS Calendar
-
Open Calendar.
-
From the File menu, select «New Calendar Subscription».
-
Copy the Calendar Feed URL into the address field.
-
Your calendar will be created.
Please note: Generating Calendar Feed URLs for others
Depending on your admin rights, you can create Calendar Feed URLs for yourself and for other admins:
-
Superadmin Rights: Can generate a Calendar Feed URL for themselves, for general purposes, and for other admins.
-
Admin Rights: Can generate a Calendar Feed URL for themselves, for general purposes, and for other admins.
-
Manager Rights: Cannot generate a calendar feed URL.
Always select the specific admin under 'Permission' for whom you want to generate a URL. Reason: If an admin is deleted, their calendar feed subscription in the external calendar will also be terminated. If an admin is deactivated, their calendar feed subscription in the external calendar will be paused and reactivated upon re-enabling the admin.
Related Guides
Keywords for this guide
Calendar ¦ Dates ¦ Modules ¦ Lesson ¦ Calendar feed URL ¦ Subscribe to calendar ¦ Export dates ¦ Lessons ¦ Calendar feed URL ¦ calendar feed URL ¦ calendar ¦ export dates