Google Tag Manager / Google Analytics
E-Commerce Tracking
Google Tag Manager makes it easier for you to integrate Google Analytics. With Google Analytics, you can not only measure sales and conversions, but also find out how users use your website, how they got there and how you can turn these users into regular visitors.
This guide explains in detail how you can use cross-domain tracking. As even small deviations in the set-up can hinder the functionality, we recommend that you follow the step-by-step instructions below exactly. The container that can be imported later may be edited, but this is also linked to the risk that cross-domain tracking is no longer possible.
Necessary settings
Create a Google Analytics account (if you do not already have one). You can find help here at Google Analytics
Create a new data stream for your website in your Google Analytics account (if not already available) and add the domain app2.edoobox.com and edoobox.com to the data stream
Insert the Google Analytics measurement ID on edoobox
Create a Google Tag Manager account on Google (if you do not already have one)
Enter your Google Tag Manager container ID in the edoobox settings
Import the JSON file into the Google Tag Manager and publish it
1. create a Google Analytics account
If you do not yet have a Google Analytics account, create one on Google Analytics. Enter an account name, the name of the website and the URL. The data sharing settings can be set as required. Then click on "Retrieve tracking ID".
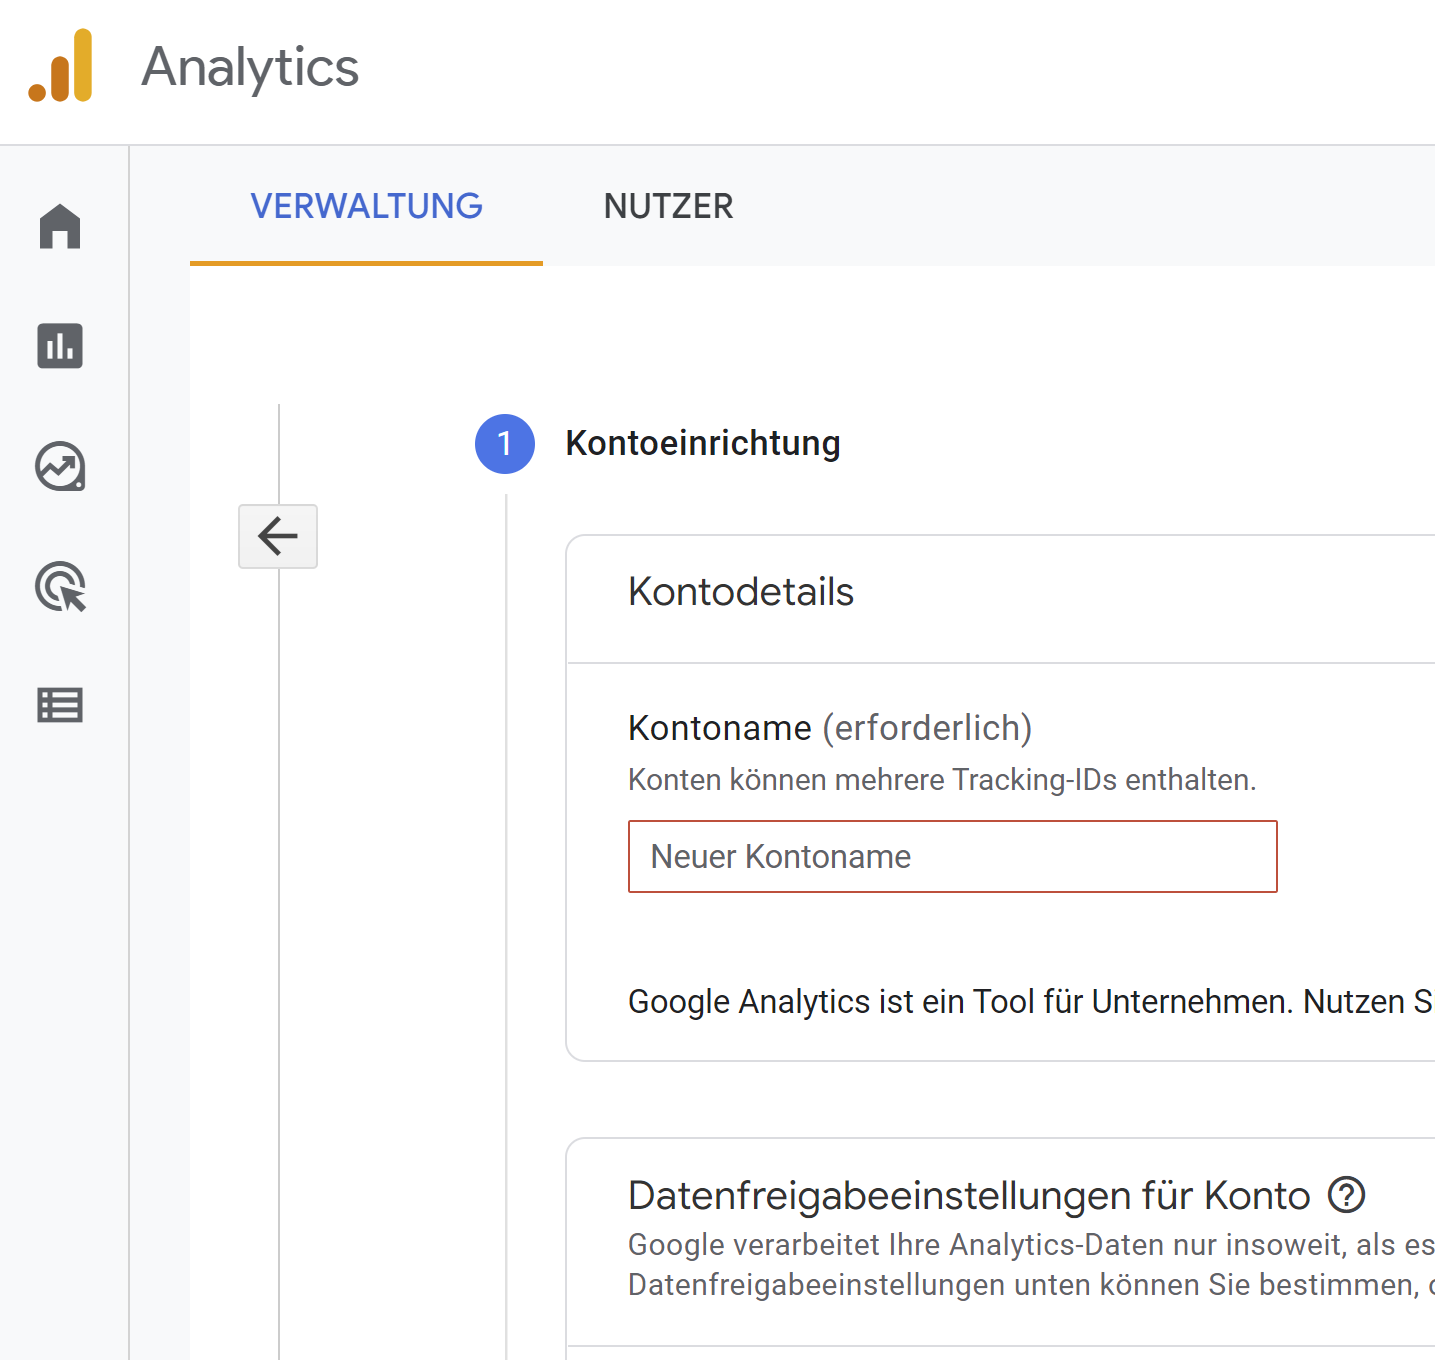
Create a Google Analytics account
2. enter new data stream in Google Analytics account
Click on "Add stream" under "Data streams" and enter a new web stream for your website if this has not already been entered.
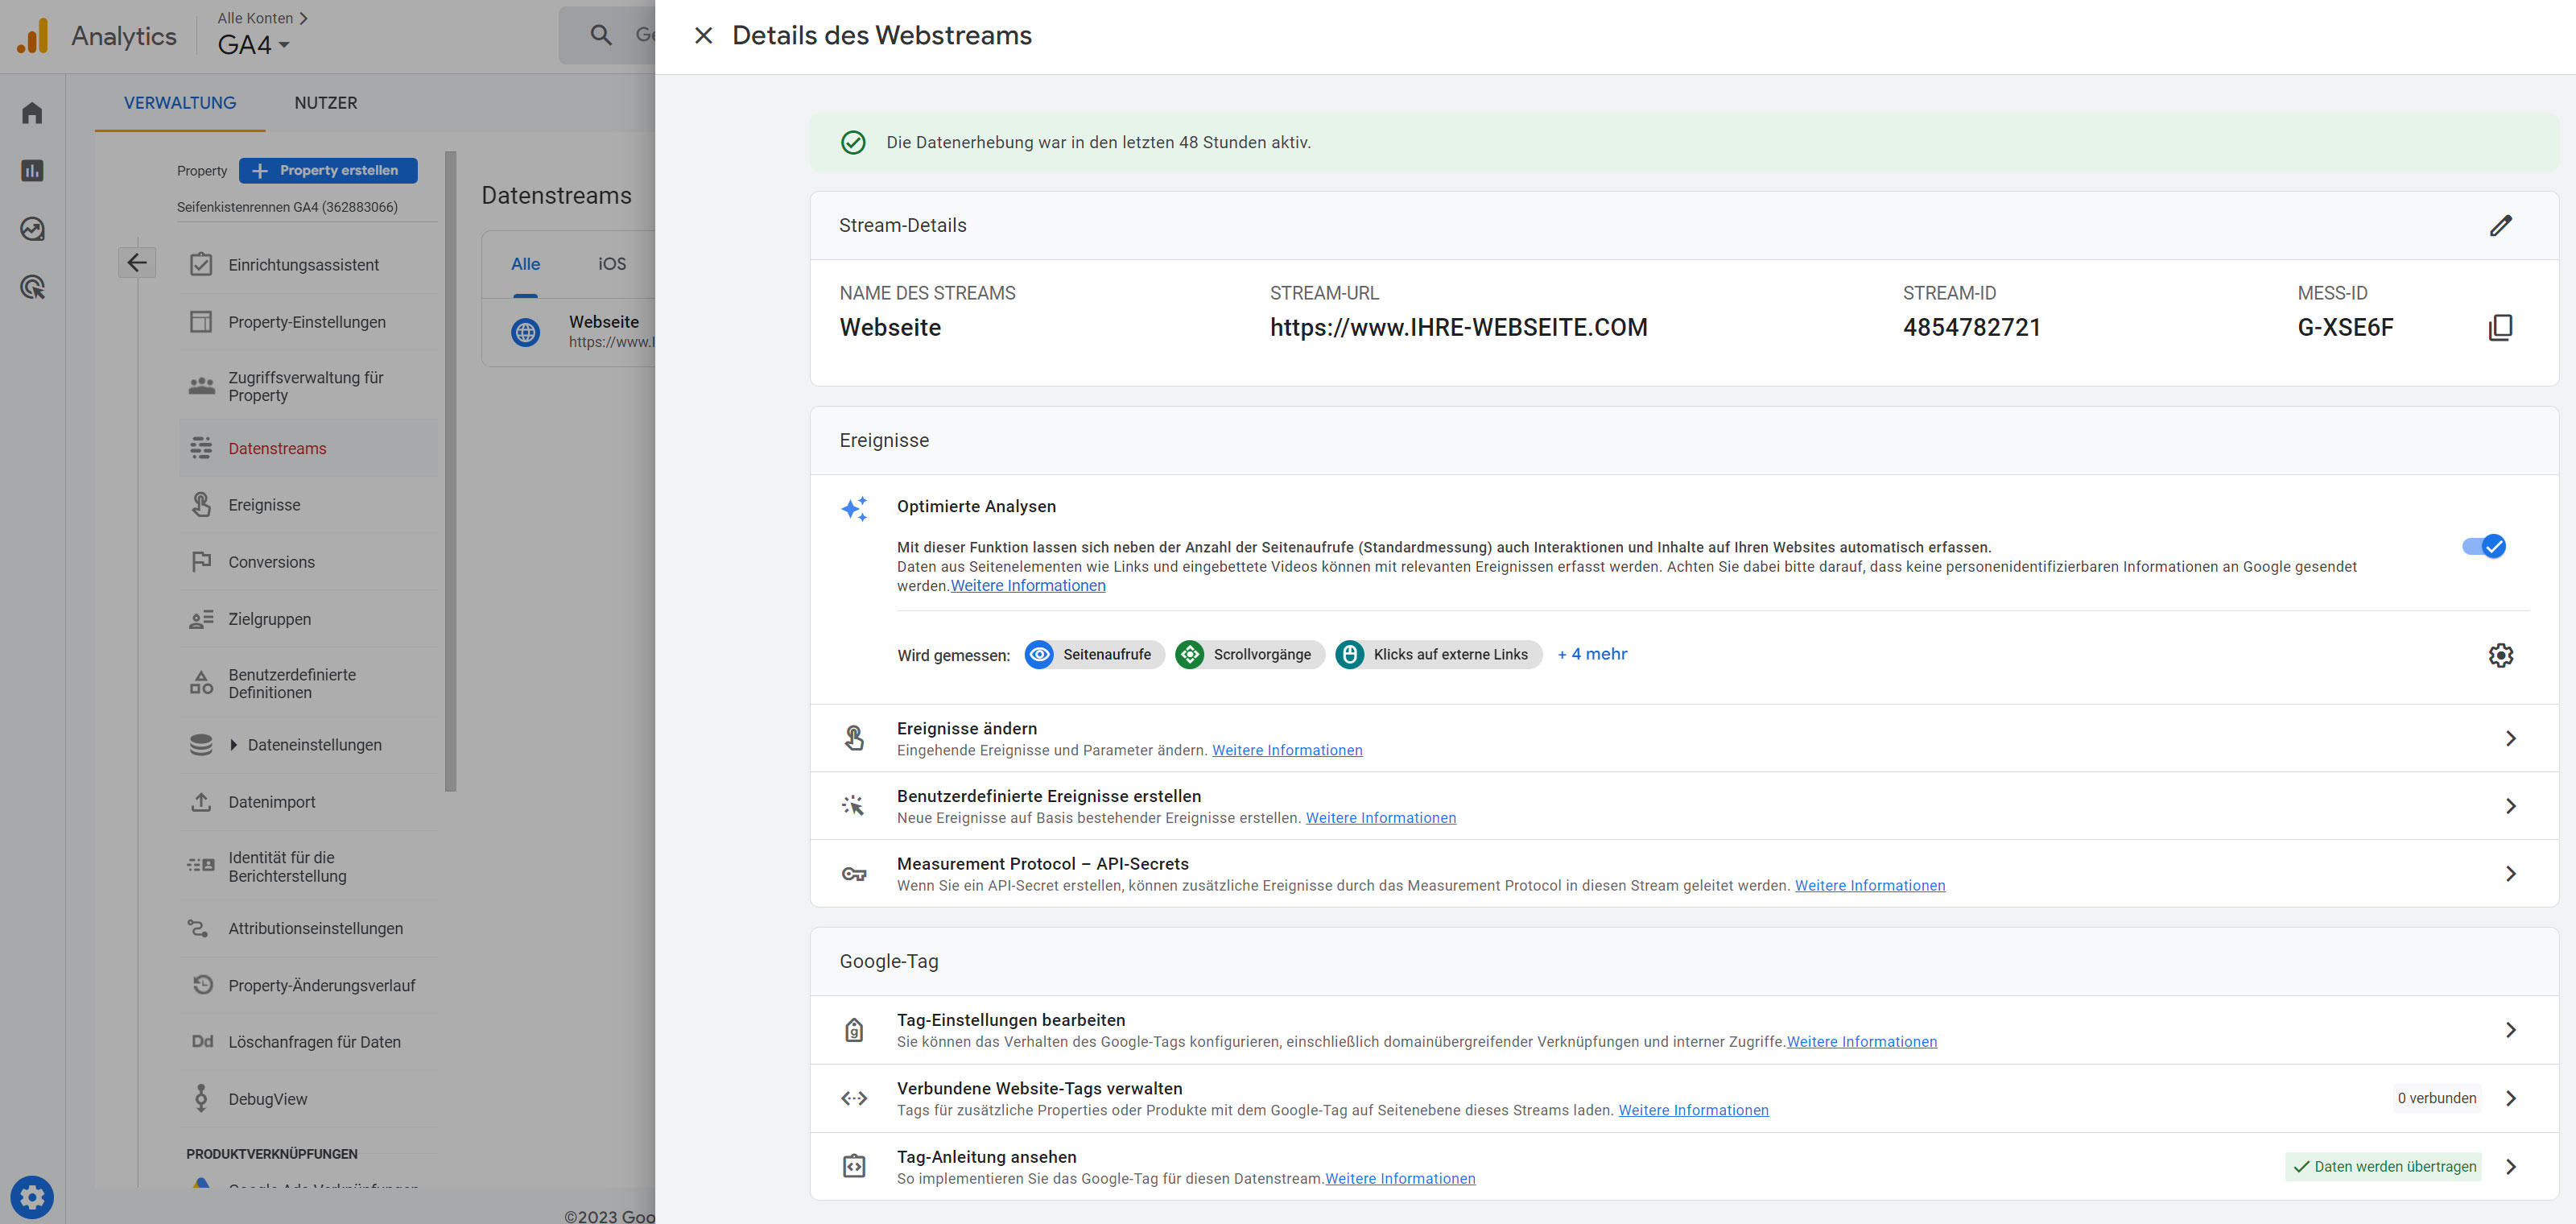
Data stream in GA4
To ensure that tracking also accepts calls from the edoobox domain, these must be entered under "Edit tag settings" "Configure domains".
Add all domain addresses and save them:
app2.edoobox.com | edoobox.com | your-domain.com etc.
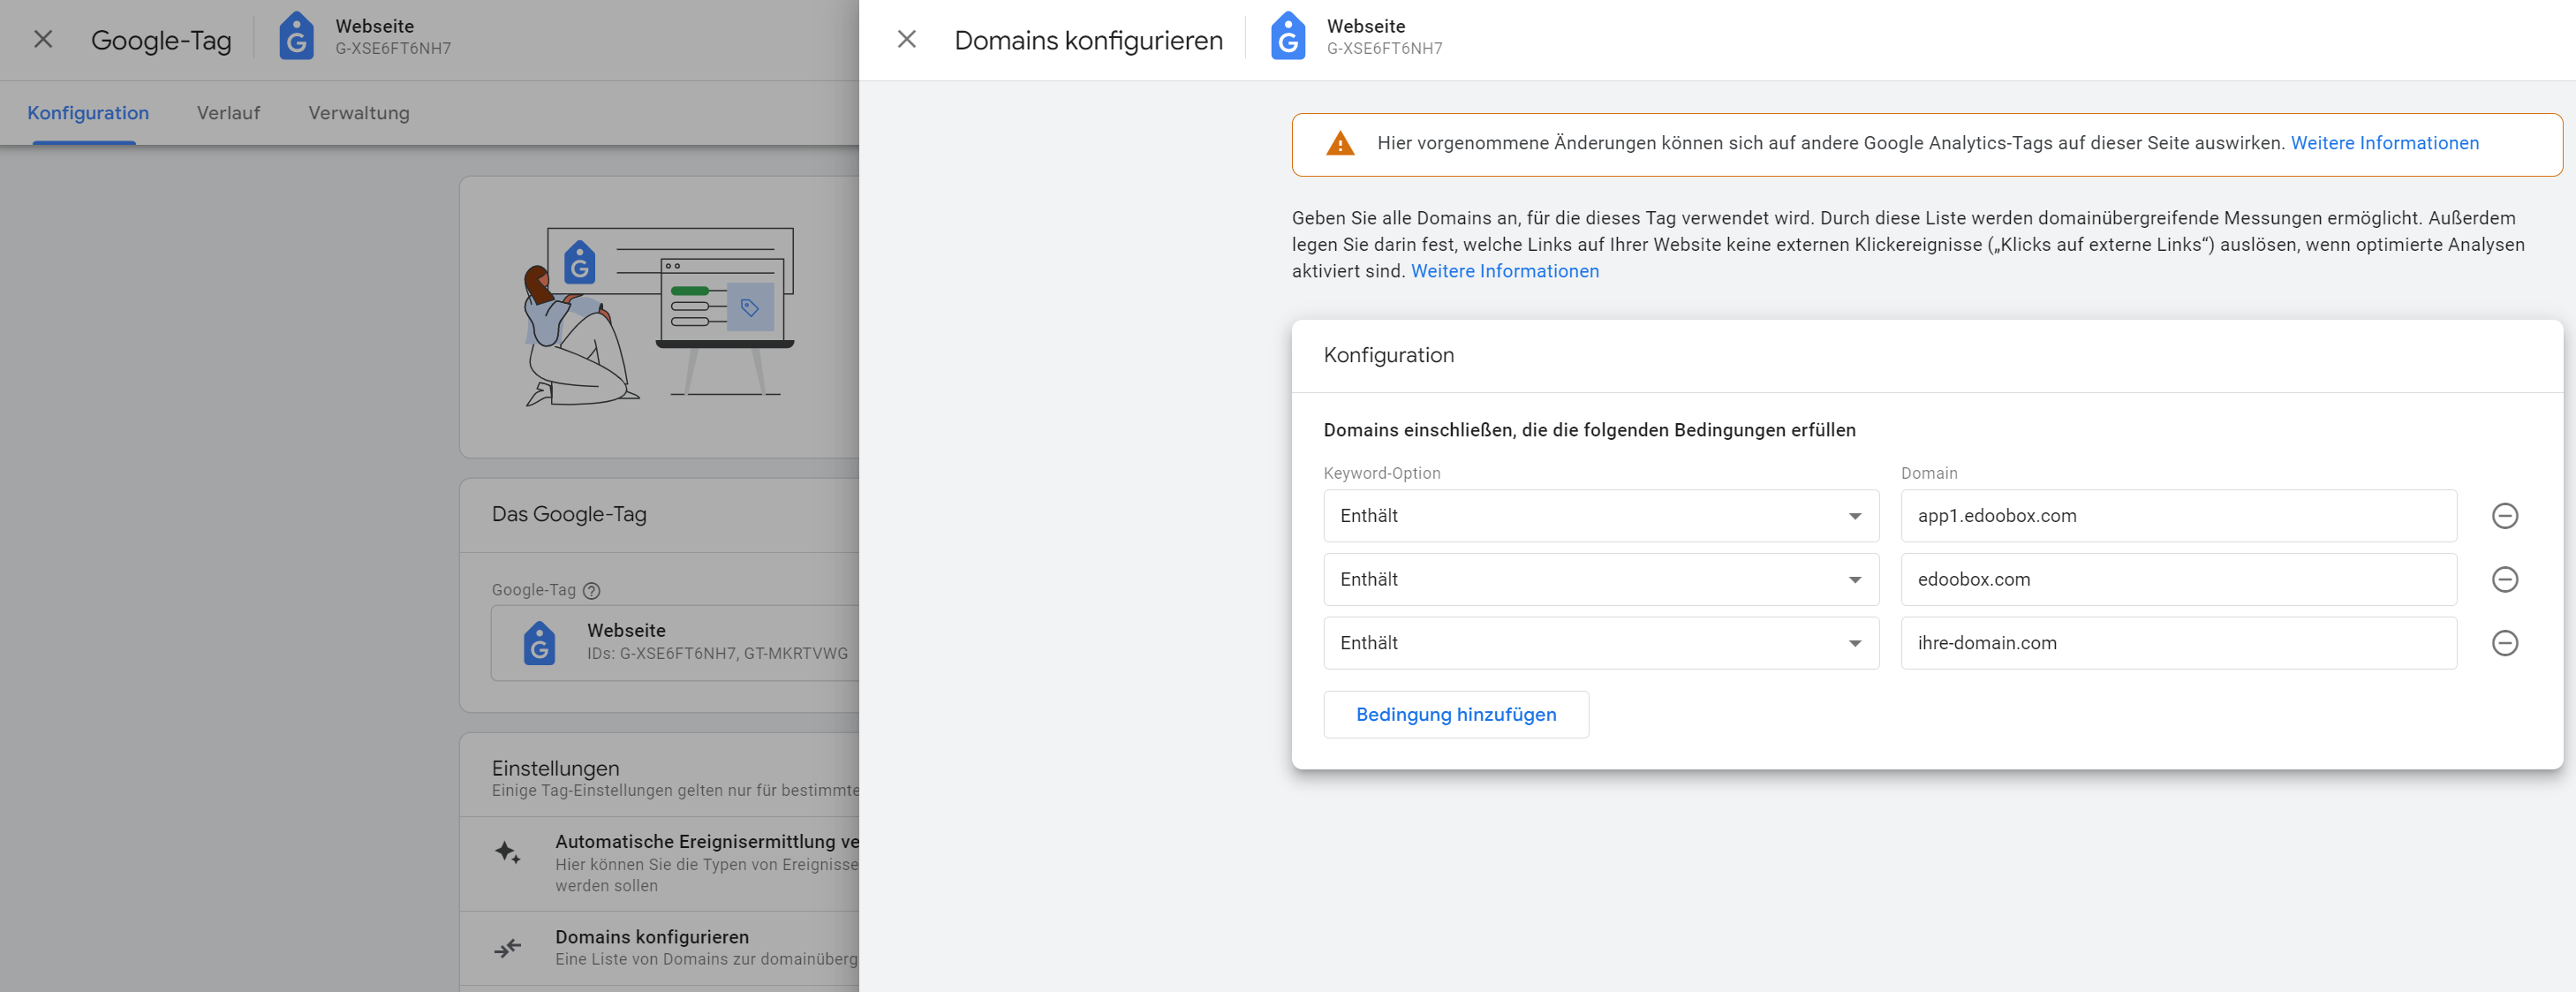
Add all domains to the stream
Now copy the measurement ID from your stream to your clipboard. You will find the measurement ID in your stream at the top right. This usually begins with G-XXXXXX.
3. insert Google Analytics measurement ID on edoobox
Insert the measurement ID in your edoobox settings in the "Google & e-commerce" area in the field A provided.
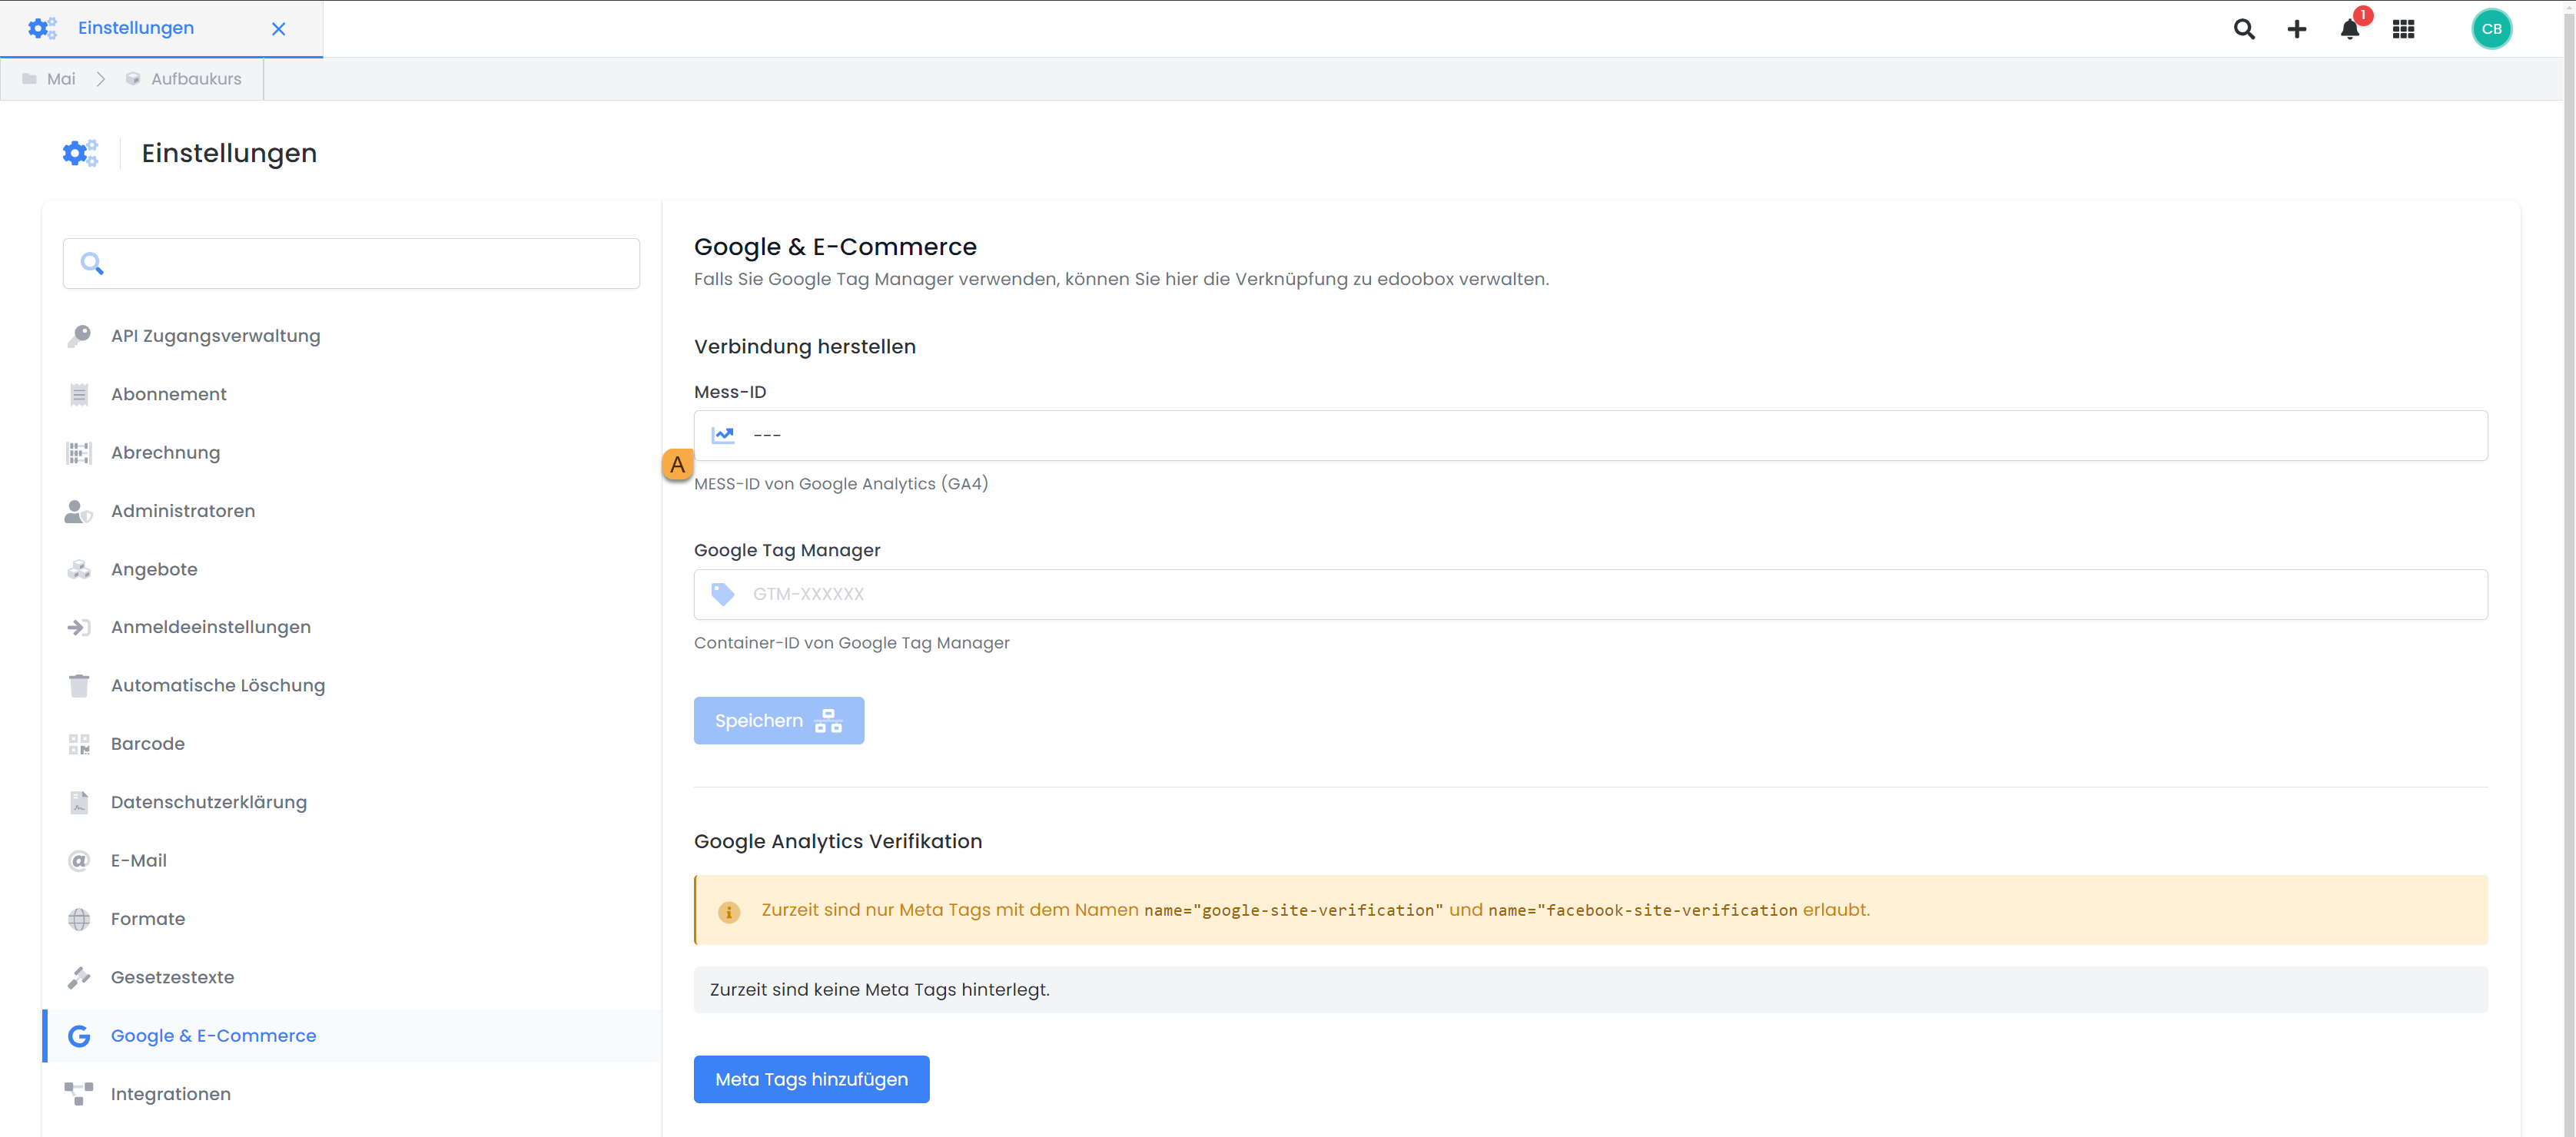
Google & e-commerce settings: Store measurement ID
4. create a Google Tag Manager account
If you do not yet have a Google Tag Manager account, you can create one on the official website.
The first step is to create a new account under "Administration". If you already have an account, this step can be skipped. We recommend using the same container as on the main page. This prevents conflicts between the containers.
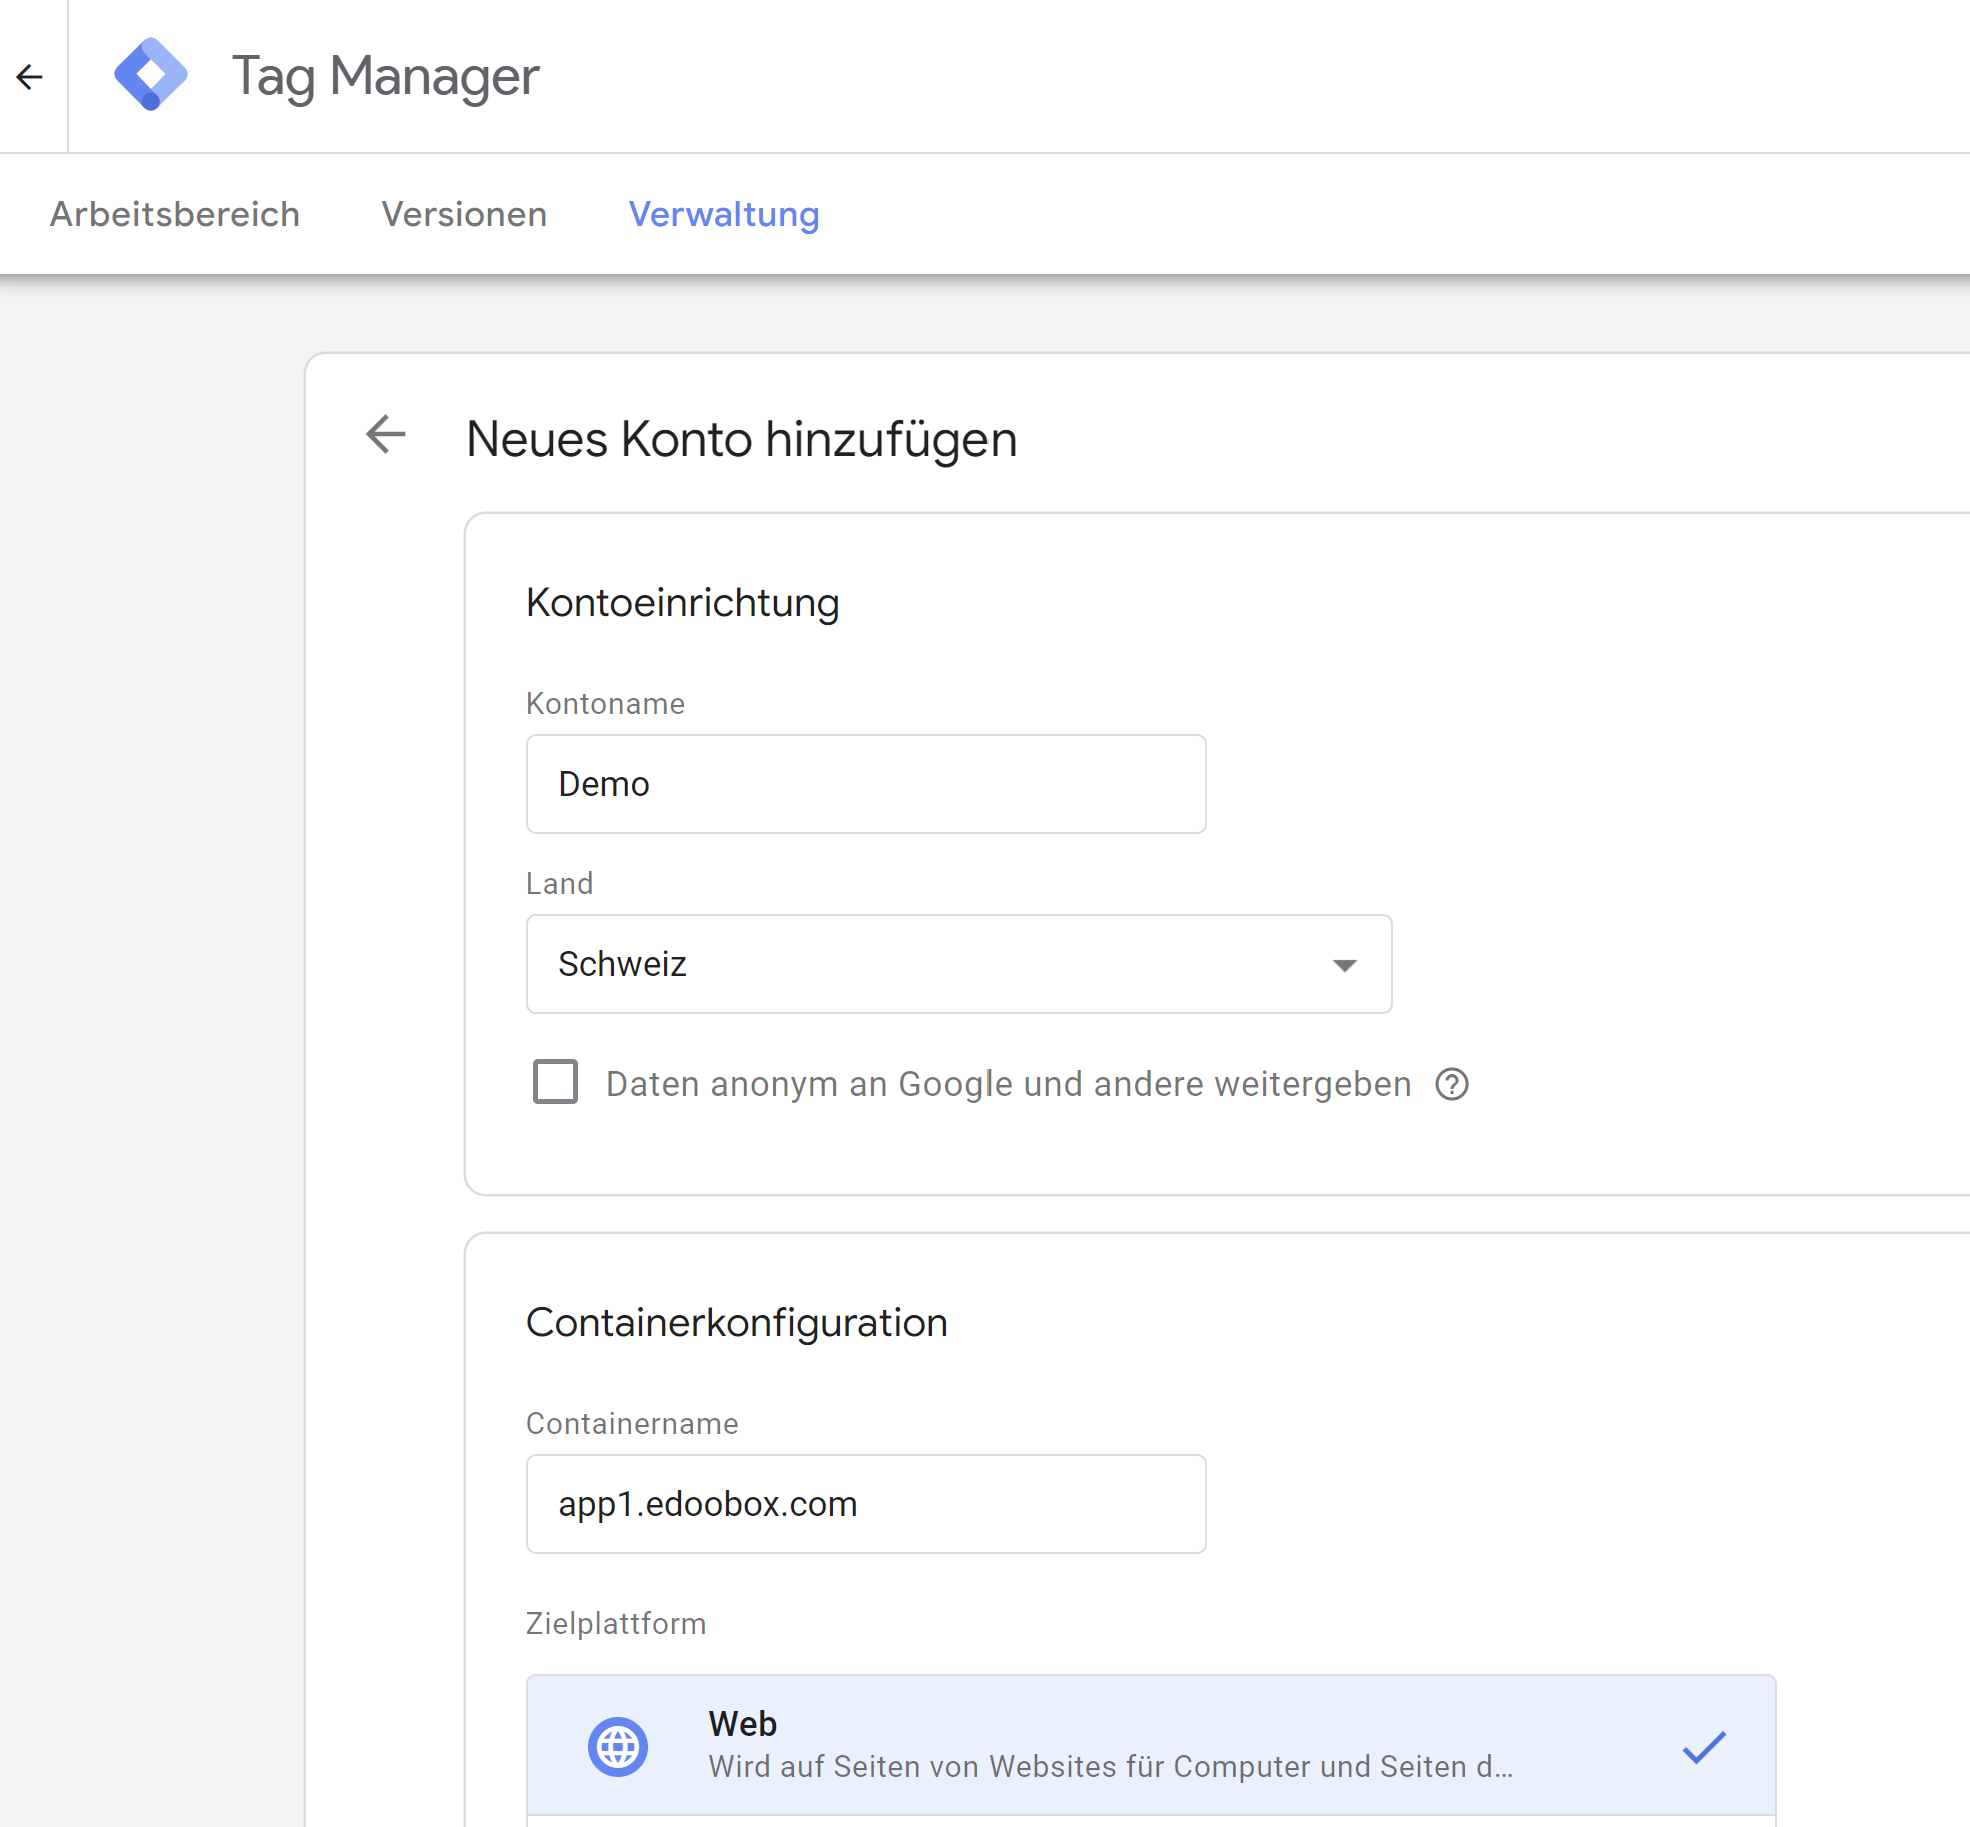
Create a new Tag Manager account
We recommend that you choose a comprehensible account name (e.g. that of your company). You can also use one account for several websites/customers, as a separate container can be created for each website/customer.
You can leave the option "Pass on data anonymously to Google and others" inactive or activate it.
If you want to manage several websites/customers with the same account, it is advisable to enter the domain as the container name, as this is unique and traceable. Select where the container should be used: Web, iOS or Android and then click on "Create". For use with edoobox, select Web.
5. insert Google Tag Manager container ID on edoobox
Copy the newly created container ID GTM-XXXXXX to your clipboard. You can find the container ID in your Google Tag Manager account under the Accounts > Container tab.
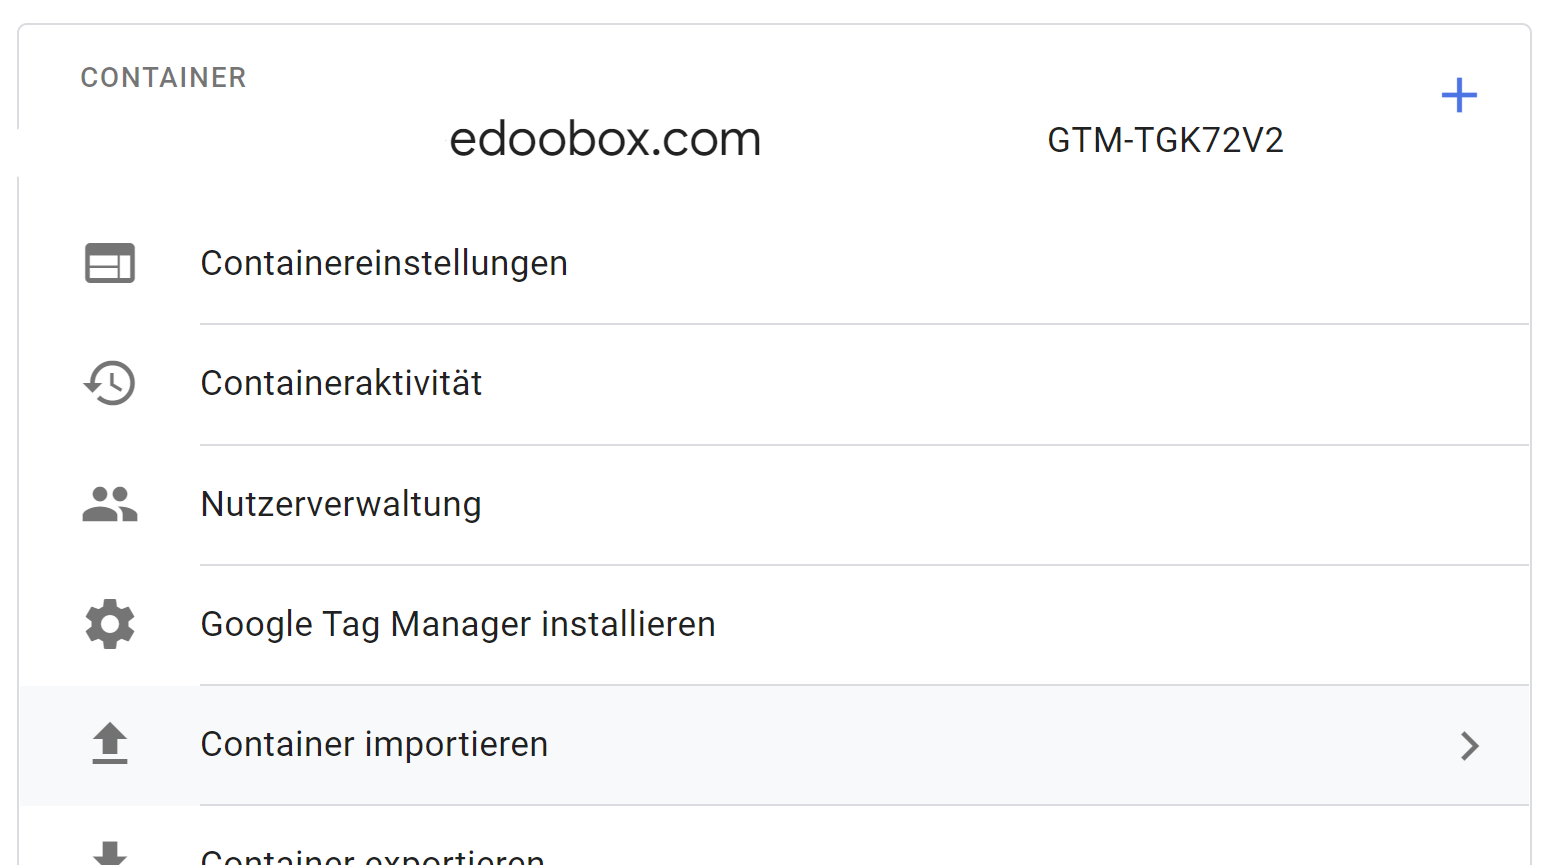
Import JSON container from edoobox into Google Tag Manager.
Insert the container ID in your edoobox settings in the "Google & E-Commerce" area in the field B provided.
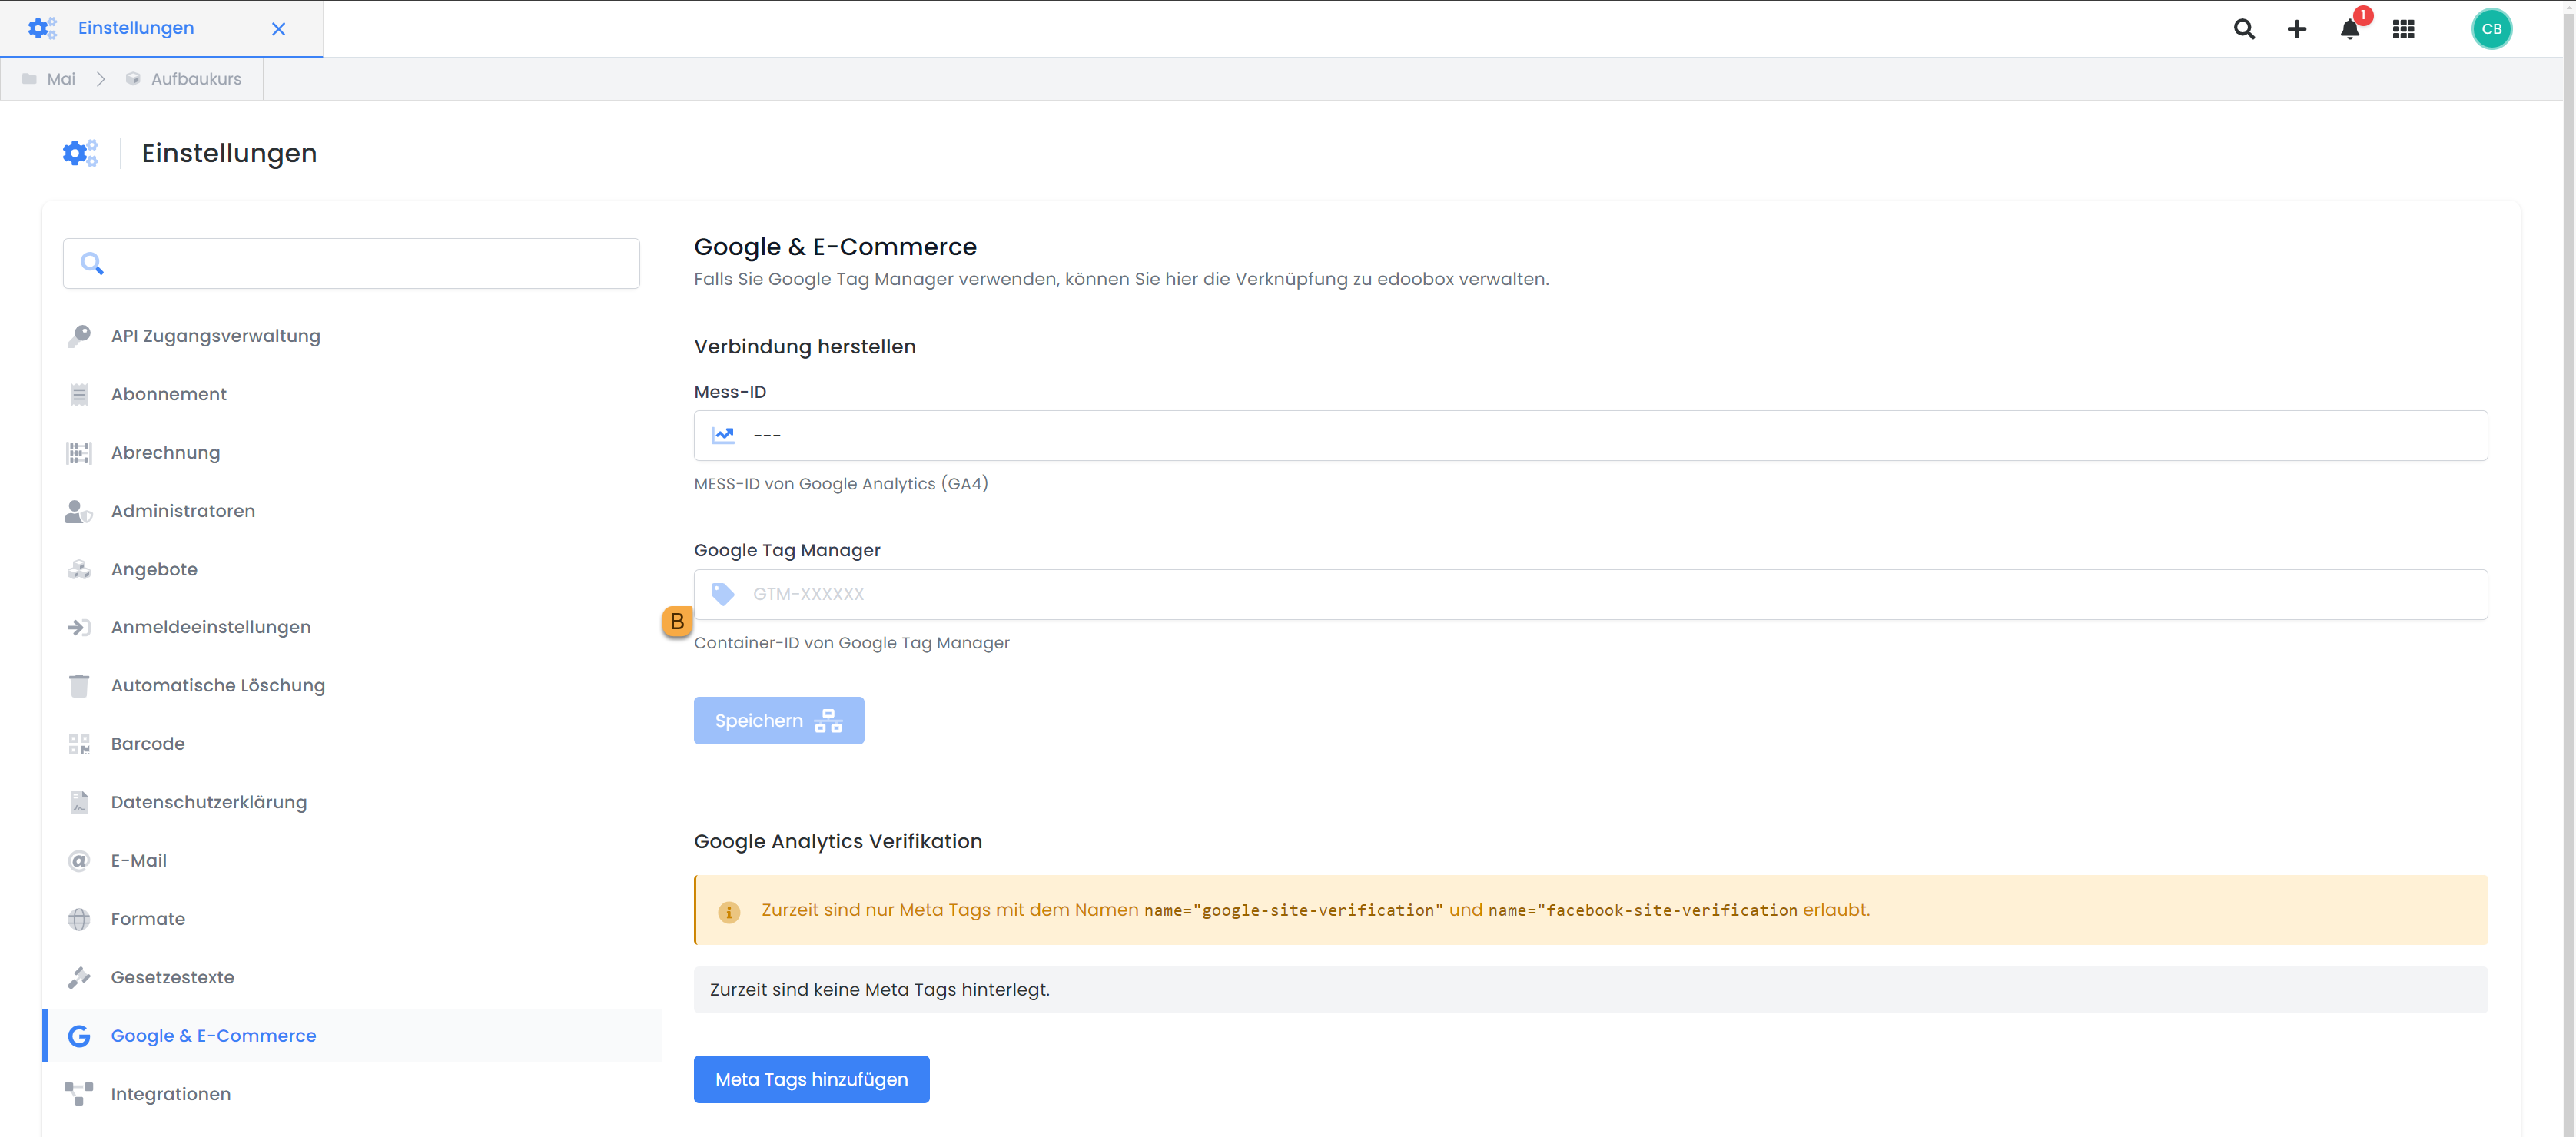
Google & e-commerce settings: Store container ID
6. import JSON file into the Tag Manager
Once everything has been saved, the JSON file can be exported from edoobox.
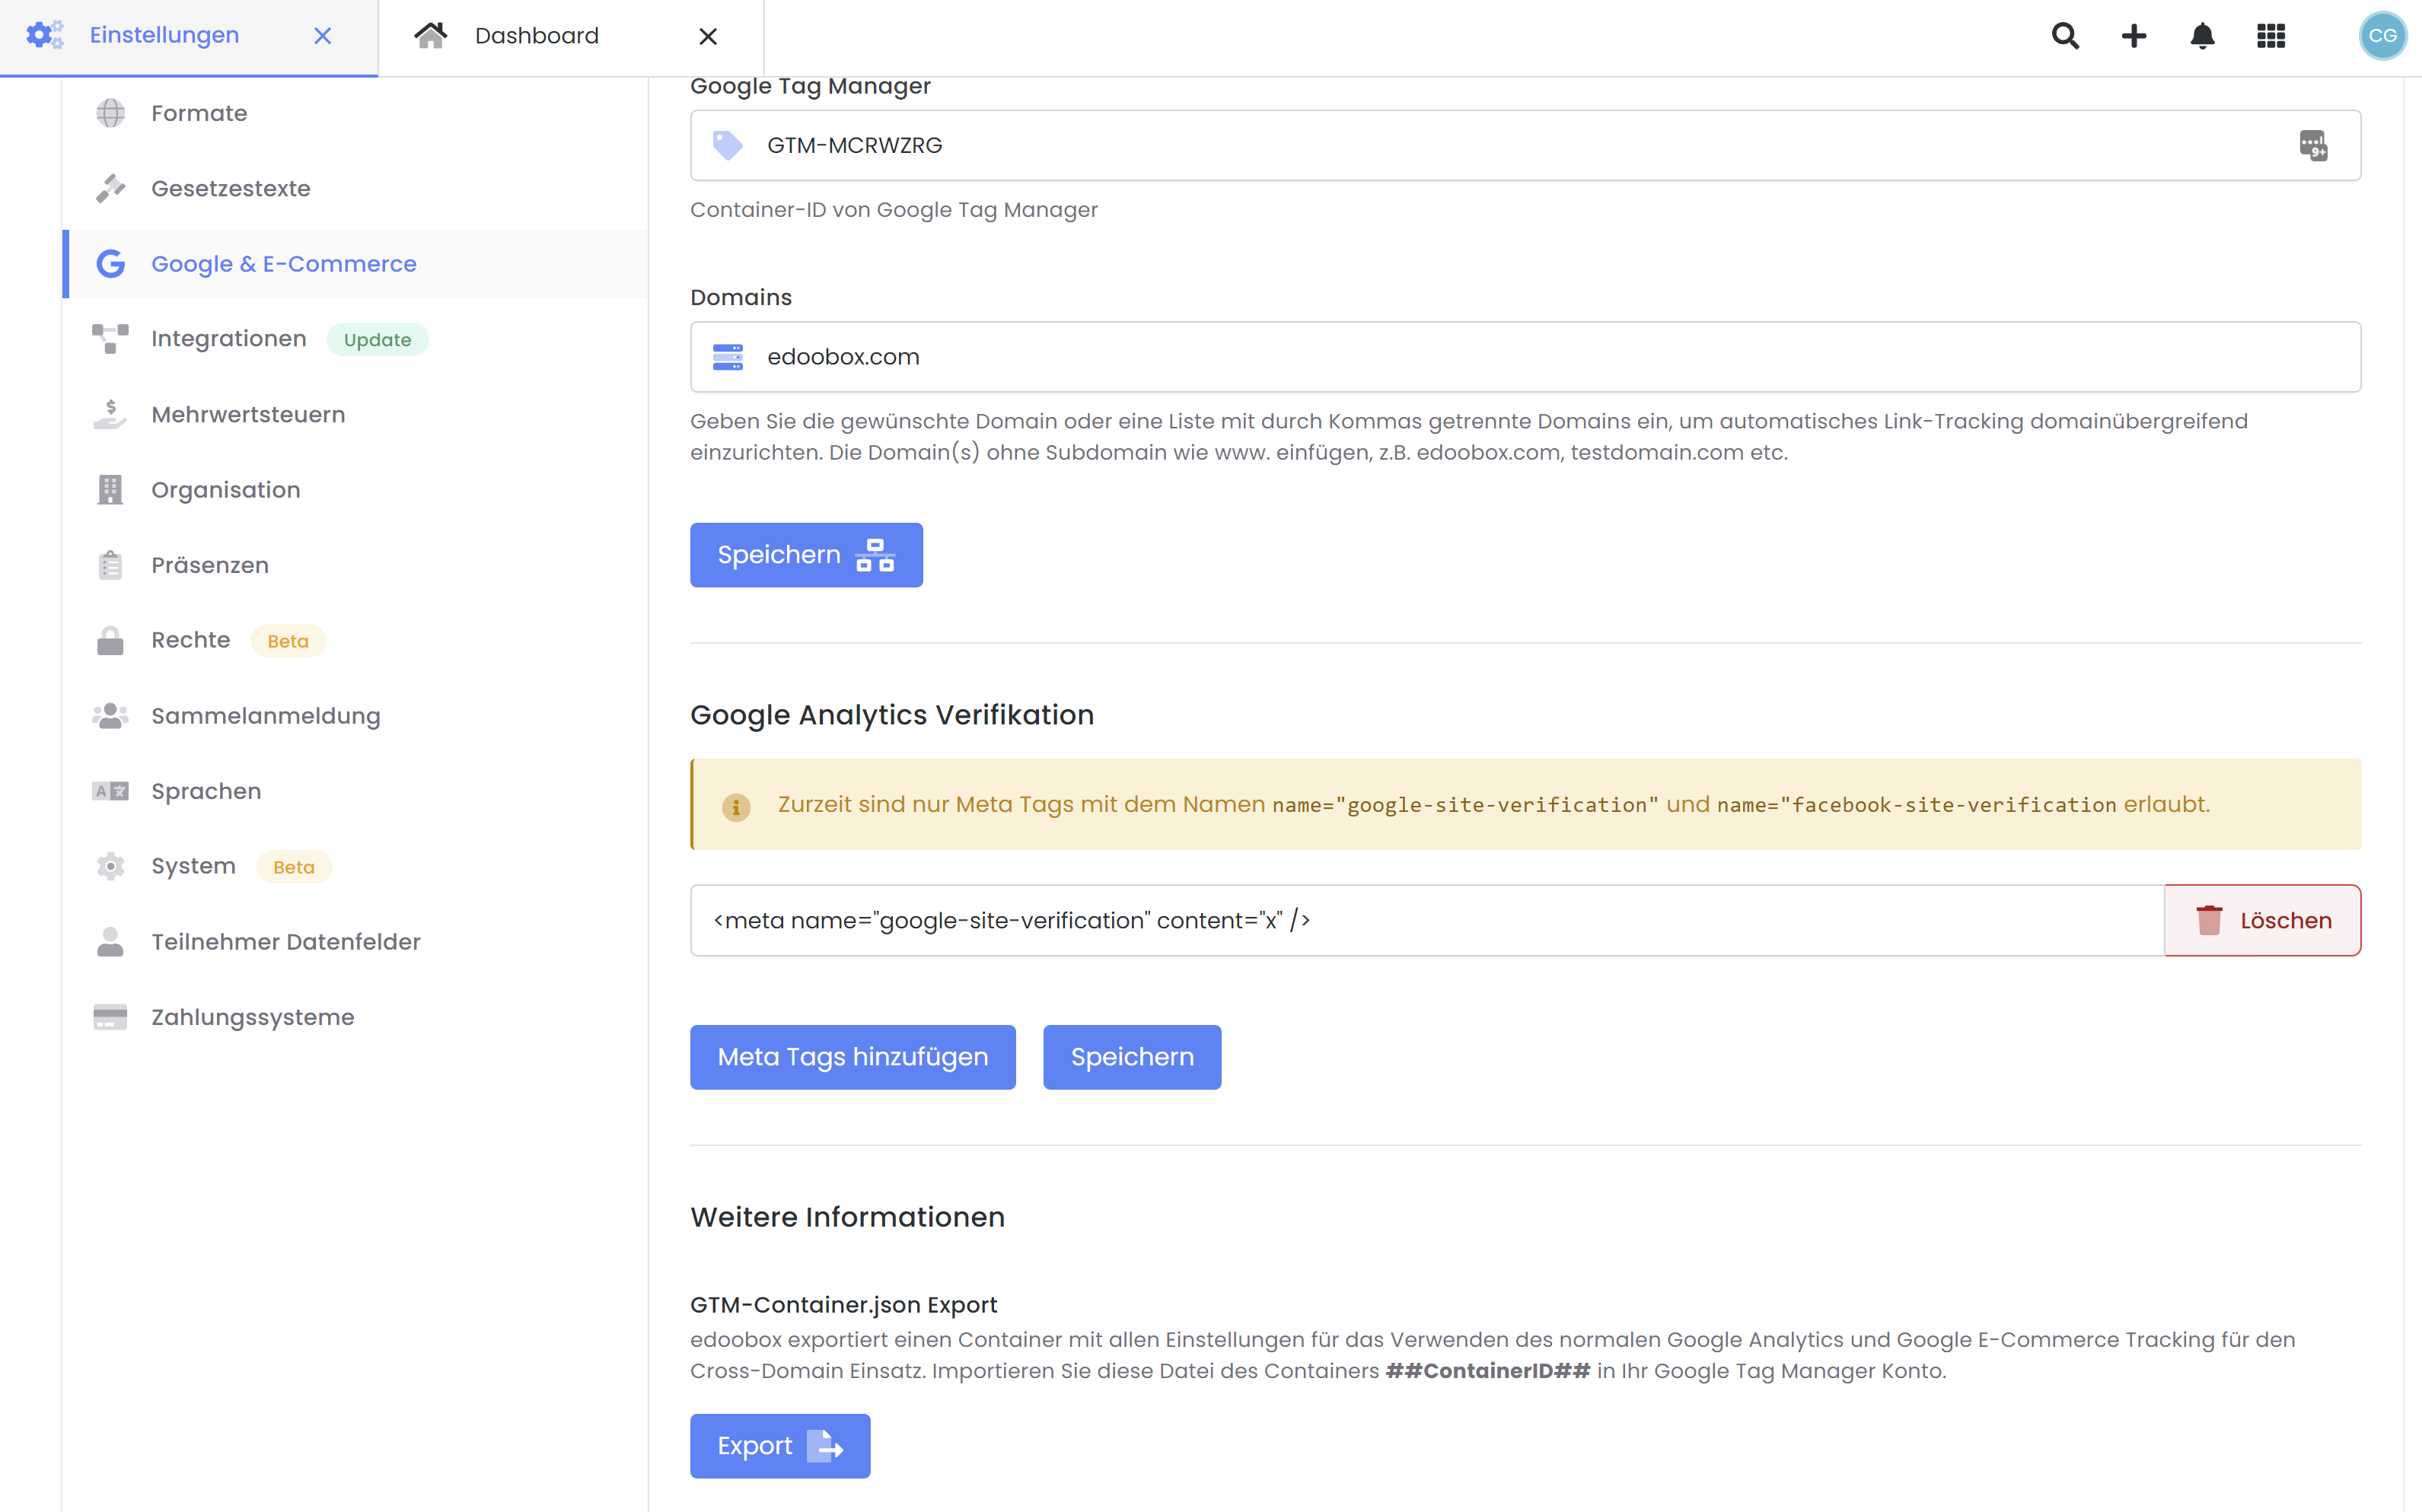
Export JSON file
This file can be imported in the Google Tag Manager under the "MANAGEMENT" tab. Select the desired Google Tag Manager, account and container and click on "Import container".

Select the exported JSON file and leave "Overwrite" active > "Next" > "Confirm"
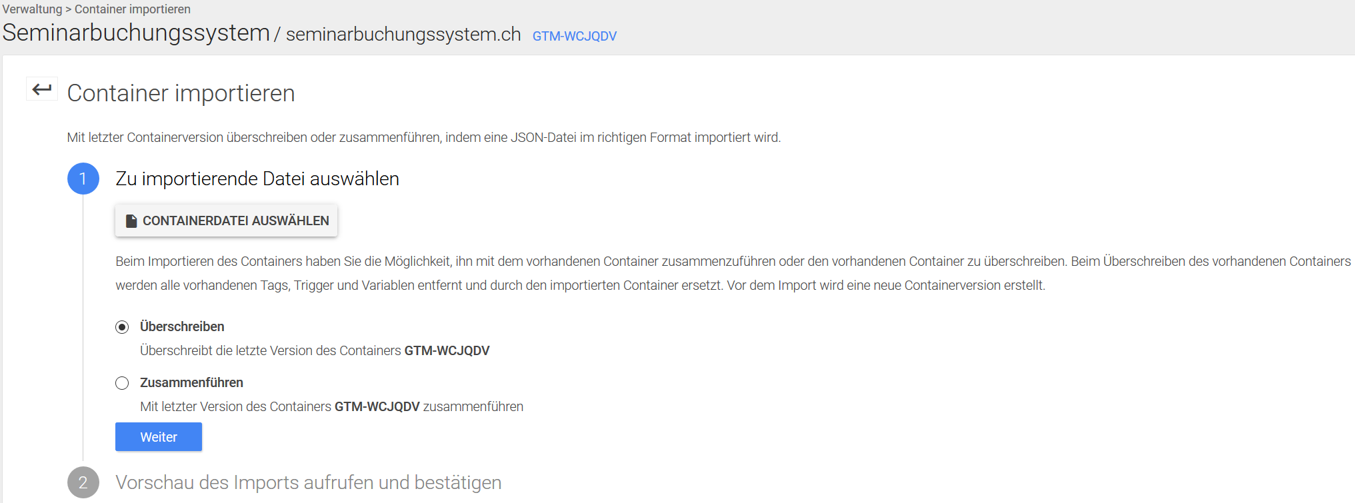
Then "send" the container > "publish" > Done!

Available events which are sent to Google Analytics
view_item_list: This event occurs when the user views an overview page. The "item_list_name" corresponds to the path of the category, whereby the individual categories are separated by a ">".
view_itemThis happens when the user looks at the details of an offer.
view_edoobox_*Various steps from the booking process (templates in the Design Manager) are recorded by events with this pattern.
pricecategoryPrice category templatedeliverablesAdditional services TemplateuserformParticipant form templatemultiofferMulti-offer templatedateDates templateoverviewSummary Overview Template
purchase: On this page the purchase is confirmed and indicated as a conversion.
The following events are available.
purchaseNormal booking completed (standard)purchase_mustpayBooking in MustPay statuspurchase_waitinglistBooking in waiting list mode
Cookie banner tracking example
The following example shows you how cookie banner events can be implemented with edoobox and the Google Tag Manager.
First create a new variable with the name edCookieApproved, with the variable type Custom JavaScript.
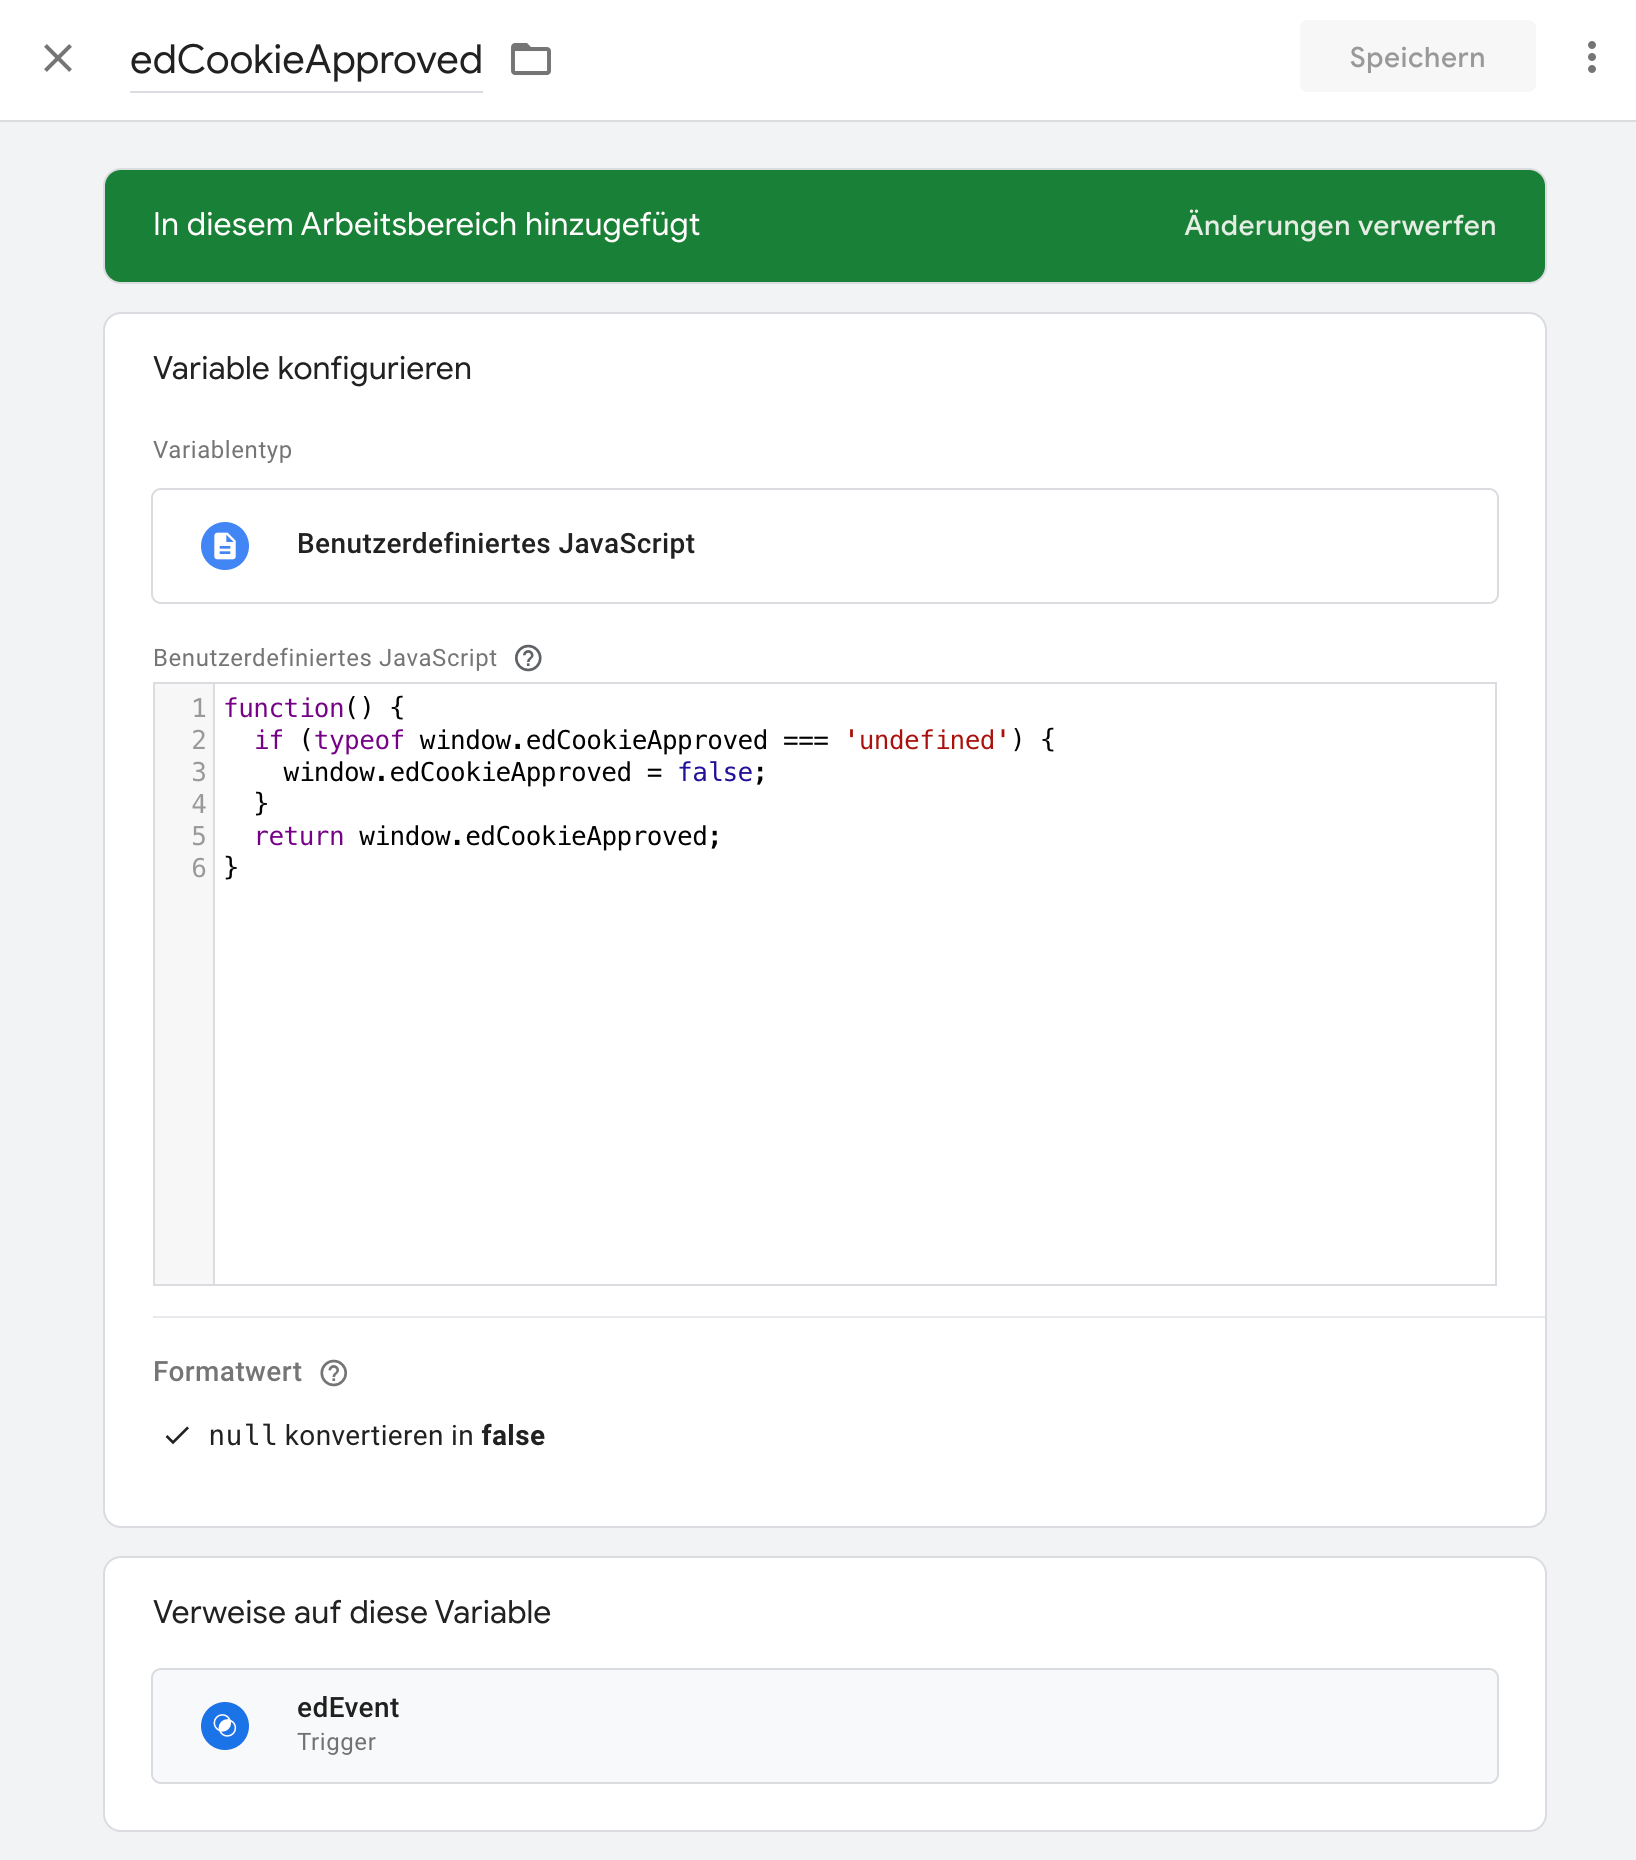
New variable edCookieApproved Create
Insert the following code:
function() {
  if (typeof window.edCookieApproved === 'undefined') {
    window.edCookieApproved = false;
  }
  return window.edCookieApproved;
}
Expand the existing trigger edEvent so that it is only triggered when the variable is set to true is set:
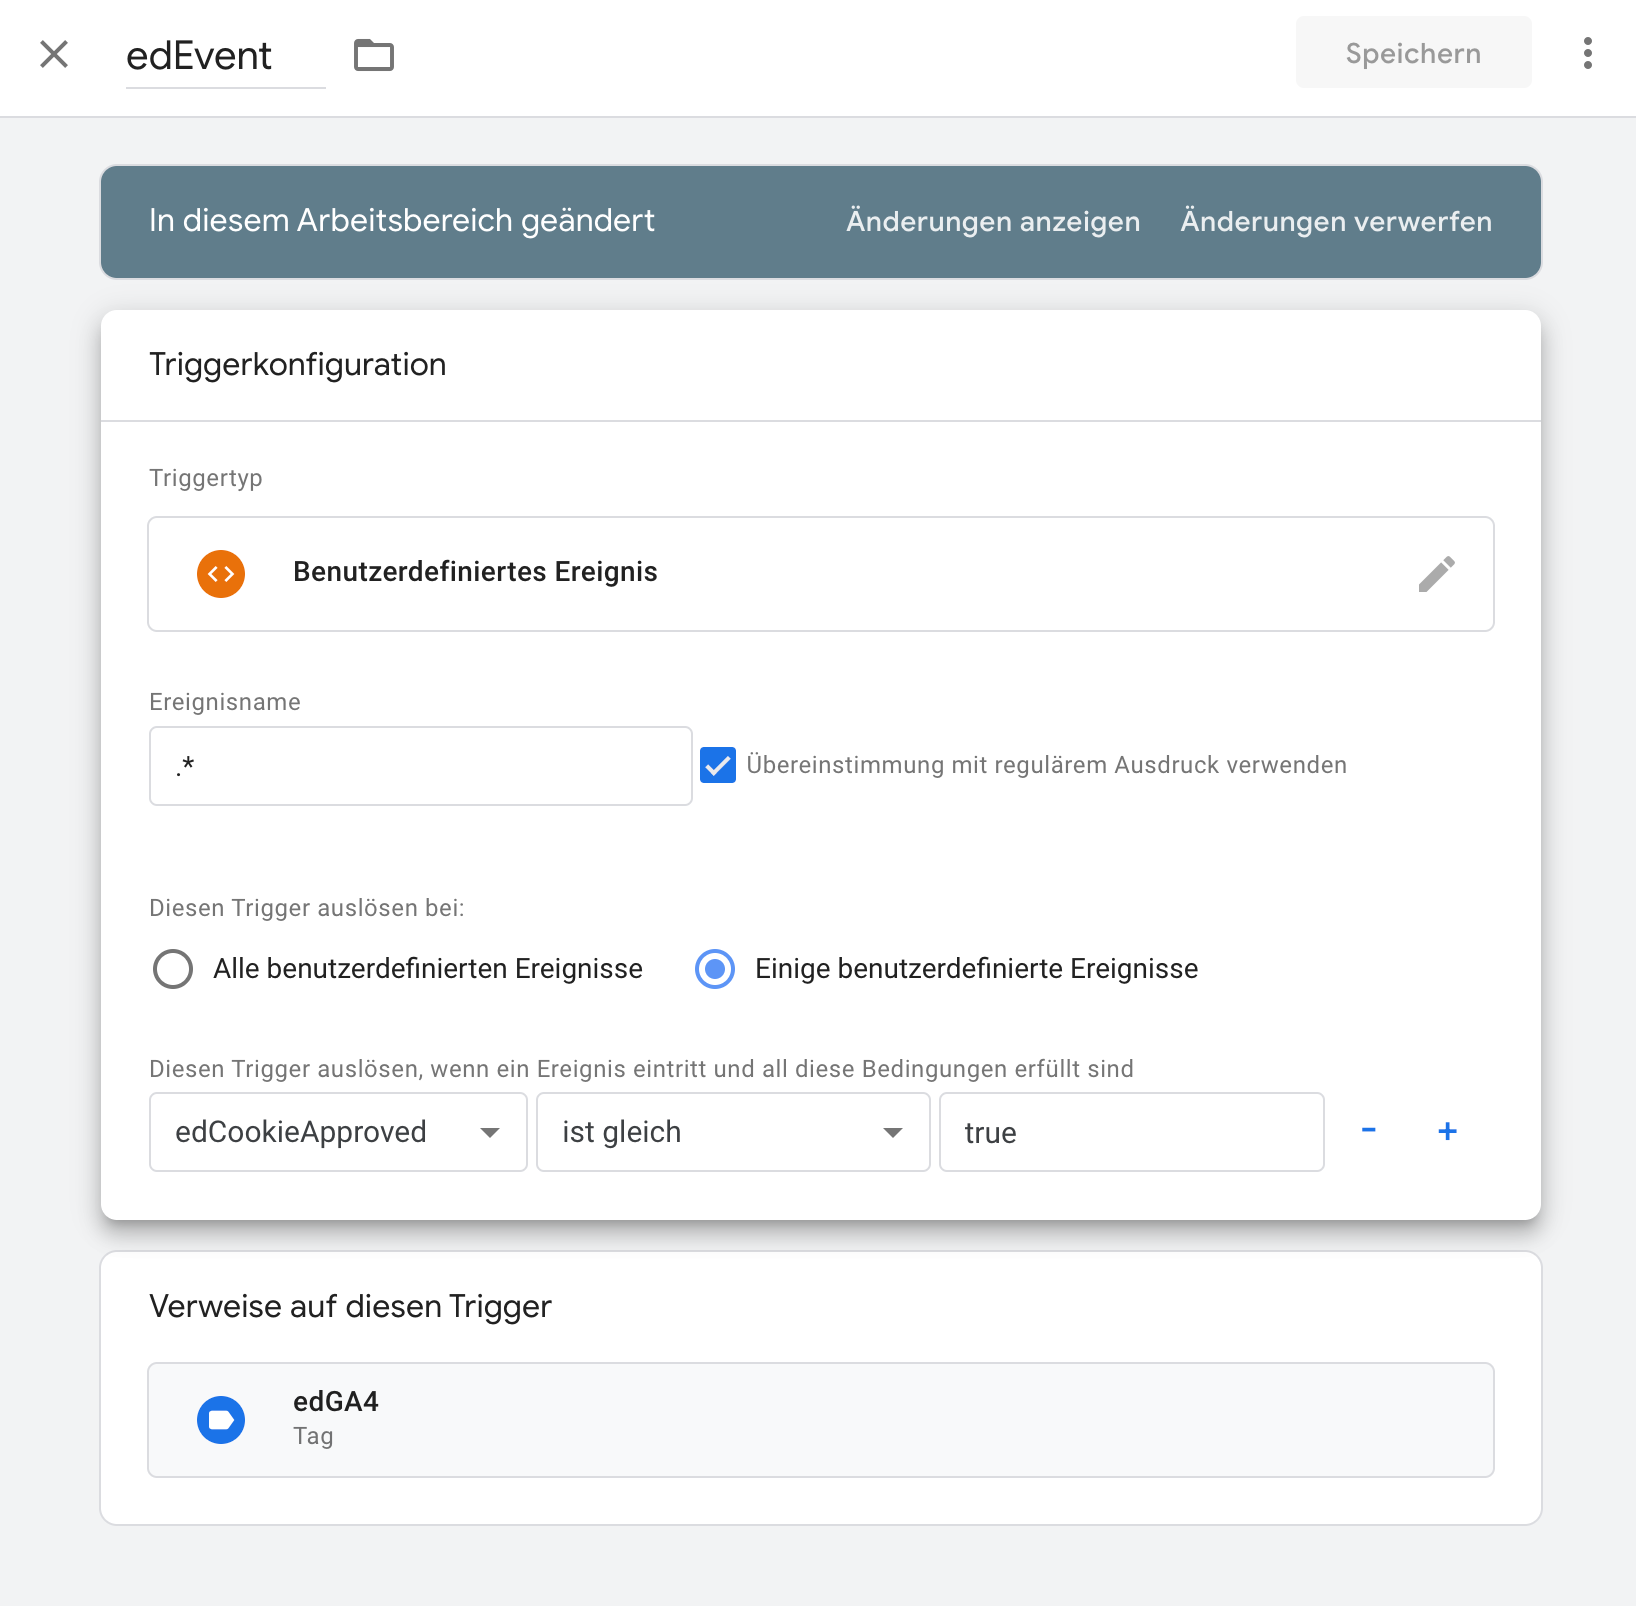
Trigger configuration: edEvent expand
In the next step, create a new trigger for the cookie banner event. If a corresponding trigger already exists, this step can be skipped.
Create a new tag with the name edCookieTag and select the option Custom HTML from.
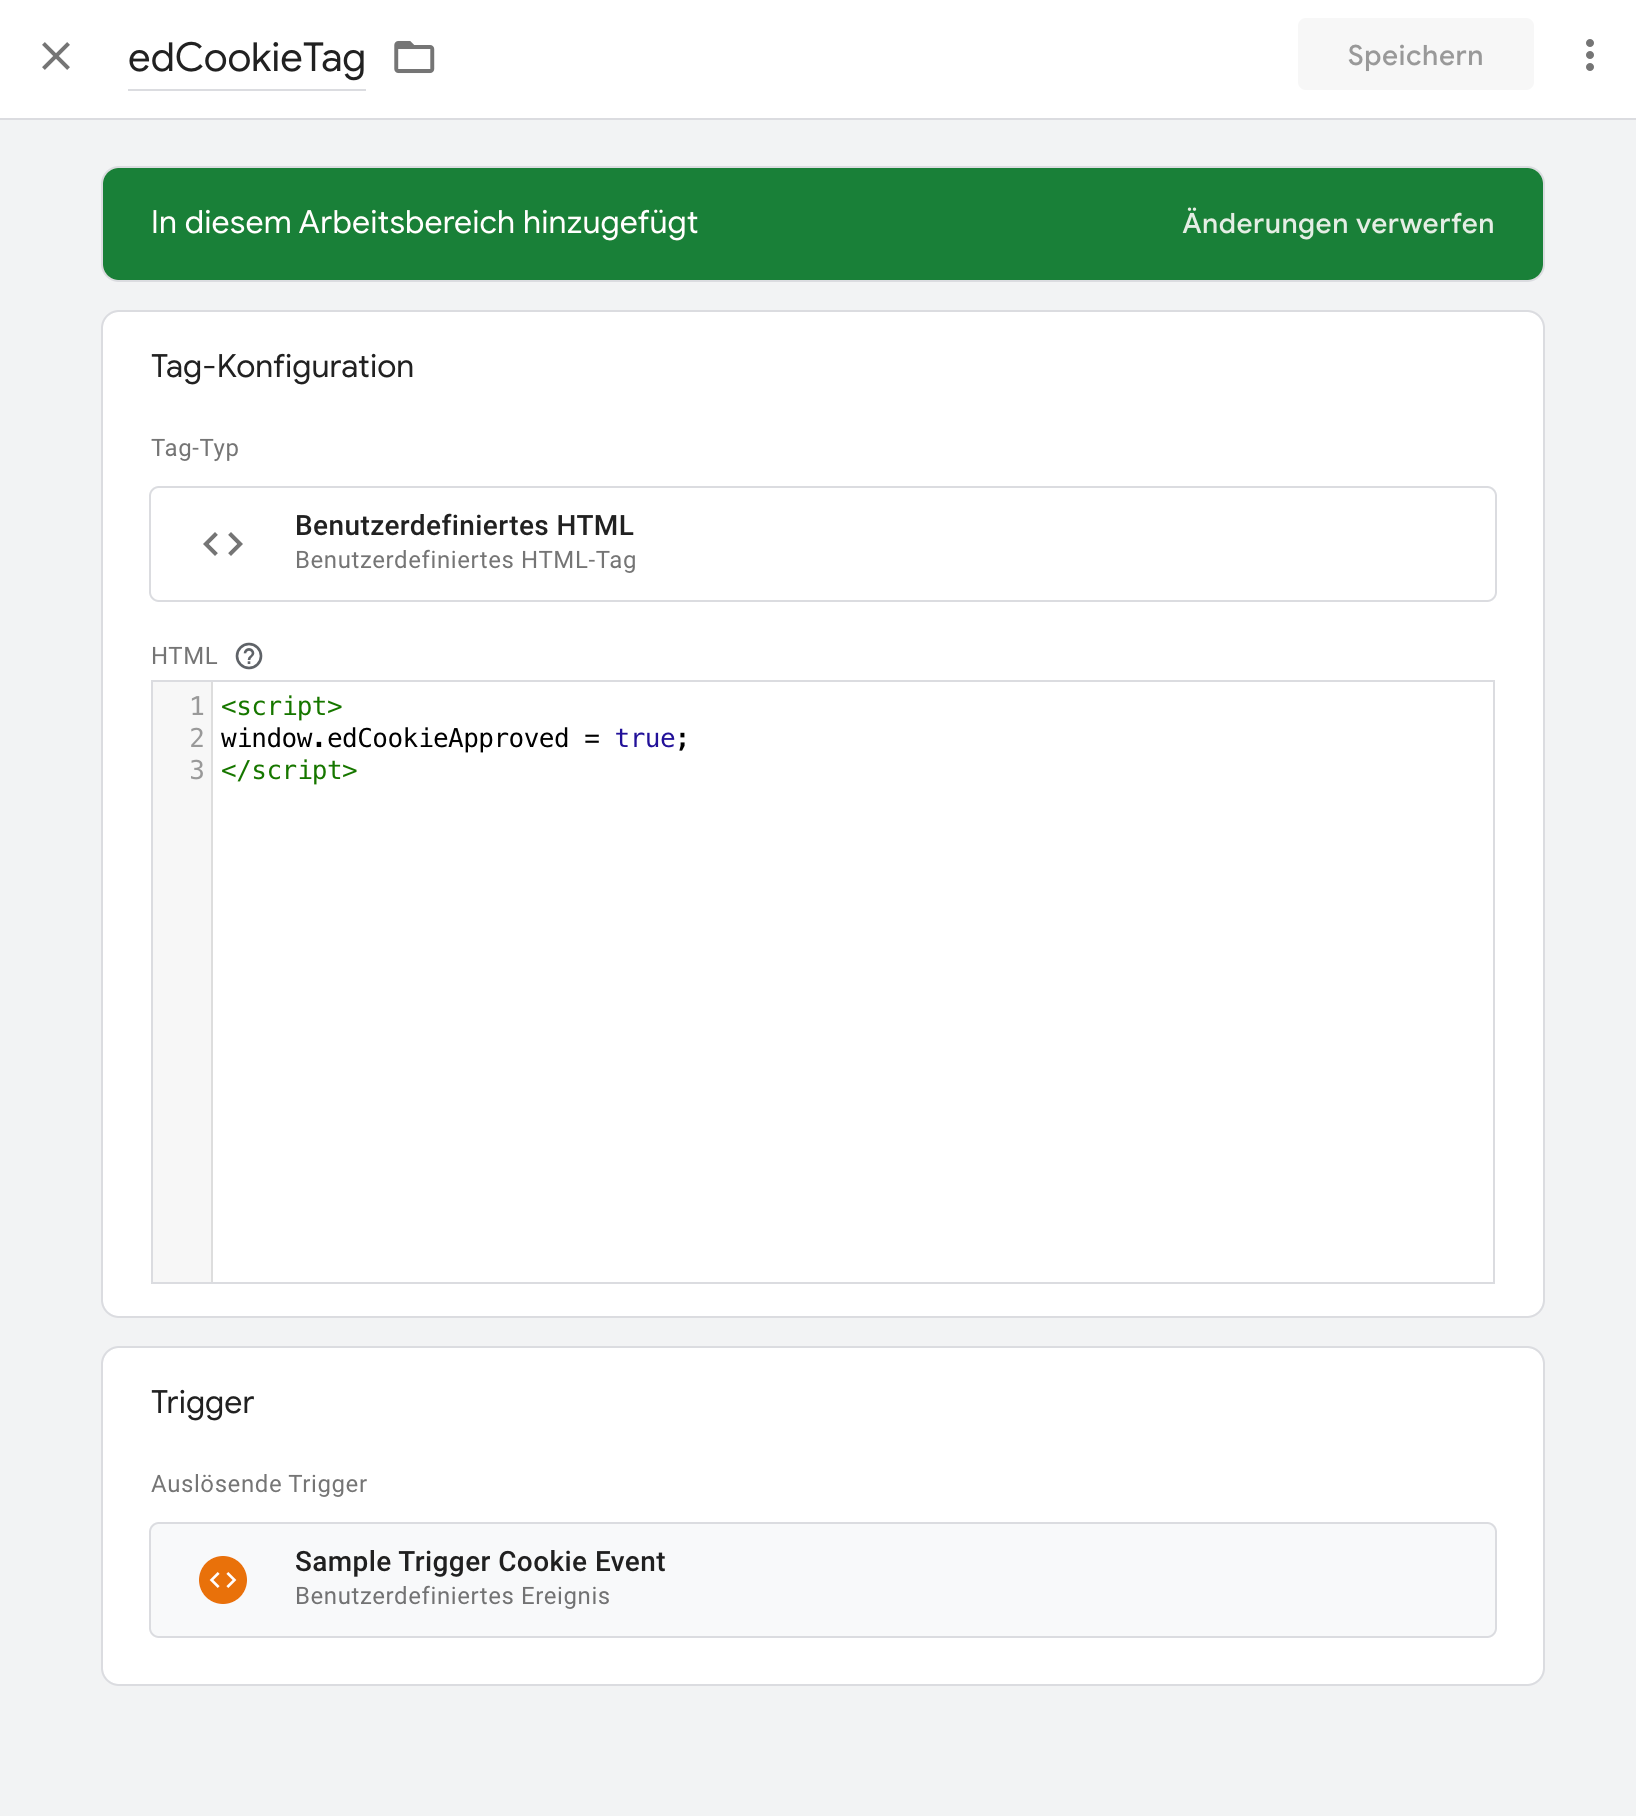
Tag configuration: new tag edCookieTag Create
Insert the following code:
<script>
window.edCookieApproved = true;
</script>
Assign the previously created custom cookie banner event to the newly created tag. This means that events are only sent to Google Analytics if the cookie banner has been accepted by your customers.
Info: Important information on the use of Google Tracking
As soon as you use Google Tag Manager, you must mention this in your privacy policy or imprint.
For security reasons, there is no tracking on the "Payment", "Login" and "Forgotten password" pages in edoobox.
You can obtain support for Google Tag Manager directly from Google Support.
You also have the option of linking Facebook Pixel, LinkedIn Pixel, Google Ads Tracking, Bing Ads Tracking or other services to the Google Tag Manager.
Please note: Message offers are loaded for you
If this message appears, the GTM container is loaded too late on the website or the website where the edoobox plugin or iFrame is integrated does not contain a GTM container.
Related instructions
Keywords for these instructions
Google Tag Manager ¦ Google Analytics ¦ Google Ads ¦ Bing Ads ¦ Facebook Pixel ¦ Conversion
