Import Assistant
Do you have existing customer data that you wish to migrate to edoobox? The Import Assistant allows you to easily import participant data into your edoobox account via CSV file. You have the option to either import the customer data exclusively into the customer table or directly book the customers into an offering.
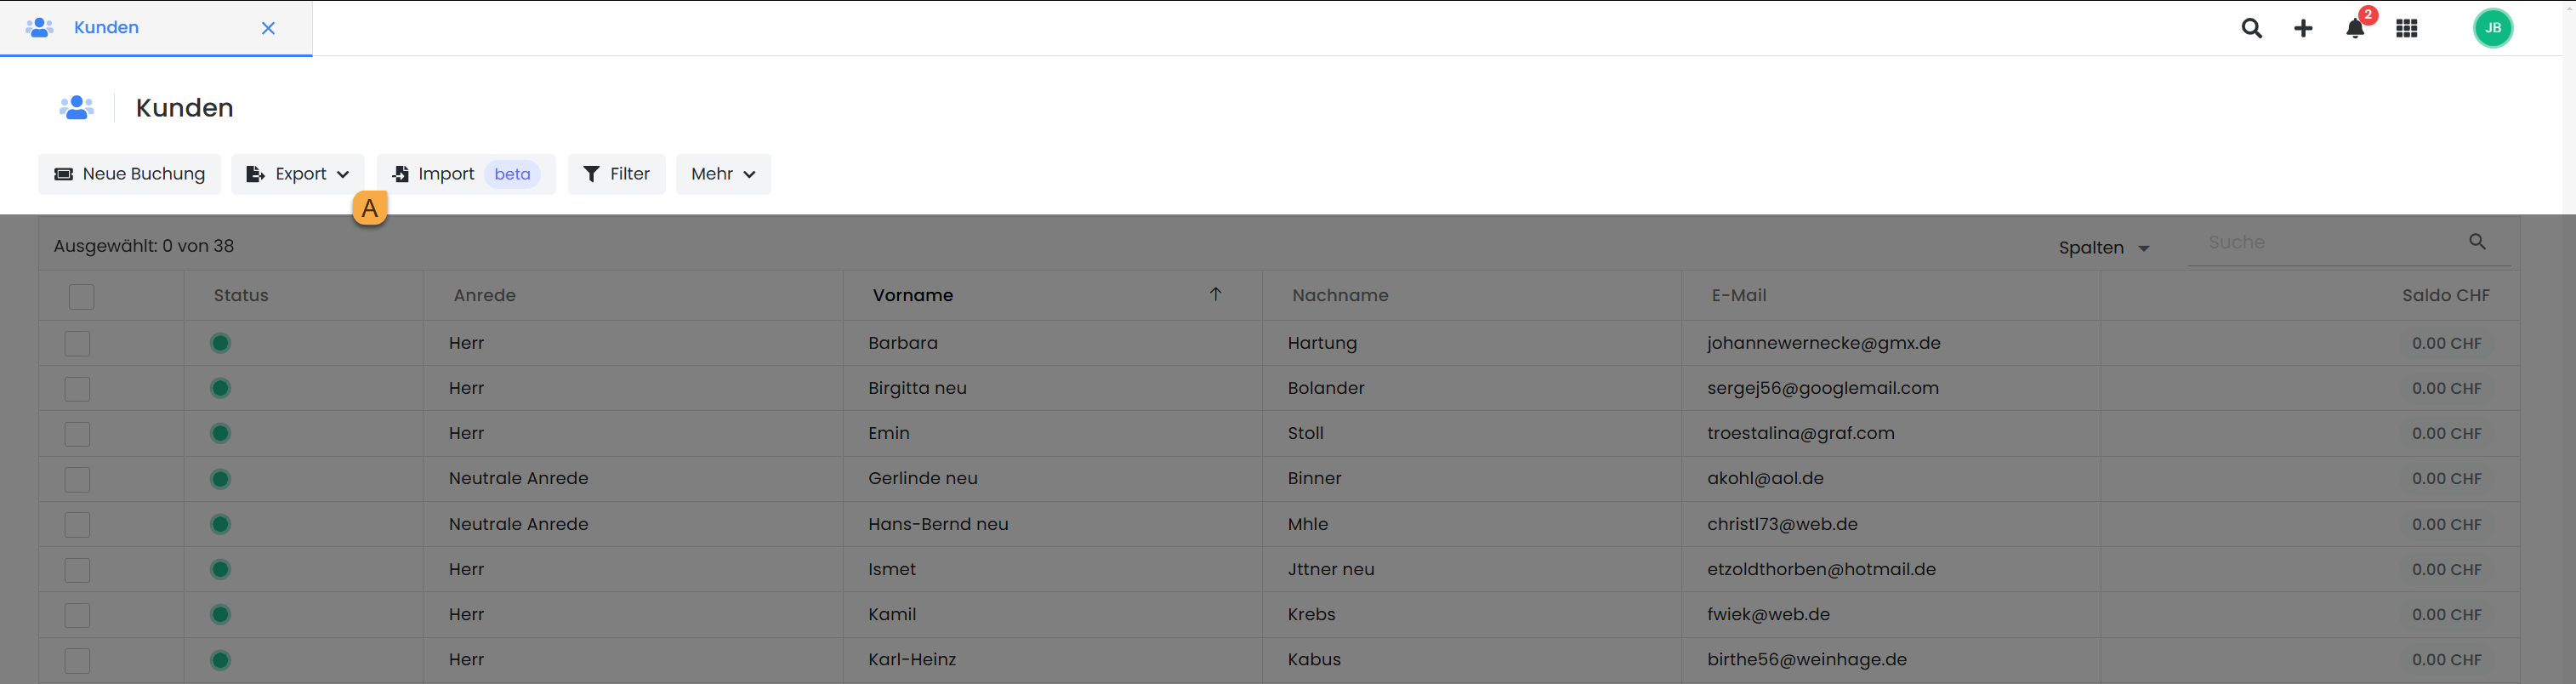
You can access the Import Assistant by navigating to the App Menu and opening the Customer Table . Above the table, you will find an "Import" button A, which allows you to launch the Import Assistant.
File Selection
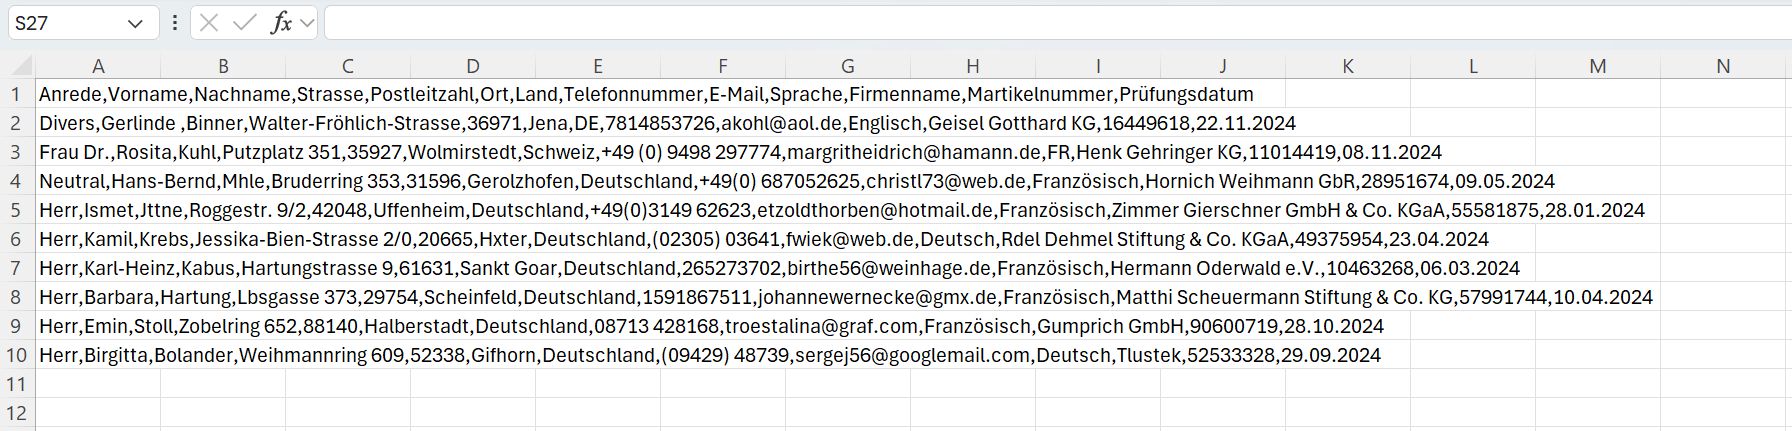
Participant data must be provided in a CSV file to be uploaded via the Import Assistant. The first row of the file must contain column headers that correspond to the participant data fields intended for import.
Important: Participant Data Fields
To successfully import all desired participant data fields into edoobox, ensure that all participant data fields are pre-configured and active within your edoobox account. Further details are available here: Participant Data Fields
Once all participant data fields are configured and activated in edoobox, and the file is in CSV format, it can be uploaded as the initial step.

Settings
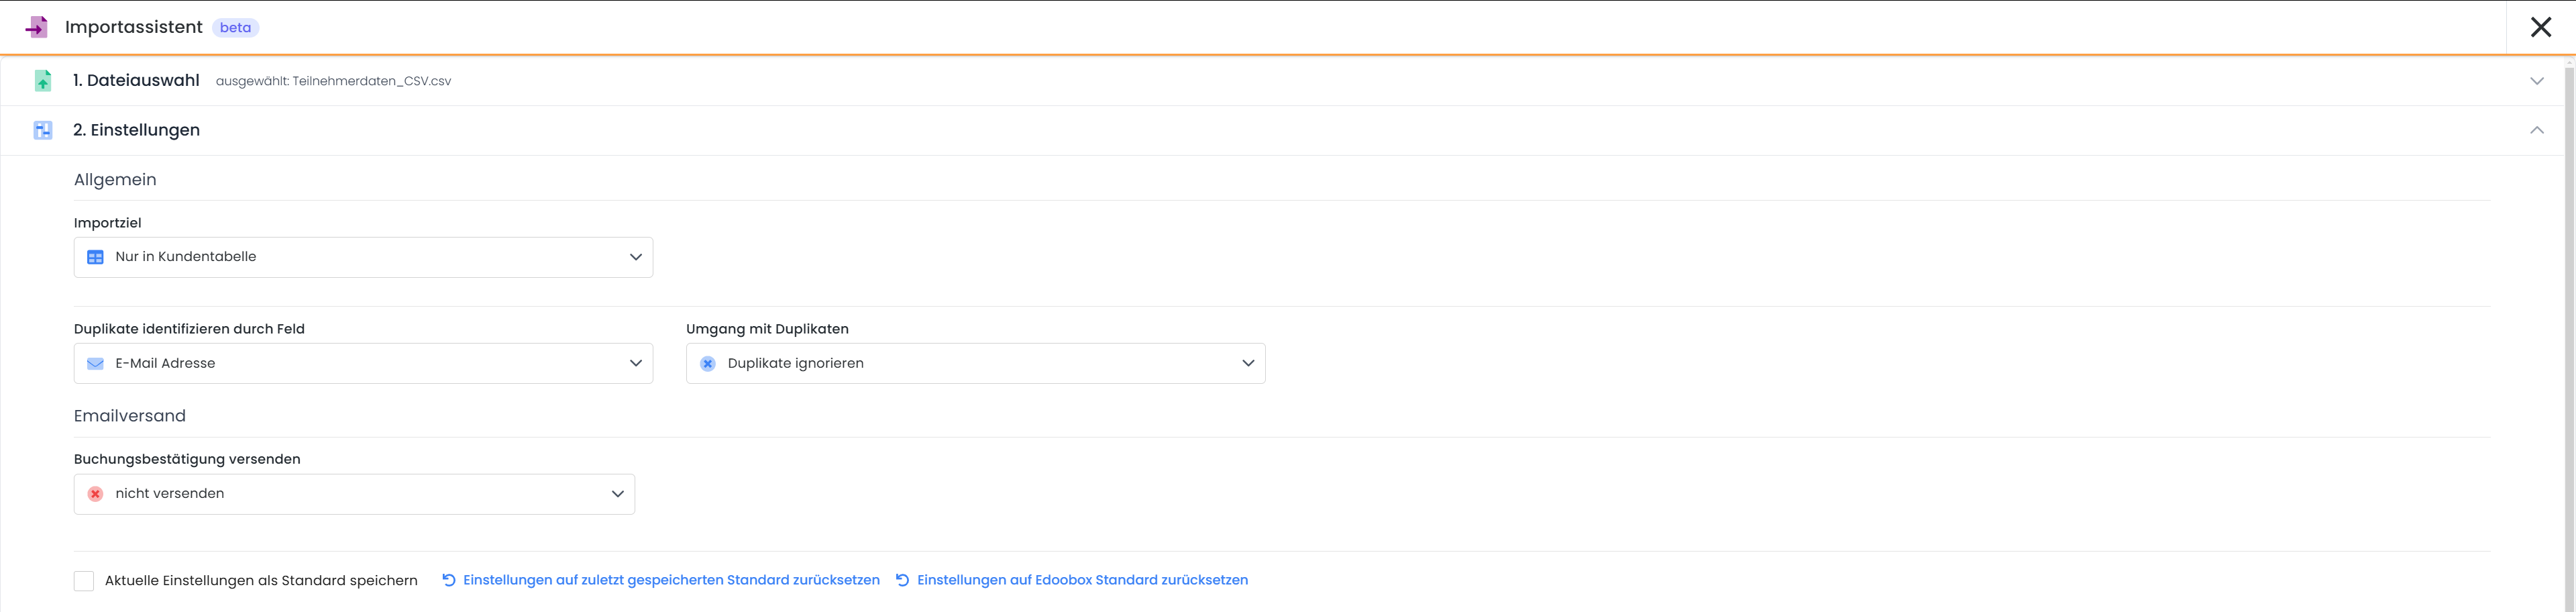
In the next step, the import settings are configured. Here, you can specify whether participant data should only be transferred to the customer table or directly entered into a specific offering.
Import Destination: Customer Table
To prevent duplicate entries, the import wizard provides duplicate detection. You can specify which field (e.g., email address) should be used to identify existing entries. Depending on the configuration, duplicates can either be ignored, existing data replaced, or data merged.
By default, duplicates within the dataset are not automatically detected. The import wizard compares the data with existing entries in edoobox, identifying potential duplicates between the current data inventory and the newly imported records. If the 'Merge Data' option is selected, changes in the duplicates are discarded, and the data already existing in the account is retained. Conversely, if the 'Replace Existing Data' option is chosen, the existing data in edoobox will be overwritten by the imported values.
Import Destination: Offering
If participants are booked into an offer, Offer B and the desired price category must also be selected. In addition to the offer and price category, you can also select the booking type D, i.e., the list to which the participants should be booked. A distinction is made here between the participant list (Import to “Booking”), the waiting list (Import to “Waiting List”), and the inquiry list (Import to “Inquiry List”).
If the import destination is a quote rather than just the customer table, the settings for handling duplicates include an additional option: "Handling of entries for duplicates E." Here, you can choose between the two options: "Do not create an additional entry" and "Create an additional entry."
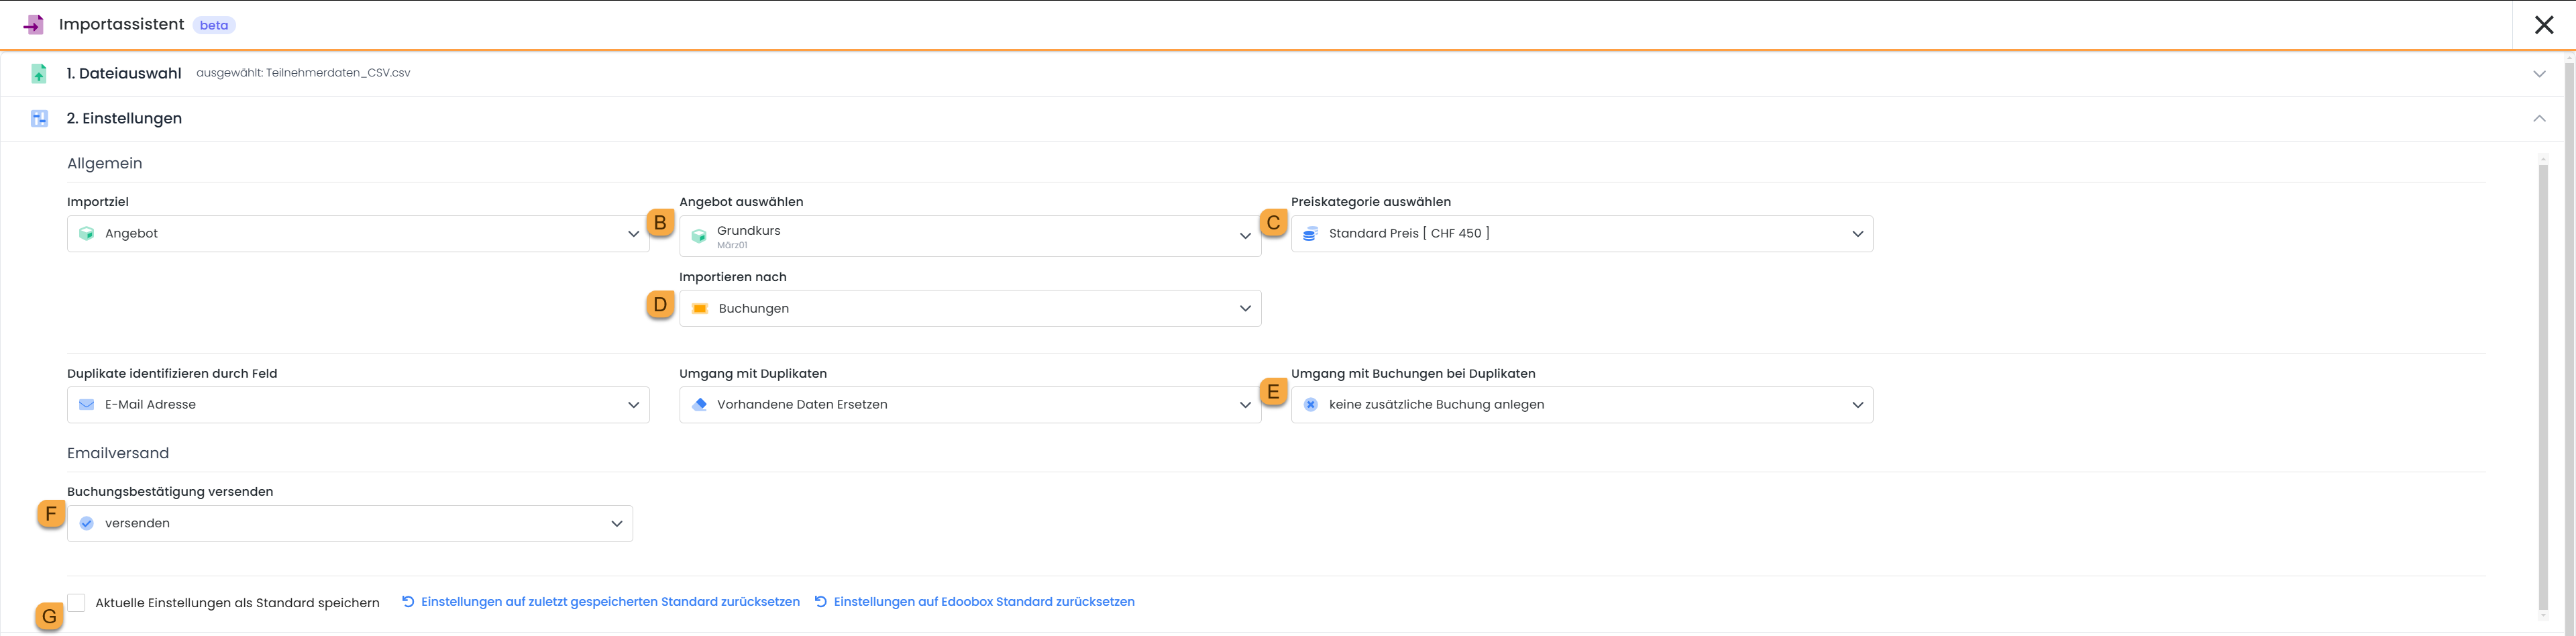
Additionally, there is an option to send a booking confirmation via email F to the imported participants or to deactivate this notification. If this option is active, all participants will receive a booking confirmation email for the selected offering upon import into edoobox and the respective offering.
To expedite future imports, the current settings can be saved as a default G.
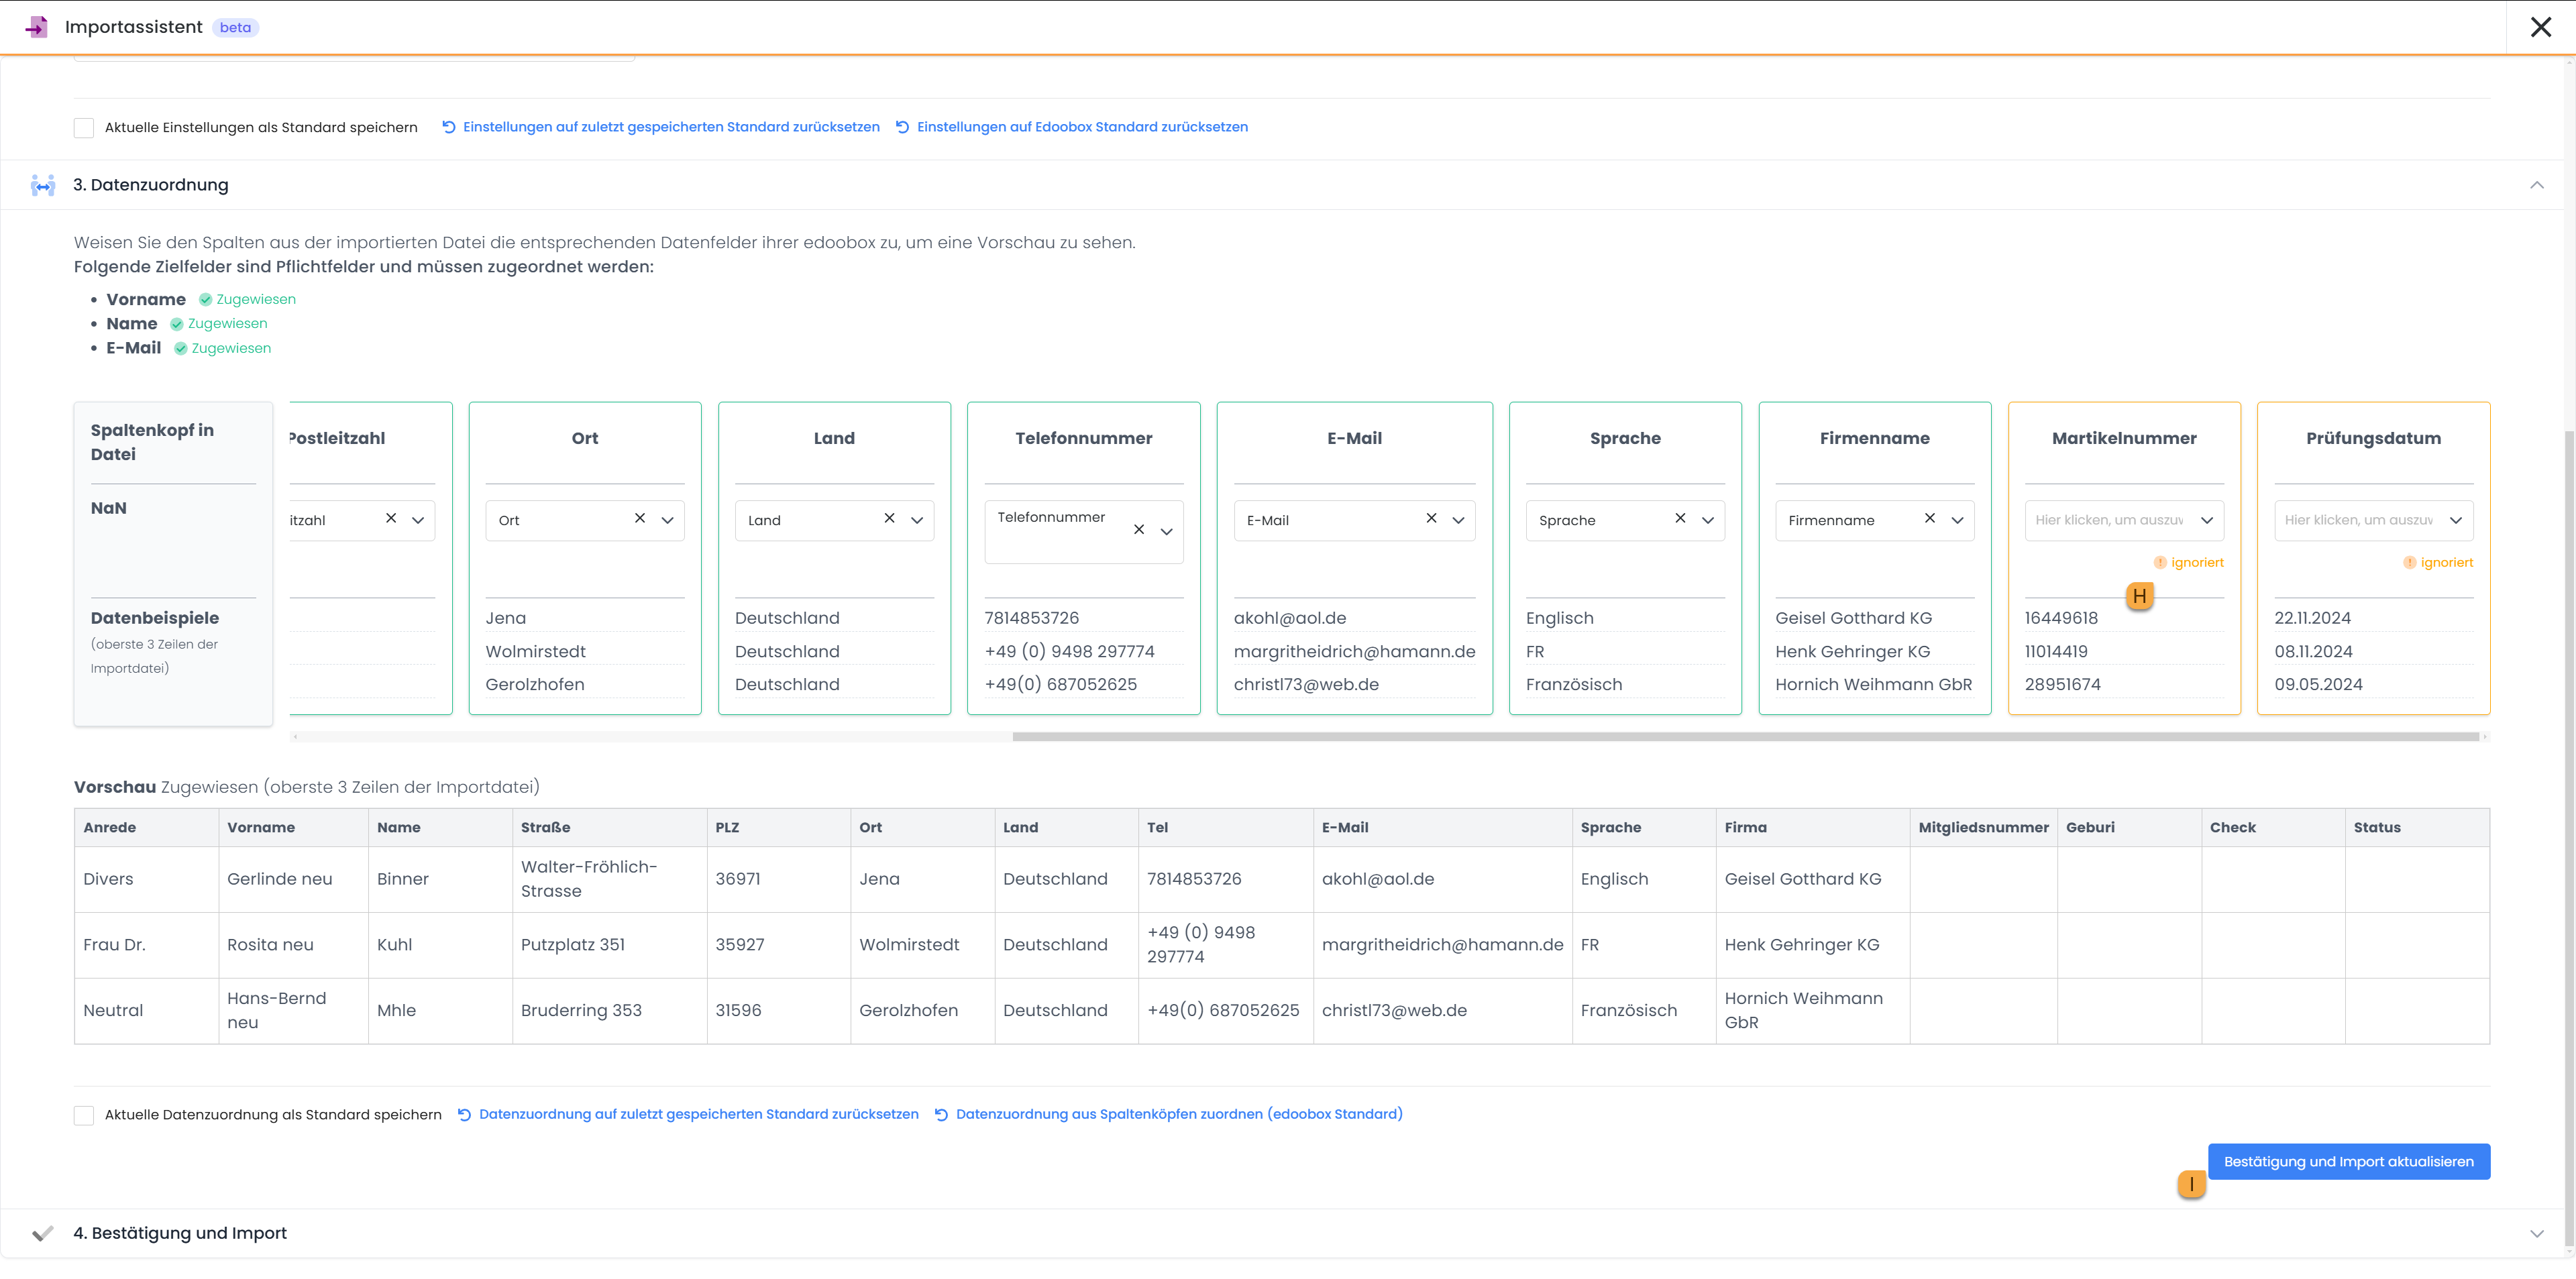
Data Mapping
The third step involves data mapping. Here, the import wizard displays a preview of the imported data and maps the columns of the CSV file to the corresponding data fields in edoobox. Mandatory fields such as first name, last name, and email must be assigned for the import to be successful. If columns are not automatically recognized, they can be manually adjusted. If no participant data field is selected, the corresponding column will be ignored H and not imported. A preview table showing the first rows of the file helps to verify the mapping and identify potential errors early on.
Here too, there is an option to save the settings. This is particularly useful as participant data fields will not need to be manually reassigned for future imports, thereby making the import process more efficient and faster.
Once all columns have been assigned, click the "Confirm and Update Import" button I to proceed to the final step: the import.
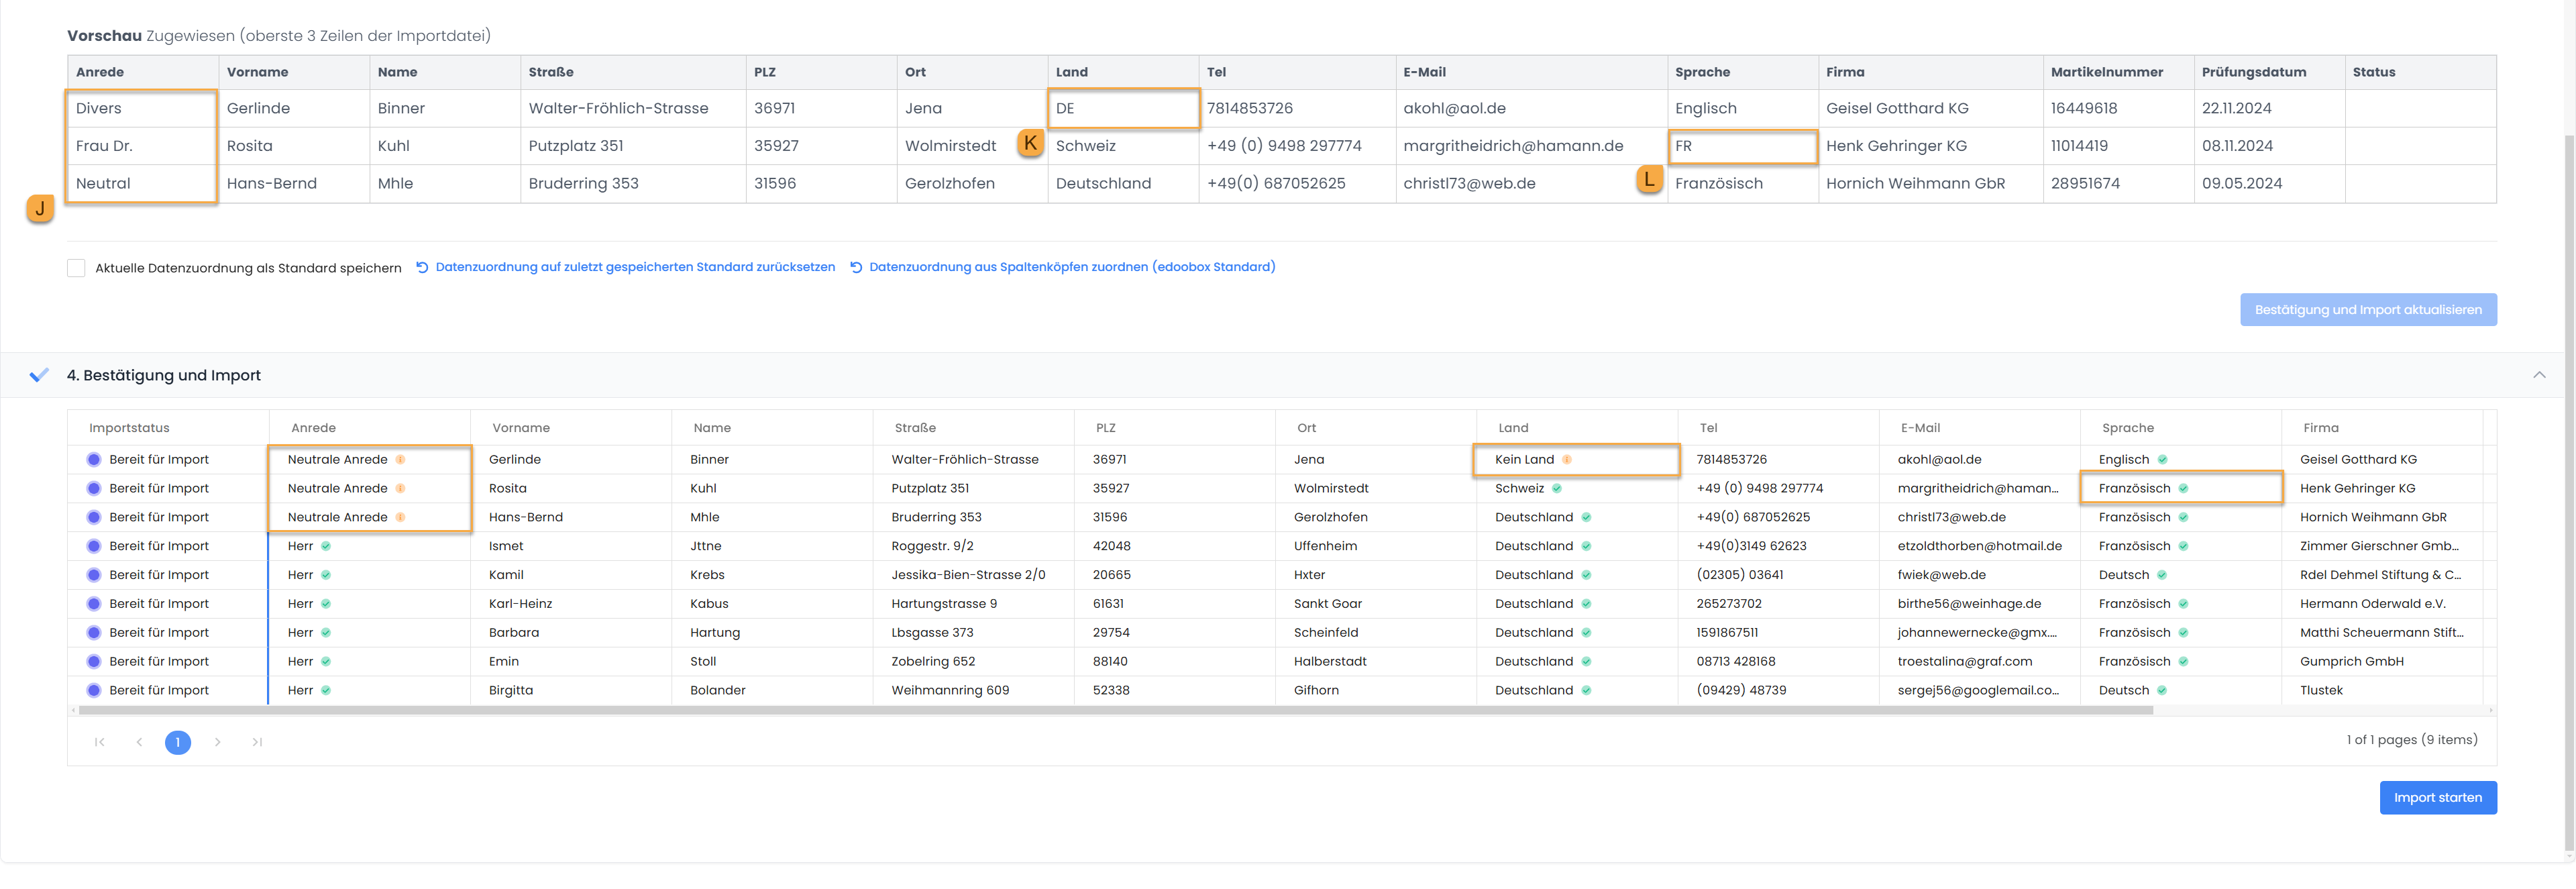
Confirmation and Import
The fourth step displays an overview of all data to be imported. Here, you have the opportunity to identify potential errors before the final import.
Special attention should be paid to the columns Salutation, Country, and Language, as specific rules apply here:
-
Salutation: If the salutation is not specified as "Ms. " or "Mr.", the default "Neutral" salutation is used automatically. This also applies to entries with titles such as "Dr." or other designations that are not explicitly recognizable as "Ms." or "Mr." J.
-
Country: The country must be entered in full, as abbreviations such as "DE" for Germany are not recognized. If an abbreviation is used, the field will remain blank and may need to be filled in manually later.
-
Language: The language can be specified either in full or as an abbreviation. For example, "French" is recognized , but "FR " is also accepted as a valid abbreviation.
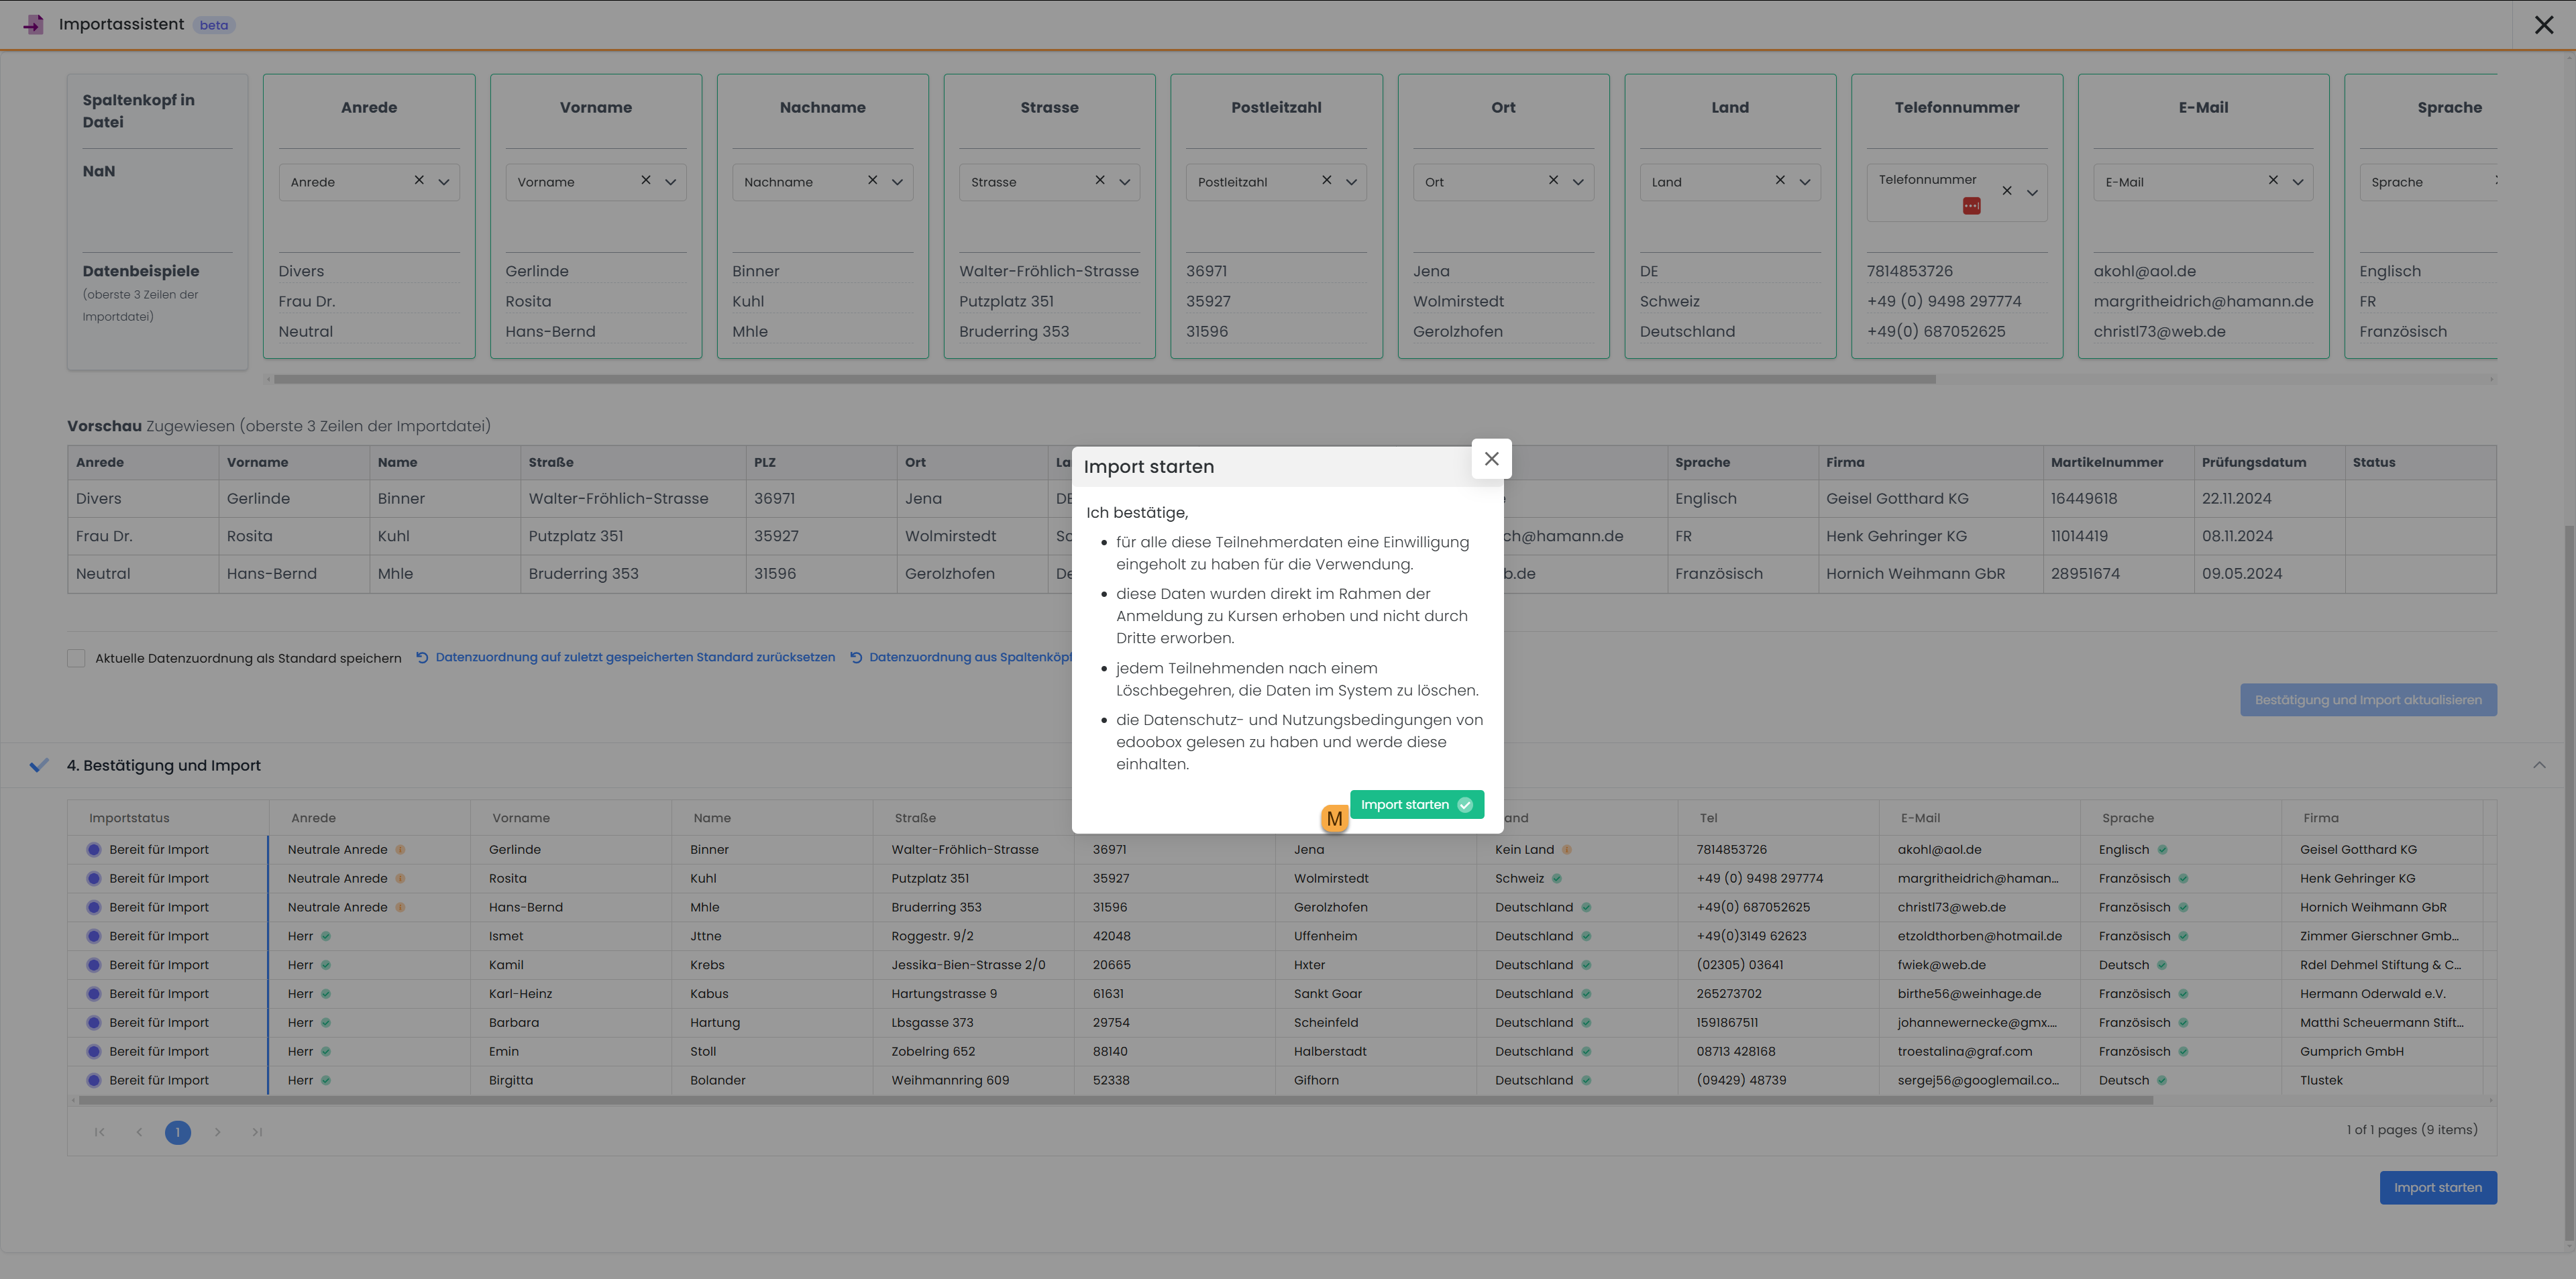
Before the import begins, a final data confirmation is required (after clicking "Start Import"). To ensure data protection, it must be confirmed that participants have given their consent for data usage, that the data was not acquired from third-party sources, and that edoobox's data protection and terms of use are complied with.
Once all settings have been reviewed, the import process can be completed by clicking "Start Import" M. Subsequently, the participant data will either be stored in the customer table or directly booked into the selected offering.
Related Guides
Keywords for this guide
Customers ¦ Participants ¦ Participant Data ¦ Import ¦ CSV