With location-based email tasks, automated email notifications can be directly assigned to a specific location. This allows external service providers such as catering services, technical partners, or reception staff to be automatically informed about upcoming courses at a particular location.
This ensures that all relevant information is sent out in a timely manner, for example, an overview of courses taking place at a specific location in the upcoming week.
Create Email Task for a Location
Proceed as follows to create a location-based email task:
-
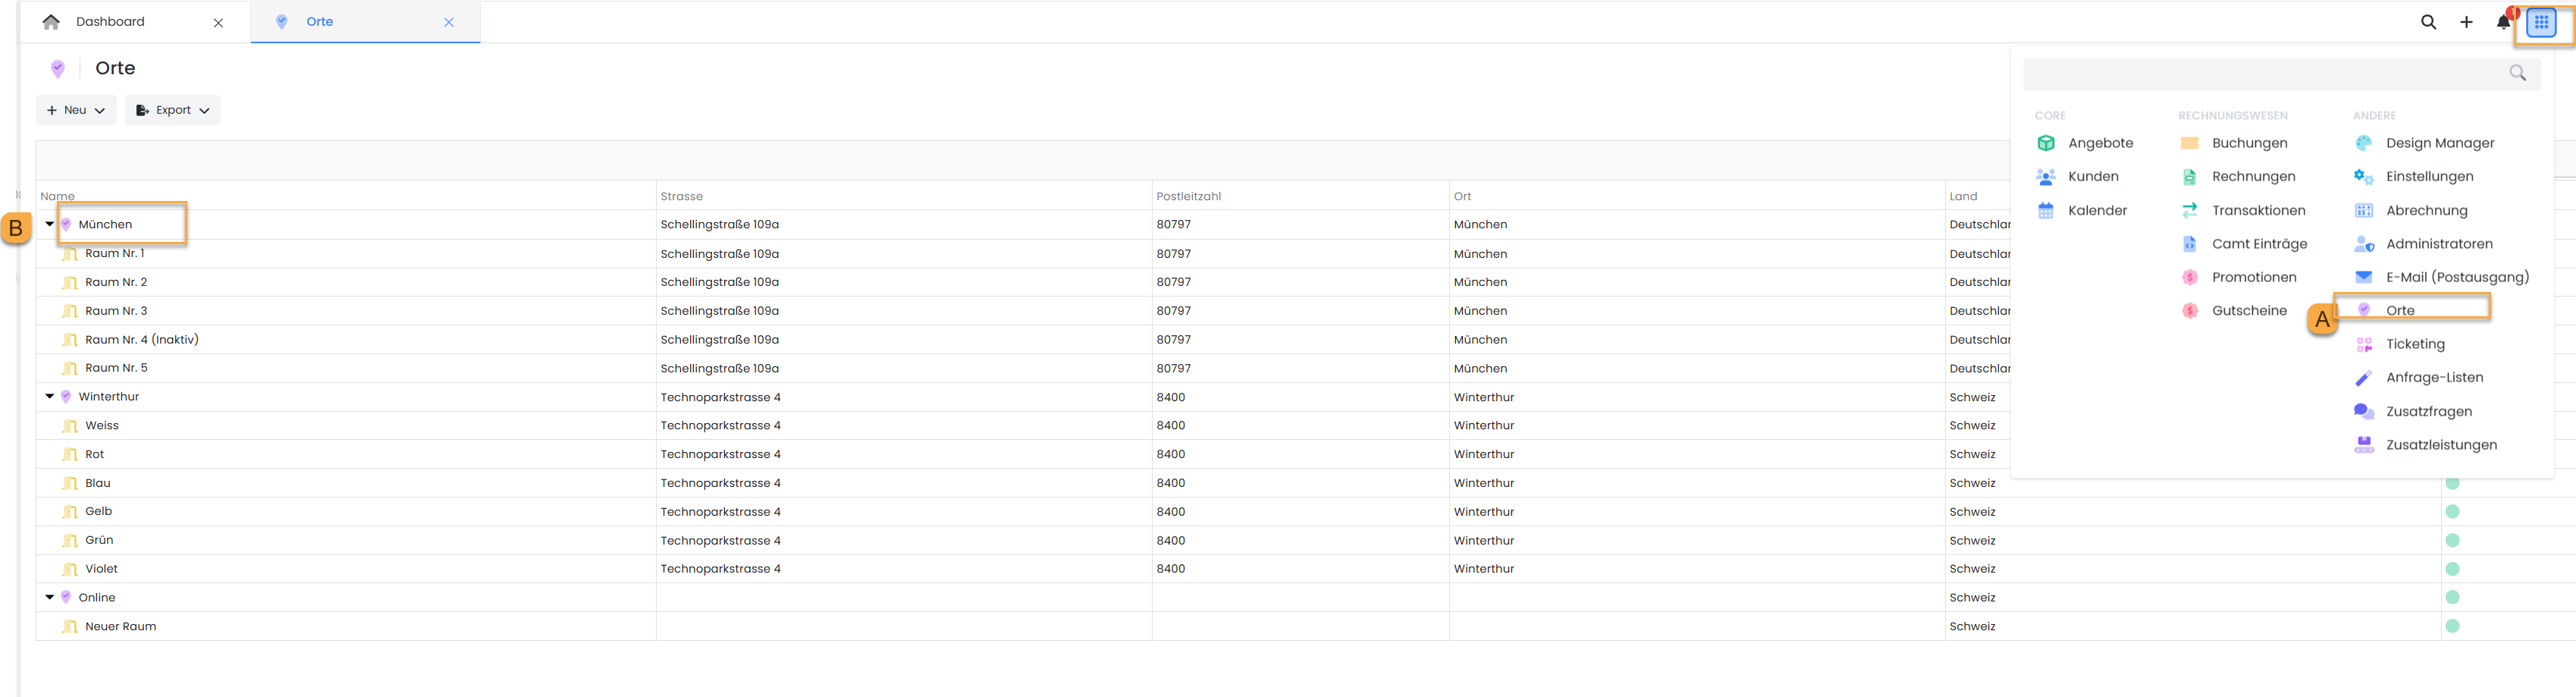
Navigate to the "Places A " section.
-
Open the desired location B.
Navigation to Location Settings -
In the opened window, up to five email tasks can be added for this location.
-
Click on "Add C ".
-
Enter the required information:
-
Subject line of email D
-
Recipient's email address E
-
Select an emailtemplate F
(You can create the desired email template in advance under “My Templates” and then select it here.) -
Define Shipping Rule G
-
The following rule types are available for automatic sending:
Send X days before the course:
The email is automatically sent a specified number of days before the respective course.
Sending on a specific day of the week:
The email is automatically sent every week on a specified day of the week and at a specific time, displaying all classes for the next 7 days.
This is useful, for example, for sending an overview of all classes for the following week every Friday.
-
After configuring all settings, click Save .
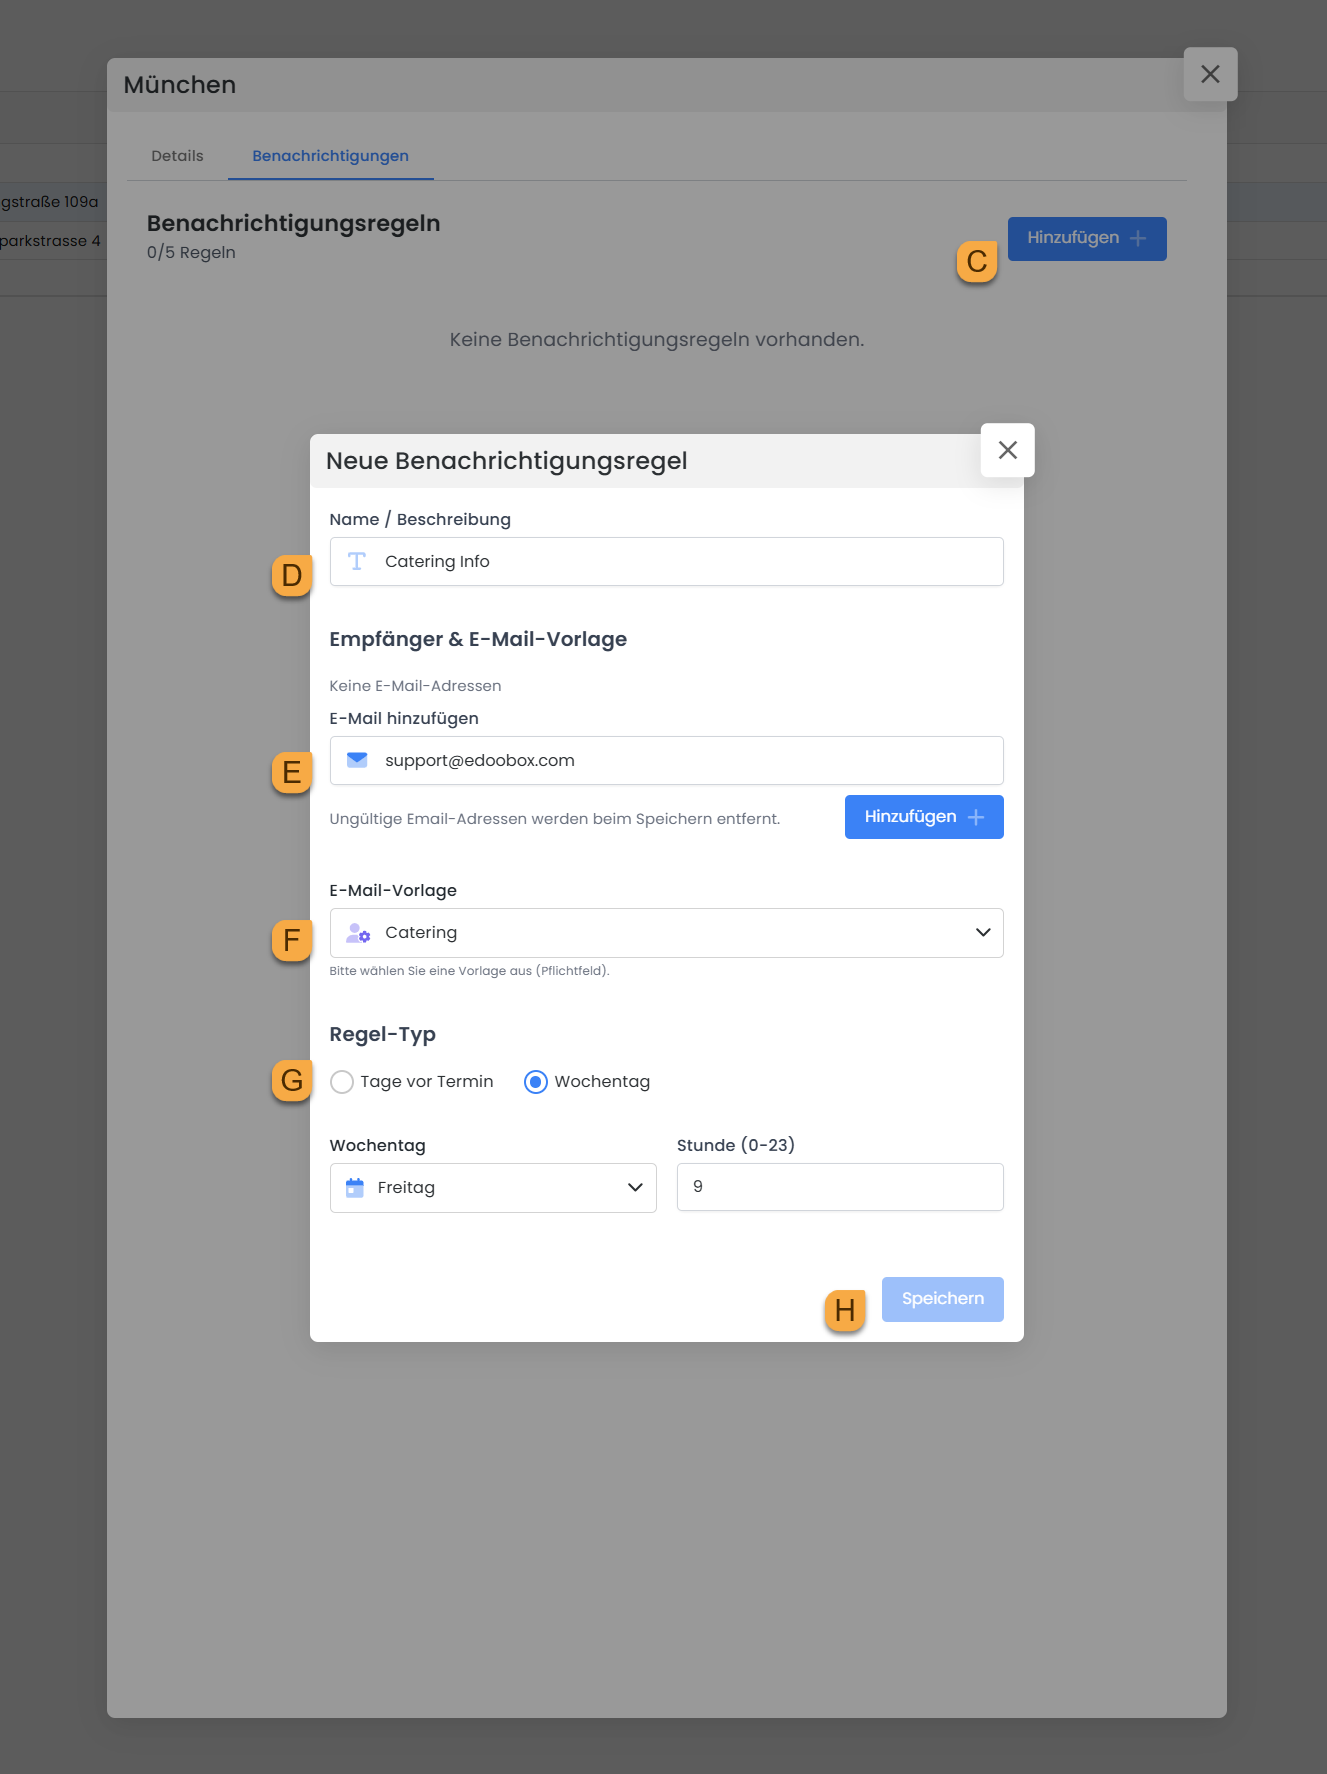
Creating a New Notification Rule: Recipient, Email Template, Sending Rule
Overview of Email Tasks
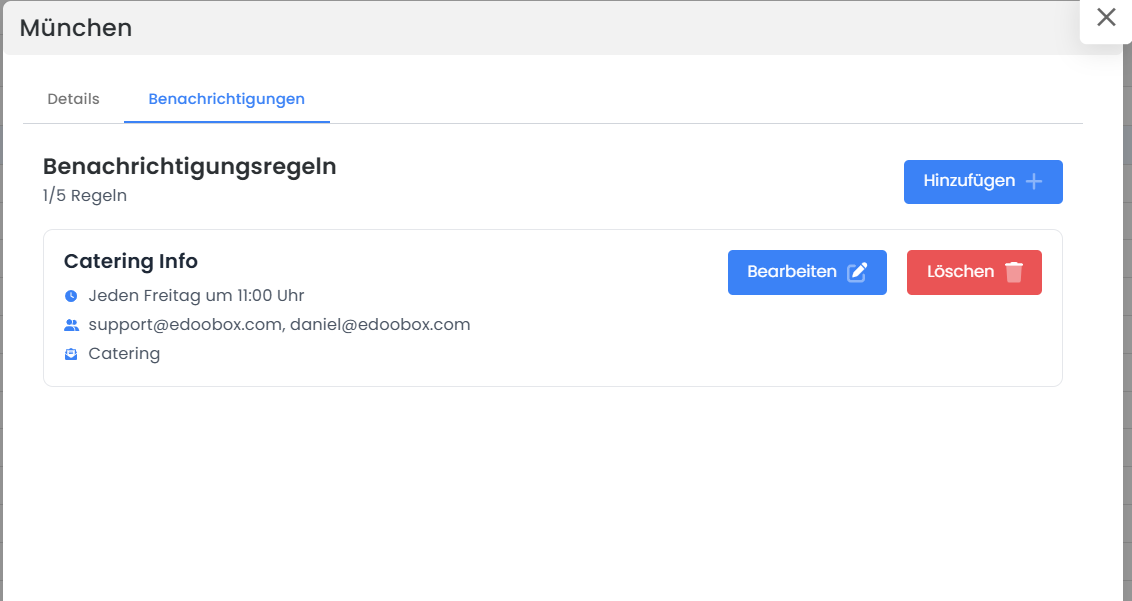
After saving, the active email tasks will be displayed in the overview for the respective location. There, you can always see which automatic notifications have been set up for this location and adjust or deactivate them as needed.
Example Templates for Location-Based Notifications
Here you will find the source code for an example template that you can use for location-based email notifications.
To do this, create a new email template and insert the code below into the source code editor.
<h2>##PlaceName##</h2>
<div>{EACH?Dates}
<table style="width: 100%; background-color: #f4f4f4; padding: 20px 0; font-family: Arial, sans-serif;" border="0" width="100%" cellspacing="0" cellpadding="0">
<tbody>
<tr>
<td style="padding: 0 10px;" align="center">
<table style="width: 600px; max-width: 100%; background-color: #ffffff; border-radius: 8px; border: 1px solid rgb(224, 224, 224); overflow: hidden; height: 611.198px;" border="0" cellspacing="0" cellpadding="0"><!-- Kopfbereich -->
<tbody>
<tr style="height: 55.8646px;">
<td style="padding: 18px 20px 12px 20px; background-color: #0b6aa9; color: #ffffff; font-size: 18px; font-weight: bold;">##OfferName##</td>
</tr>
<!-- Beschreibung -->
<tr style="height: 93.3333px;">
<td style="padding: 16px 20px 8px 20px; font-size: 14px; color: #333333; line-height: 1.5; border-bottom: 1px solid #f0f0f0;">
<div style="font-weight: bold; margin-bottom: 4px; color: #555555;">Beschreibung</div>
<div>##Description##</div>
</td>
</tr>
<!-- Terminblock -->
<tr style="height: 124.667px;">
<td style="padding: 12px 20px 8px 20px; font-size: 14px; color: #333333; line-height: 1.5; border-bottom: 1px solid #f0f0f0;">
<div style="font-weight: bold; margin-bottom: 4px; color: #555555;">Termin</div>
<div style="margin-bottom: 3px;"><span style="font-weight: bold;">Start:</span> ##Start_date##, ##Start_time##</div>
<div><span style="font-weight: bold;">Ende:</span> ##End_date##, ##End_time##</div>
</td>
</tr>
<!-- Ort / Raum -->
<tr style="height: 124.667px;">
<td style="padding: 12px 20px 8px 20px; font-size: 14px; color: #333333; line-height: 1.5; border-bottom: 1px solid #f0f0f0;">
<div style="font-weight: bold; margin-bottom: 4px; color: #555555;">Ort</div>
<div style="margin-bottom: 3px;">##Place##</div>
<div style="color: #666666;"><span style="font-weight: bold;">Raum:</span> ##Room##</div>
</td>
</tr>
<!-- Teilnehmer -->
<tr style="height: 105.333px;">
<td style="padding: 12px 20px 12px 20px; font-size: 14px; color: #333333; line-height: 1.5; border-bottom: 1px solid #f0f0f0;">
<div style="font-weight: bold; margin-bottom: 4px; color: #555555;">Teilnehmende</div>
<div><span style="font-size: 22px; font-weight: bold; color: #0b6aa9;">##ParticipantCount##</span> <span style="color: #666666; font-size: 13px; margin-left: 4px;">angemeldet</span></div>
</td>
</tr>
<!-- Fragen und Antworten -->
<tr style="height: 107.333px;">
<td style="padding: 16px 20px 18px 20px; font-size: 14px; color: #333333; line-height: 1.5;">
<div style="font-weight: bold; margin-bottom: 8px; color: #555555;">Fragen und Antworten</div>
<!-- Hier kommt das bereits vorbereitete HTML-Table aus ##QuestionAnswer## rein -->
<div>##QuestionAnswer##</div>
</td>
</tr>
</tbody>
</table>
</td>
</tr>
</tbody>
</table>
{ENDEACH}</div>
Related Guides
Keywords for this guide
Notifications¦ Email Task ¦ Location-Based Notification ¦ Create Task