A tag is a keyword or label that can be added to data to facilitate categorization or retrieval. In edoobox, tags provide a valuable tool for efficiently organizing your offers and creating a hierarchical filtering system. Tags are stored within individual offers, enabling you to classify offers into suitable sections across various categories. This allows for a targeted and user-friendly organization on your website, where your customers can quickly find the desired offer.
Create a New Tag
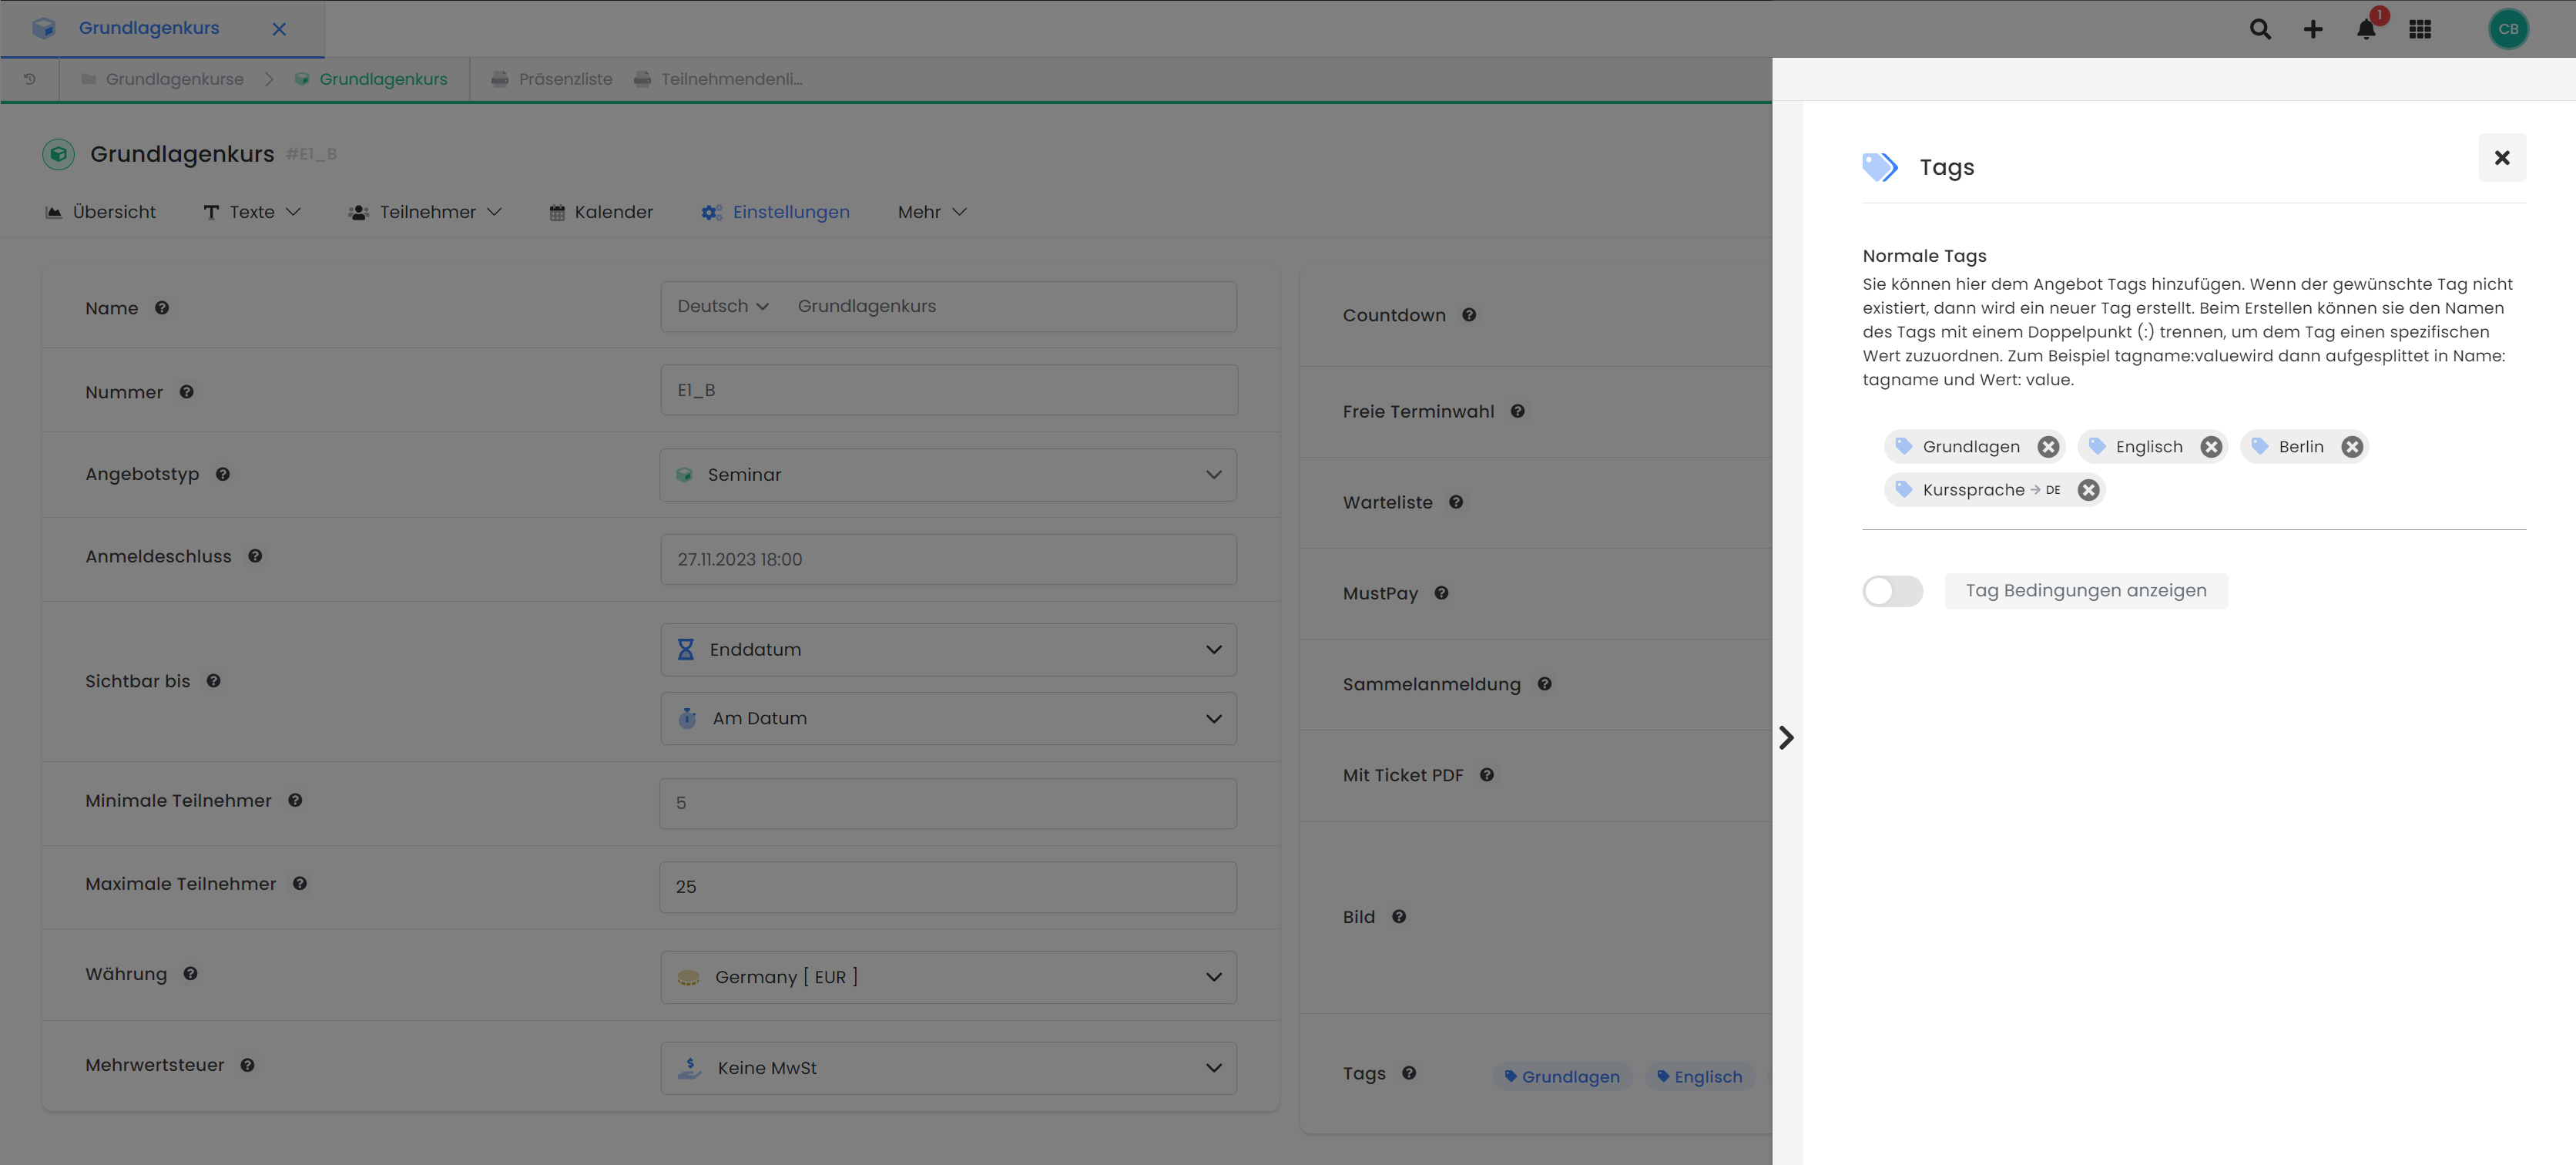
To add a tag to a listing, go to the listing and click " Edit Tags " under "Tags " in the listing settings .
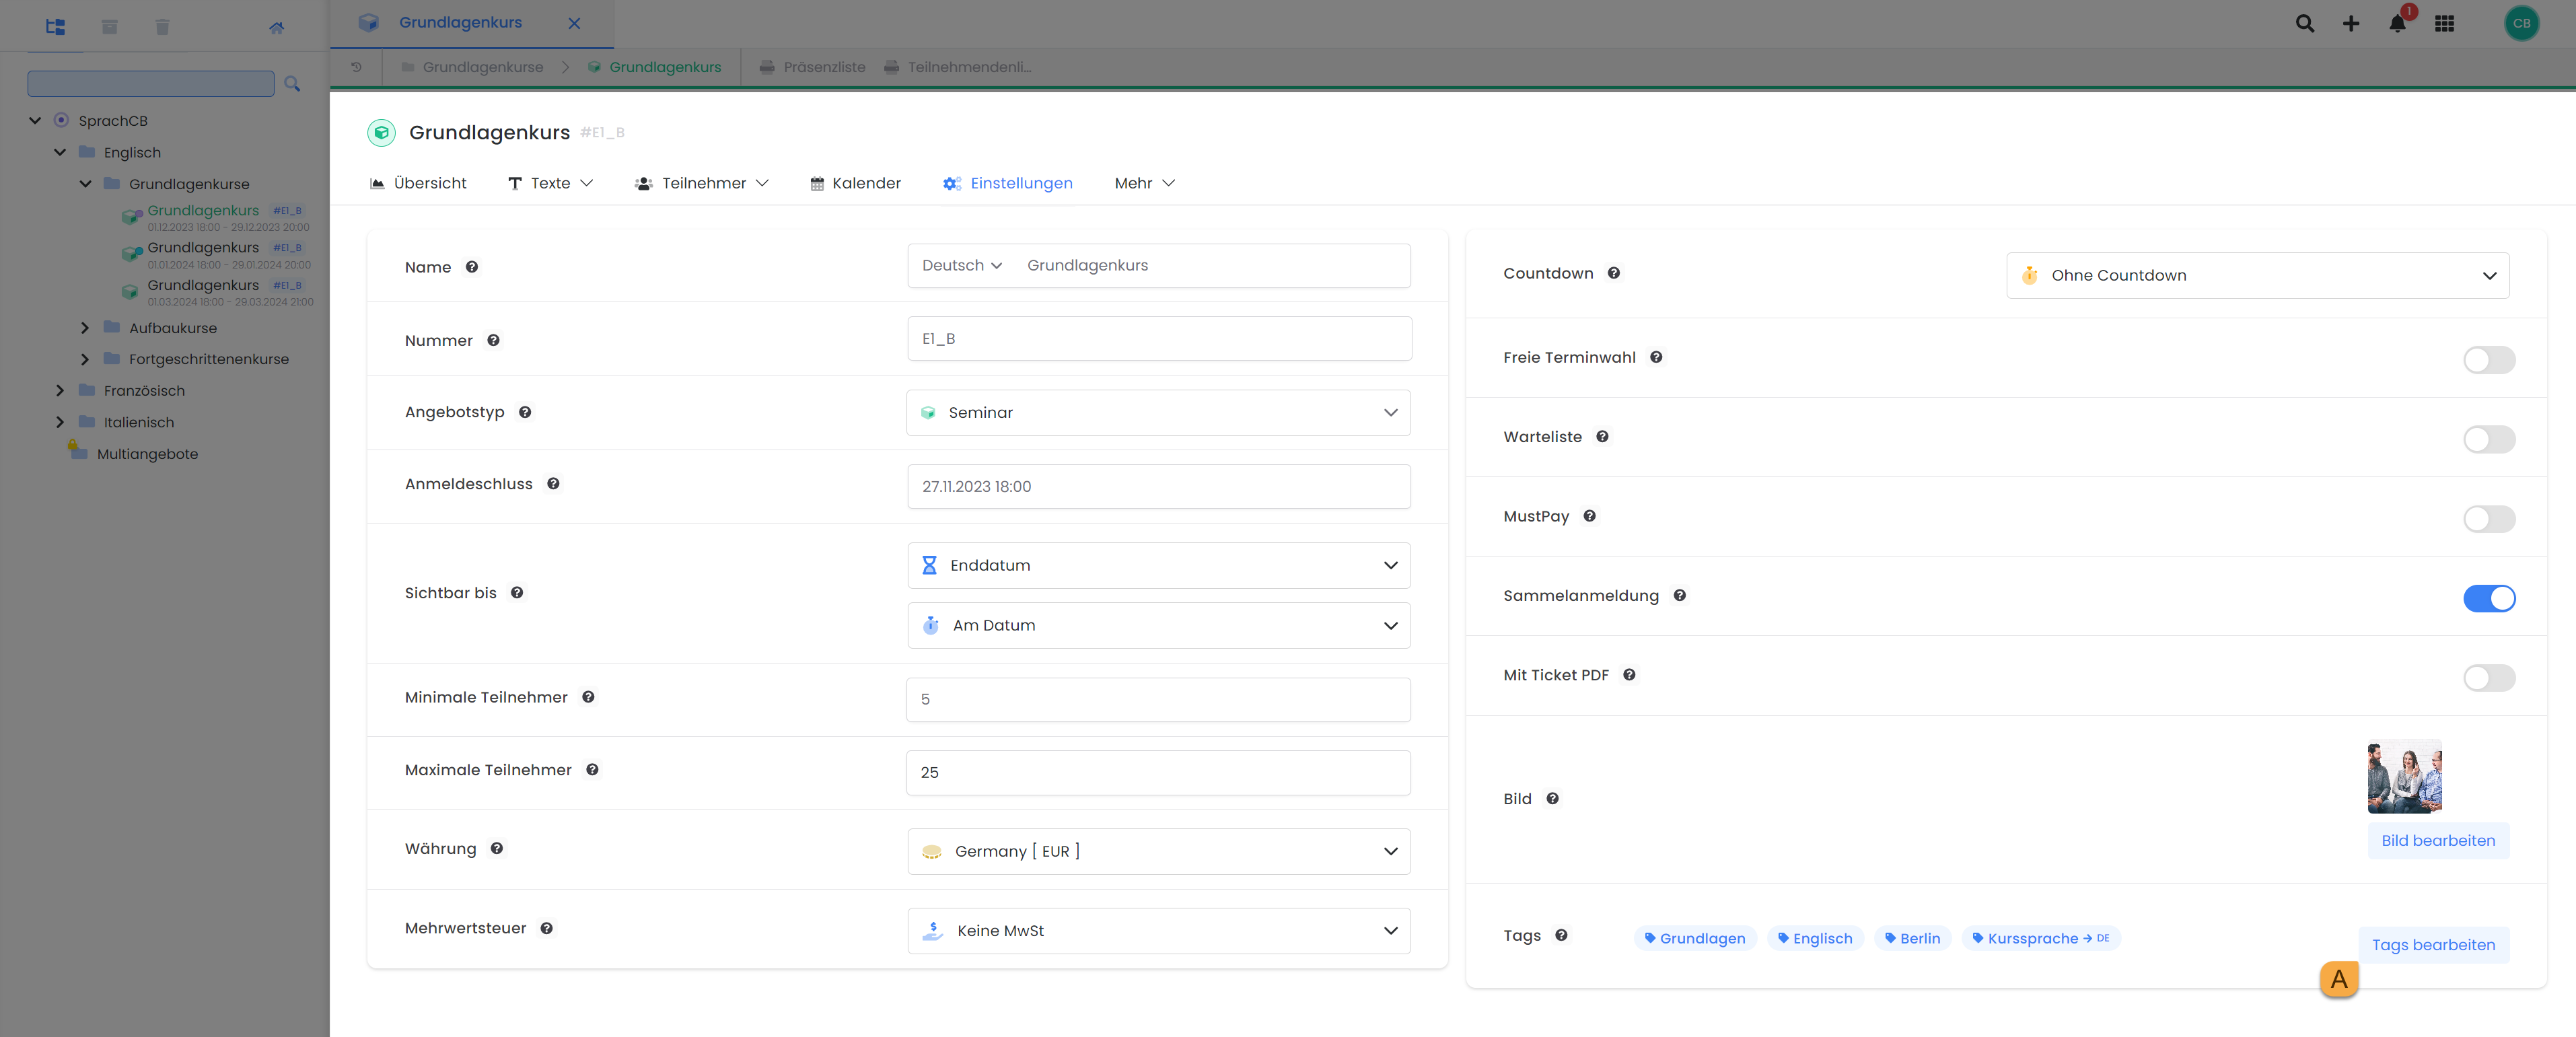
Clicking 'Edit Tags' opens the sidebar where you can add the desired tags. There is no limit to the number of tags per offer, and you can freely choose the tag name, provided it adheres to the maximum character limit of 20. We recommend ensuring that your tags do not contain umlauts, spaces, or special characters.
In addition to standard tags, there is also the option to use advanced tag types, such as tags with assigned values or tags as conditions. Comprehensive information and instructions for these advanced tag types can be found in the corresponding documentation. Tags are generally not visible on your website unless they are used for integration or actively displayed.
Note: URL Decoding of Tags
If you use umlauts, spaces, or special characters in tags, special attention is required when accessing them via URL, as the tag must be URL-decoded. Once you use umlauts, spaces, or special characters, you cannot enter them directly into the URL, as these characters are represented differently in URL decoding (e.g., 'ä' = %C3%A4).
To avoid errors, we advise against manually inserting tags into the URL. Instead, use the preview share function, as described under 'Display in Embedding Code'. This automatically inserts the tags into the URL with the correct encoding. You can then simply copy and use the generated URL.
Edit an Existing Tag
Clicking 'Edit Tags' opens the sidebar where you can add the desired tags. There is no limit to the number of tags per offer, and you can freely choose the tag name, provided it adheres to the maximum character limit of 20. We recommend ensuring that your tags do not contain umlauts, spaces, or special characters.
Tags on Your Website
If you aim for a targeted and user-friendly presentation of your offers on your website beyond the categorization in the offer tree, tags serve as a valuable tool. You can use tags to classify your offers into specific sections and subsequently integrate these sections into your website. There are two possible options, which can be used individually or in combination:
Option 1: Display via Filter Widgets in the Booking Process
Filter widgets are an option to optimize your website with edoobox and quickly and intuitively guide your customers to the desired offer. Filter widgets are managed via the Design Manager, and created widgets are displayed in the offer overview during the booking process. This option allows your customers to navigate from a general overview of offers to predefined sections or filtered views.
Procedure
In each of your designs, you can decide whether to integrate one or more filter widgets. Two types of widgets are available: the Tag Filter Widget and the Offers Filter Widget. The detailed use of these filter widgets is explained in this documentation.
Essentially, both widgets allow you to define specific categories (tag filters) that will be displayed in the booking process. You then assign specific tags to each category. Consequently, when a visitor selects a category during the booking process, all offers containing one of the associated tags are automatically displayed.
With this option, customers must click on the desired category to view a filtered offer overview. Ultimately, the filter widgets enable a targeted presentation of your offers, which can be precisely tailored to the needs and interests of your clientele.

Example: Using the Tag Filter Widget
You have created various categories in the offer tree and assigned your offers to them: English courses, German courses, and French courses.
Within all these categories, there are beginner, intermediate, and advanced courses. If you assign the tag 'Beginner Course' to all beginner courses, you have the option to display all beginner courses from the different categories within a single section in the Tag Filter Widget. In this design example, the section was named 'Basic Courses'.
Option 2: Display via Embedding Code
Alternatively or in addition to filter widgets, you can generate embedding codes that exclusively display specific tags (and their associated offers). This ensures that when customers visit the website, they immediately see the filtered view and do not need to actively click on a tag filter to display the relevant offers.
Tip: Select the Appropriate Level in the Offer Tree
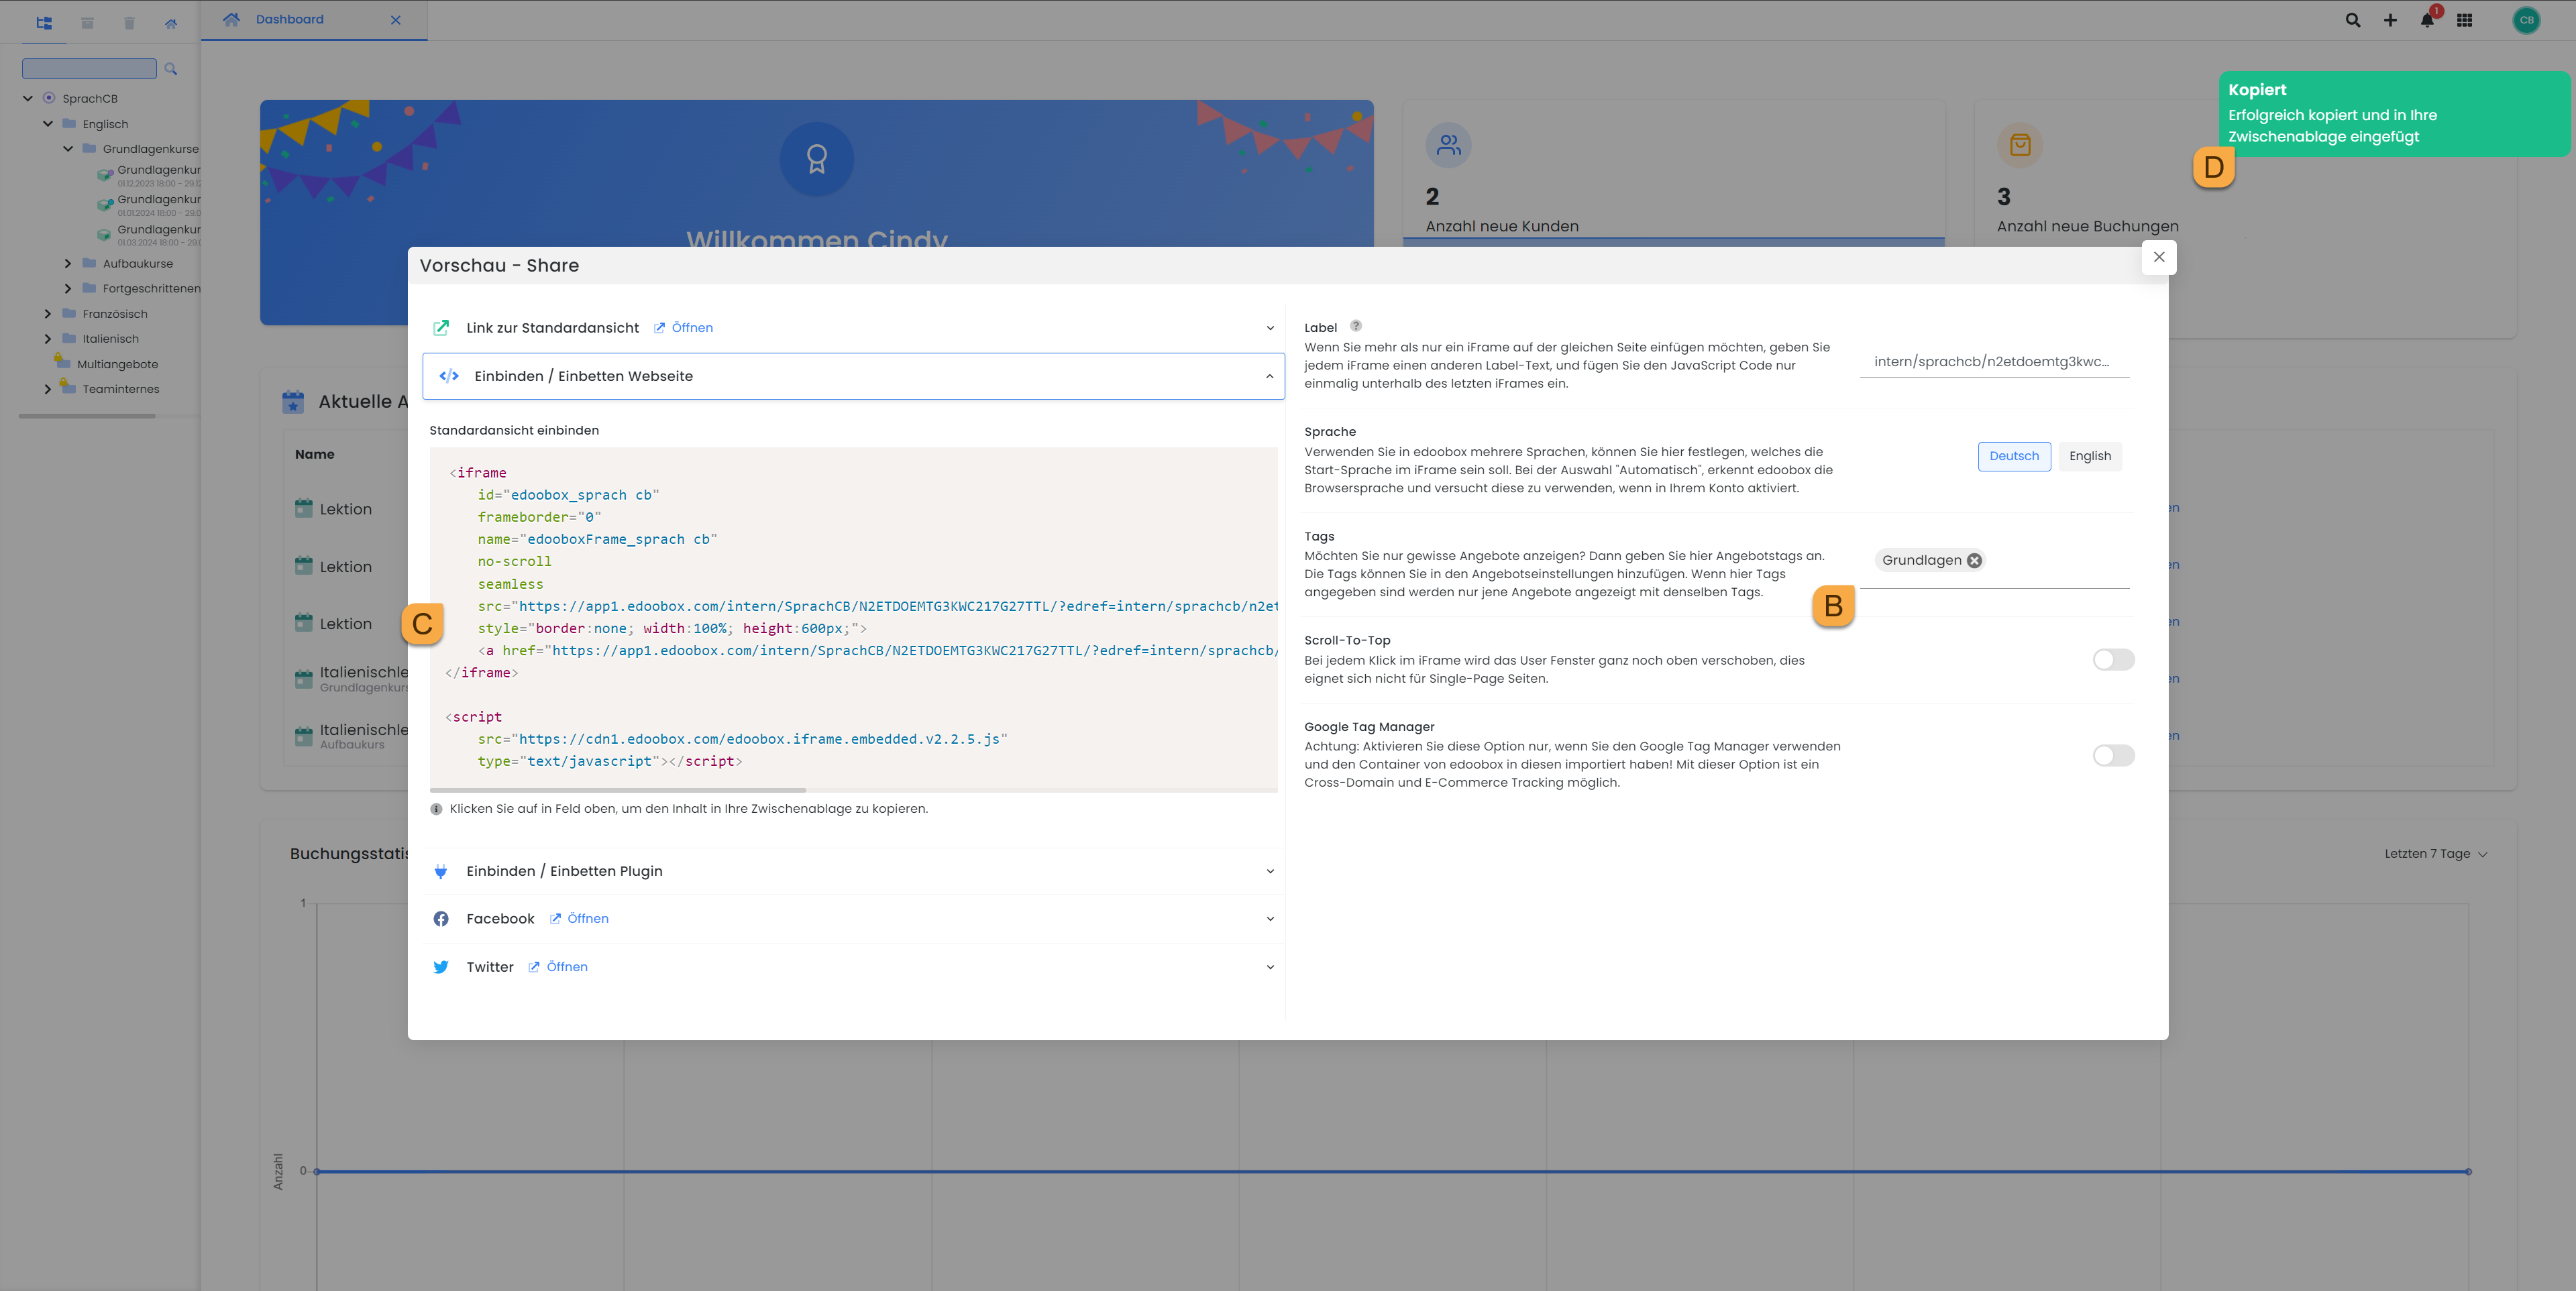
To display all offers with one (or more) tags in the booking window, open the Preview Share function on your account shortcut and generate the embedding code there.
If, however, you only want to display offers with one (or more) tags from a specific category, open the Preview Share function on the corresponding category.
This option is particularly useful if you want to embed multiple iFrames on different pages and achieve targeted views of your offers on those respective pages. Each embed can be configured to display precisely the offers relevant to its specific page. Furthermore, the combination of multiple iFrames and appropriate headings positively contributes to your website's search engine optimization (SEO).
With this option, the tags used are visible in the URL via the embedding code and are not displayed directly on the website.
Procedure
To generate embed codes ( e.g., iFrame or shortcode) for the offers with the desired tags, right-click at the desired level in the offer tree and select “Preview & Share.” There, you can customize the embed code settings by adding the desired tags .
Once you have added all the tags, click on the corresponding code to generate the embed code C. Clicking on the code automatically copies it from the document to the clipboard C. The code is now ready to be pasted onto your website.
Example: Tags via the Embedding Code on Your Website
You have created various categories in the offer tree and assigned your offers to them: Sport Climbing, Bouldering, Skiing, and Swimming.
Within all these categories, there are beginner courses, advanced courses, and workshops. If you assign the tag 'Beginner Course' to all beginner courses, you have the option to display all beginner courses from the different categories within a single iFrame.
You can also assign the tag Outdoor or Indoor to the offers. This allows you to group all outdoor or indoor offers within a single iFrame.
Info: Display of Tags in the iFrame
Single Tag
If only a single tag is added to the iFrame code, the iFrame code is extended as follows:
?edtag=TAG_NAME
Example: https://www.edoobox.com/iframe/YOUR-SHORTCODE/?edtag=Fundamentals
Multiple Tags
If multiple tags are added to the iFrame code, the iFrame code is extended as follows:
?edtag=Fundamentals..English
Example: https://www.edoobox.com/iframe/YOUR-SHORTCODE/?edtag=Fundamentals..English
Separate the tag names with two periods (..) each.
Delete a Created Tag
You can edit or delete tags at any time. To do so, open the app menu, go to Settings, and select the Tags section. For the tag you want to edit, you can adjust the details A and save your changes B, or delete the tag by tapping the trash can icon C.
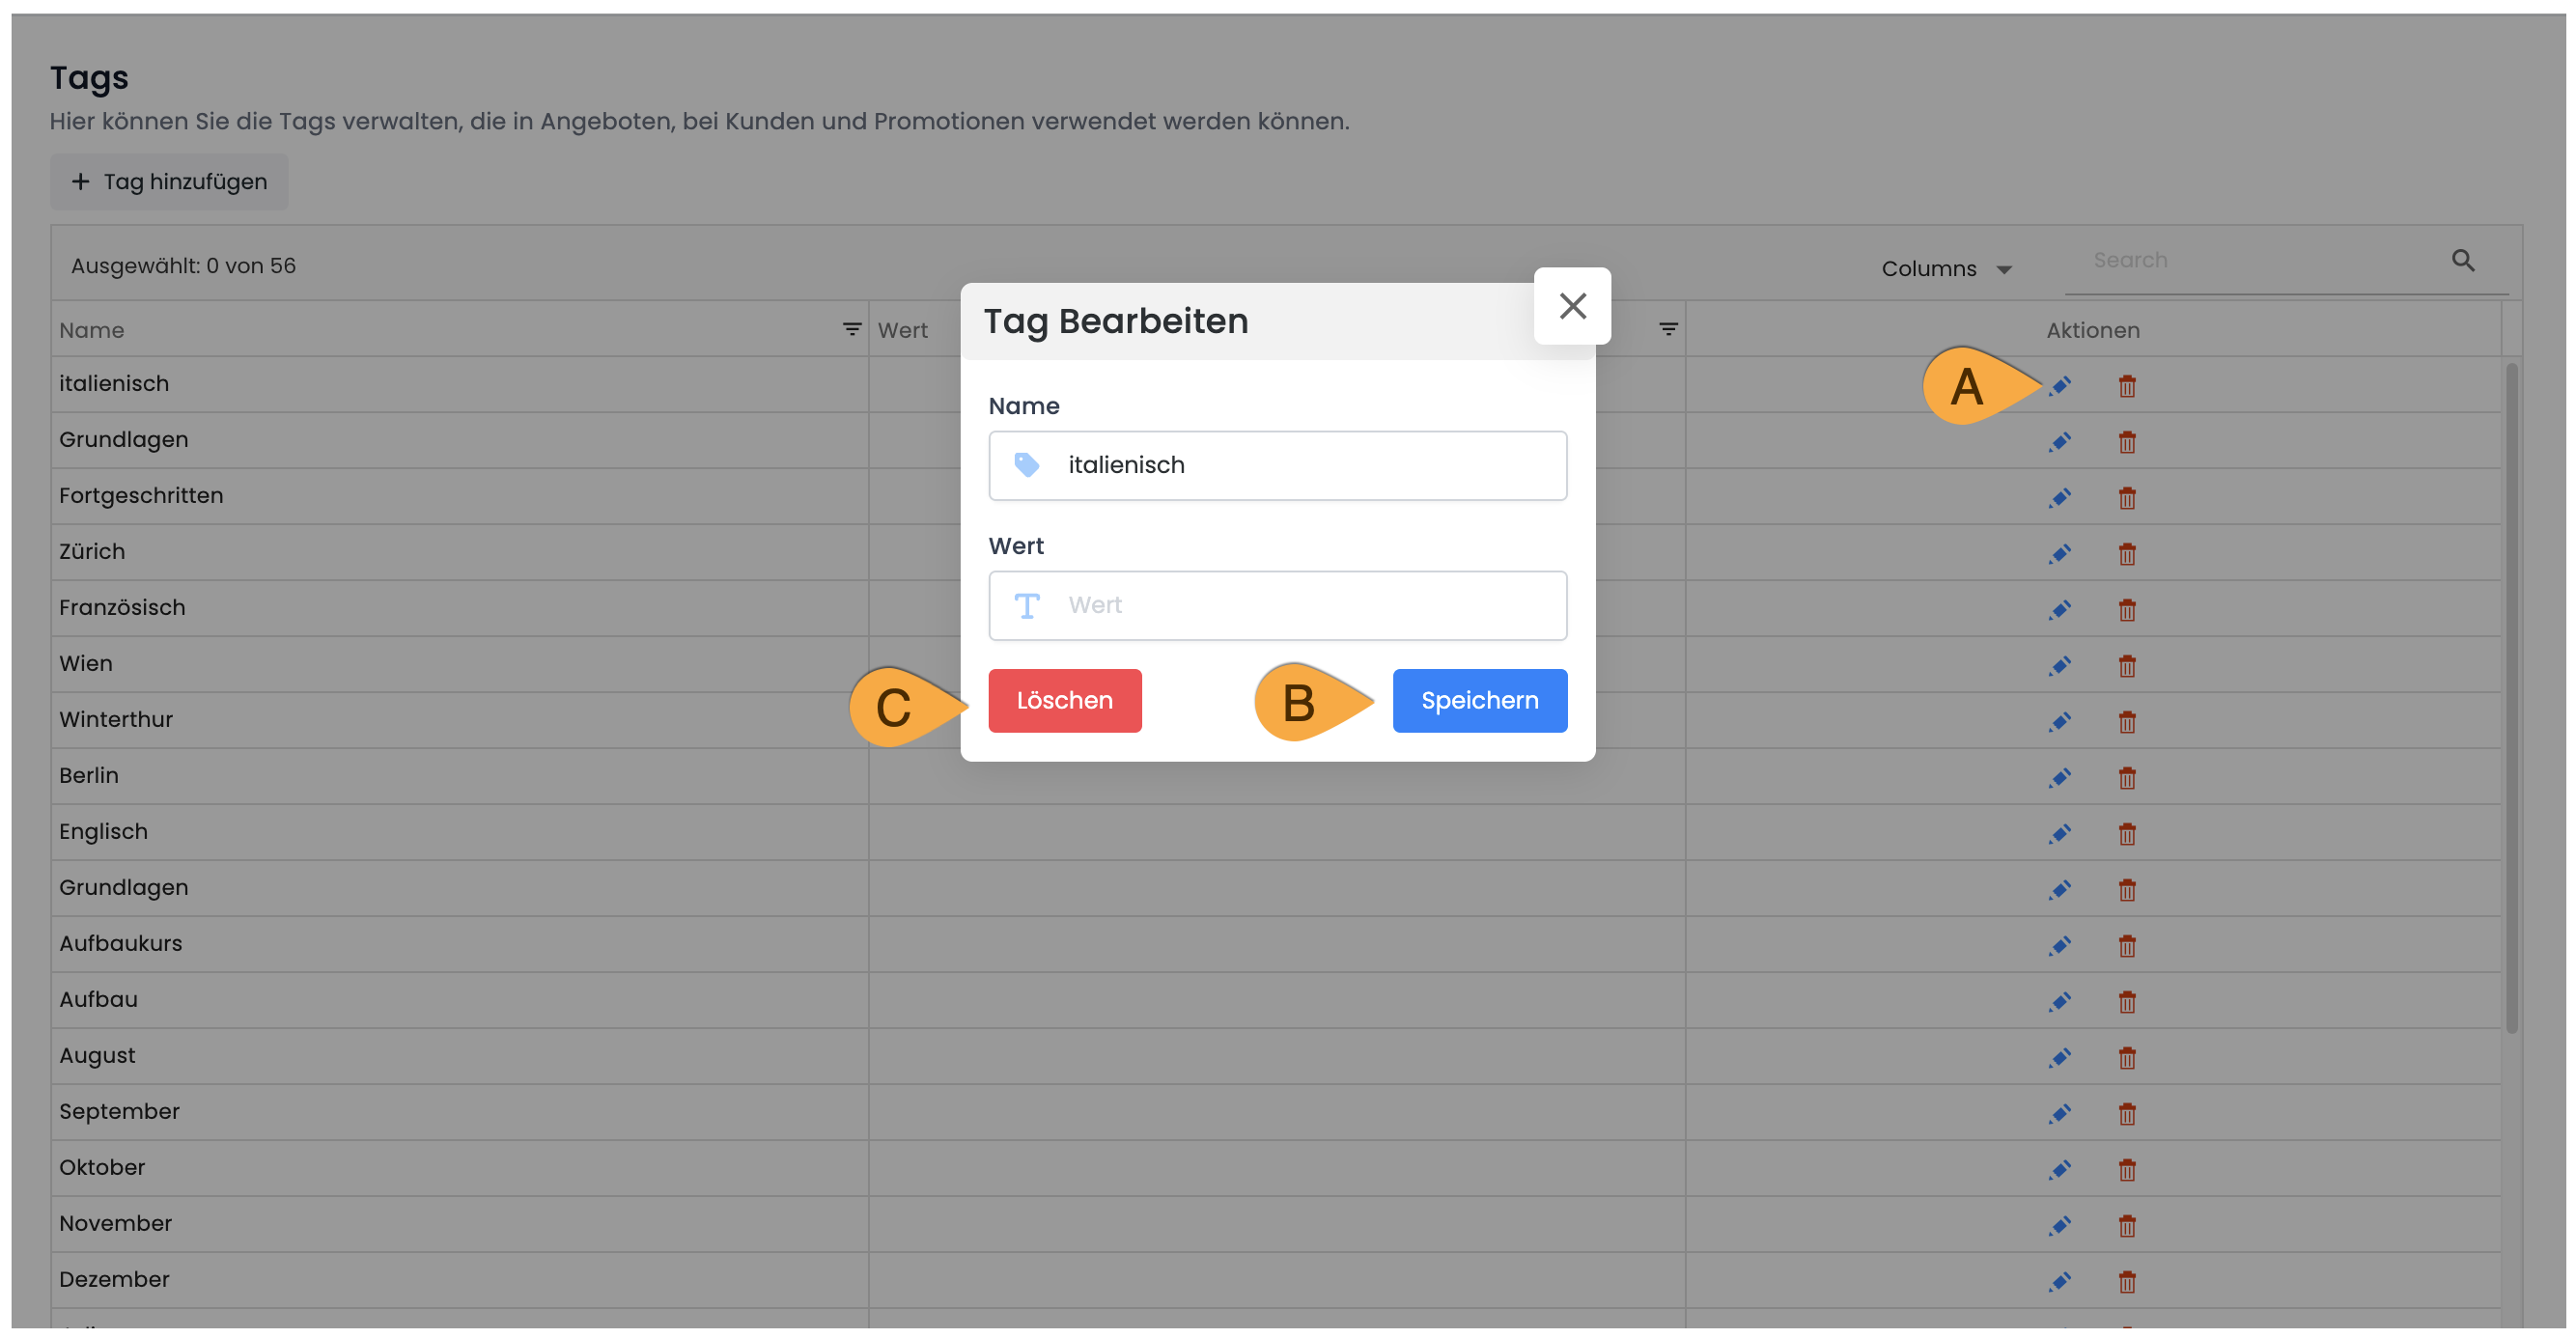
You will then be prompted to enter the tag name followed by an underscore and confirm the deletion. Once confirmed, the tag will be permanently deleted. Please note that a deleted tag is completely removed and automatically deleted from all listings in which it was previously used.
Related Guides
Keywords for this guide
Filtering ¦ Conditions ¦ Tagging ¦ Tag ¦ URL